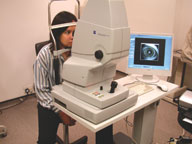
Earlier in the year, Optician (January 27) reported on the new Zeiss Visucam Pro NM which was launched onto the UK market late last year.
As we reported, the camera boasts some nice new features, so we had the systems installed at the Fight for Sight clinic, City University, and captured images from as wide a range of patients as possible. The aim was to do so without mydriasis, bearing in mind that the manufacturers state quite clearly that this non-mydriatic system allows ‘totally non-mydriatic examination of even problematic patients with exceptionally small pupils’.
 Setting Up
Register now to continue reading
Thank you for visiting Optician Online. Register now to access up to 10 news and opinion articles a month.
Register
Already have an account? Sign in here