Subjective refraction techniques, as the name suggests, rely on the patient’s response to obtain the refractive correction that gives the best visual acuity. While it is prudent to say that this technique can only be performed on patients who can communicate effectively, the development of computerised and projector test charts has enabled the practitioner to adapt subjective techniques by using alternative targets to carry out a subjective routine.
Before commencing your refraction, communication is of prime importance. Obtaining all the relevant information necessary from the patient regarding their reason for visit, visual symptoms, previous ocular history and so on is essential and allows you to adapt your examination to deal with the patient’s concerns and help you form your conclusions more easily.
[CaptionComponent="2667"]
Subjective refraction
Putting together a well thought out, structured routine to maximise patient response and comfort will allow the practitioner to work as quickly and as efficiently as possible. The subjective refraction should ideally be performed in conditions that simulate the patient’s normal viewing environment. For most, this will be in ambient lighting and binocular viewing.
Performing the test in dim illumination will cause the pupils to dilate and increase spherical aberrations, which could in turn have an impact on the refraction.
Carrying out a binocular refraction (using a fogging lens rather than an occluder) can assist to control spherical aberrations, help to relax accommodation and speed up the subjective routine as there is no need to carry out binocular balancing. Binocular refraction can also be particularly useful when examining patients with refractive conditions that can be further manifested by the use of an occluder, for example, hyperopia, pseudomyopia, latent nystagmus and rotational phorias (cyclophorias).
Patients presenting with highly dominant eyes, unequal acuities and greatly fluctuating accommodation, will find it difficult to perform a binocular refraction and they will report symptoms of diplopia.
It is not always apparent when a binocular or monocular refraction will be most appropriate for the patient. For the purposes of these next two articles a monocular refraction will be described first and a brief explanation of the binocular refraction technique will be illustrated later on.
Subjective routines can vary between practitioners and depend on the patient. Whatever order you choose to carry out the subjective routine, it should flow effortlessly and have logical progression.
Always ensure you explain the test/procedure to the patient and what they may expect. Be clear and concise, know how to explain the test you are conducting and keep it simple.
[CaptionComponent="2668"]
Overview of the subjective routine
? Measure the pupillary distance (PD)
? Fit the trial frame
? Measure vision/visual acuity at distance and near
? Determine and refine the best vision sphere (BVS)
Without retinoscopy
– Fogging technique
Following retinoscopy
– Fogging technique
– Using +/- twirls
– Duochrome
? Check duochrome/circle of least confusion (where appropriate)
? Cross cylinder/fan and block
Jackson cross cyl
– Axis
–Power
Fan and block
? Final sphere check
? +1.00 blur check
? Binocular balancing
? Binocular addition
? Binocular visual acuity
? Recording the results.
The pupillary distance (PD)
Measuring the PD enables the practitioner to set up the trial frame correctly so that the optical centres are correctly aligned for the patient to avoid induced prisms and aberrations.
Procedure for measuring the distance PD
? Sit directly in front of the patient and at the same eye level to avoid parallax
? Instruct the patient to look at your left eye, while you close your right eye. Rest the rule on the patient’s forehead and line up the outer edge of the PD ruler with the centre of the patient’s right pupil (to avoid parallax)
? If your patient has dark brown eyes this may be difficult and therefore it may be easier to line the PD rule up with the temporal limbus (the junction between the cornea and sclera)
? Keep the ruler in place, now direct the patient to look at your right eye while you close your left eye; look at the scale of the ruler directly in line with the centre of the patient’s left pupil (or nasal limbus) using your right eye (this avoids parallax). The measurement between these two points is called the distance PD.
[CaptionComponent="2669"]
The trial frame
[CaptionComponent="2670"]
The trial frame supports the trial lenses required for the patient during the subjective refraction technique. Poorly fitting trial frames will be uncomfortable for the patient, induce unwanted errors such as prismatic effects due to poor centration; pantoscopic tilts due to poor angles and increased vertex distances due to poor length fitting.
Procedure for fitting the trial frame
? Adjust the apertures of the trial frame to correspond with half the PD in each section
? Check that the sides are parallel, angled slightly downwards and are fully extended
? Place the frame on the patient’s face
? Adjust the bridge pad angle to position the bridge of the patient’s nose
? Reduce the side length to fit the patient
? Adjust the bridge height vertically to ensure the patient is looking through the centre of the lens aperture
? If the frame is not level, adjust the side angles to achieve this
? Make sure that the back vertex distance (BVD) is appropriate.
[CaptionComponent="2671"]
Vision/visual acuity and approximate refractive error
Measuring the patient’s vision/visual acuity can provide significant information about the visual function.
Vision (V) refers to the patient’s ability to read the letters on a chart without any correction. Visual acuity (VA) refers to the patient’s ability to read the letters on a chart with the aid of a refractive correction. Both the vision and visual acuity should be measured and recorded at distance and near and both monocularly and binocularly.
Where the letters on a chart cannot be randomised, it is ideal to measure the vision first, to avoid patient memorisation.
? Measuring the V/VA monocularly will indicate anisometropia or amblyopia
? Asymmetric monocular visions may indicate anisometropia or amblyopia
? Binocular unaided vision should be at least as good as its monocular equivalent, if not better
? Poor binocular visions may indicate a binocular problem
? A disproportionately improved binocular unaided vision may indicate a nystagmus.
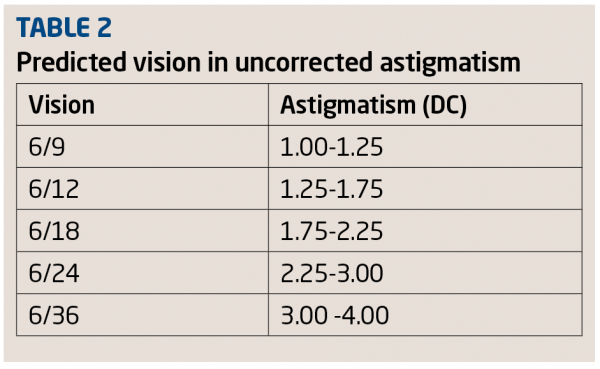
Tables 1 and 2 show how vision can be used to estimate equivalent sph/cyl.

Note: Estimates will not be accurate if the patient is hyperopic and accommodating.
Procedure for measuring the distance vision
? Ensure the patient is sitting centrally to the test chart
? The patient should not be wearing any form of correction
? Depending on your test chart, direct the patient to look at either the Snellen or LogMAR chart (Figures 5 and 6 respectively)
? Cover the patient’s left eye, ideally with an occluder, and ask them to read the ‘lowest’ or ‘clearest’ line of letters visible on the chart with their right eye. Asking the patient to read the ‘lowest’ or ‘clearest’ line, permits you to speed up the process of ascertaining the patient’s vision without having to read the entire letter chart from the top to bottom
– For patients with poor subjective response or poor vision; asking them to read the letters starting from the top of the letter chart down will simplify the test and not discourage them from the otherwise poor results that might be obtained by trying to read the smaller letters first
– Ask the patient if they can read any more of the letters on the line below the clearest/lowest read, to ensure the patient is giving the greatest value of visual function. Mistakes of four or more on a five letter chart should be disregarded.
? Recording the results:
– LogMAR notation: There are five letters on each line of the logMAR chart. Each letter is assigned a value of 0.02 (This avoids the use of pluses or minuses appended to the Snellen fraction) and a step of 0.1 between each row. The logMAR score for a patient is the sum of all the letters correctly read. For example, a patient reading the 6/6 line on a Snellen chart can be translated to 0.00 on the LogMAR chart and 6/7.5 translates to 0.1. If a patient reads all of the 6/7.5 line, and only one letter on the 6/6 line the vision will be recorded as 0.08 ie it is scored as 0.1 minus 0.02 for each additional letter read from the next line. Similarly, if a person reads logMAR line 0.2, but misses two letters, you would add 0.02 for each letter missed. Negative values apply when the patient reads letters below the 6/6 line eg a patient reading 6/6 or 0.00 plus two letters on the 6/5 line will be translated to -0.04
If the patient is unable to read even the biggest letters on the chart, it is not adequate to record the vision as <1.00, the patient should be walked to a distance of 3m from the chart or 1m. If no letters can be resolved at 3m, their visual acuity is re-measured and either add 0.3 to the score (when measured at 3m) or 0.8 (when measured at 1m)
– Snellen notation: The Snellen score denotes the lowest line of letters a patient can read correctly, noting additionally any further letters that can be seen or not seen. For example, if the patient reads the Snellen line 6/6 but misses one of the letters, you would record the result as 6/6-1. If the patient reads the 6/6 line and two letters on the next line down, it is recorded as 6/6+2.
If the patient is unable to read the largest letter on the chart at 6m, walk the patient to a distance of 3m and re-evaluate the vision at this distance. If the patient sees only the largest letter = 60, the Snellen acuity will now be recorded as 3/60. Reduce the working distance to 1m if no letters can be read at 3m
? If the patient is unable to resolve the chart at 1m, return them to the chair, and while one eye is occluded ask them if they can tell how many fingers you are holding up at approximately 20cm, if they can do this record vision as CF (counts fingers), if they are still unable to see this, wave your hand at about 20cm in front of them and ask them if they can see this, if so record this as HM (hand movements). Failing this, direct a beam of light into their eye and ask them to locate it, if they are able to do this record their vision as LP (light perception) and, if not, NPL (no perception light)
? Record the vision for the right eye, eg R V 0.00 or V 6/6
? Repeat the process with the left eye.
[CaptionComponent="2672"]
Procedure for measuring the distance visual acuity
? Ensure the patient is sitting centrally to the letter chart
? Ask the patient to put their spectacles on or proceed if they are already wearing contact lenses
? Select the appropriate viewing chart eg logMAR or Snellen
? Occlude the left eye and perform steps 4-8 as described above in measurement of distance vision.
Determining the best vision Sphere
Best vision sphere (BVS) is established in order to determine the most +ve or least –ve lens with which the patient can achieve maximum visual acuity. The technique is also performed prior to performing ‘cross-cyl’ (described in the next article) intended for checking the cylindrical component of the subjective refraction.
The BVS can be determined using either a fogging technique, the Simultan technique (using +/- twirls) or by use of the duochrome, all either with or without the retinoscopy results in place.
[CaptionComponent="2673"]
Procedure for measuring the best vision sphere
Fogging technique
This technique is useful in controlling the accommodative status of the eye and is said to be easier to perform when using a phoropter due to lens changes being made quickly and easily.
Without retinoscopy results in place:
? Occlude the left eye and measure the unaided vision. This will give you an indication of the amount of ametropia present (see Tables 1 and 2)
? Add a +1.00D sphere and ask the patient if the vision is worse
? If the vision does not worsen, add more plus sphere in +0.25 steps (use a larger dioptric lens initially, when the vision is poor eg ±0.50 if vision <6/9) until the vision blurs. Once blur is appreciated, reduce the sphere by +0.25. The BVS will be the maximum plus the eye can tolerate without causing blur on a letter chart
? If the vision is worse with the presentation of a +ve sphere lens, add minus sphere lenses until the best line of acuity is obtained, taking care not to over minus the prescription (see section on BVS).
With retinoscopy results in place:
? Add a +1.00D sphere to the spherical lens determined in retinoscopy and check the VA. The VA should be reduced to approximately 6/18. If the VA does not worsen, add additional positive power until the eye is ‘fogged’/blurred, again to approximately 6/18.
? Reduce the plus sphere by +0.25 to gradually improve the visual acuity. Stop when no further improvement in the visual acuity is seen.
Simultan technique using +/- twirls
This technique is said to be easier when using a trial frame as fewer lens changes need to be made. However, it may be more difficult to control accommodation in young patients. This technique may also be employed without retinoscopy results but using larger bracketing lenses, for example. +/-0.75 as dictated by the patient’s vision.
With retinoscopy results in place:
? Direct the patient to view the best line of acuity. Add +0.25DS and ask if the letters are clearer, more blurred or the same
? If the patient reports that the letters are better or the same add +0.25DS. Continue to offer and add +0.25DS until the patient sees no improvement in the acuity or letters begin to blur
? If the visual acuity blurs with the presentation of +0.25DS in the first instance, offer -0.25DS. Only give the negative lens if an improvement in the line of acuity is seen and the patient reads more letters than previously recorded (see section on BVS).
Duochrome technique
[CaptionComponent="2674"]
This technique is quick and easy. However, it can give poor results in patients with poor subjective reliability, patients with small pupils, lenticular changes, or vision 6/9 or worse. It can be carried out in conjunction with the Simultan technique to refine the BVS.
With retinoscopy results in place:
? Direct the patient to look at the black circle(s)/dots/letters on the red and green background (Figure 7)
? Ask the patient if the circles appear clearer and blacker on the red or green background, or if they appear the same
? If the circles on the green background appear clearer, add +0.25DS to the sphere lens. Continue to offer and add +0.25DS until the circles on both backgrounds appear equally clear
? If the circles on the red background appear clearer, add -0.25DS to the sphere lens. Continue to offer and add -0.25DS until the circles on both backgrounds appear equally clear
? If adding +/-0.25DS changes the clarity of the circles from one background to the other, leave the patient on the ‘green’ as they will be able to accommodate to bring the circle of least confusion on to the retina.
Following the Simultan technique:
? Follow the Simultan technique as specified above
? Direct the patient to look at the black circles/target on the red and green background
? Follow steps 2-5 as listed above.
– If the Simultan technique has been correctly performed, the patient should not need to accept any more than +/-0.25DS to change the clarity of the circles from one background to the other.
Duochrome/circle of least confusion (CLC)
As mentioned previously, the duochrome is a quick and easy test that can be conducted on most patients to determine if extra plus or minus is needed on the best vision sphere and to ensure the circle of least confusion is in the correct position before commencing cross-cylinder.
A lens with cylinder power produces an astigmatic focus. This astigmatic focus contains a vertical focal line, corresponding to the focus of the horizontal principal meridian, and a horizontal focal line, corresponding to the focus of the vertical principal meridian. The region between these two lines is known as the conoid of Sturm or Sturm’s interval. At the dioptric mid-point between these two focal lines, the astigmatic focus forms a circular patch known as the circle of least confusion.
Before commencing the cross-cylinder technique to check the cylindrical axis and power, to ensure the circle of least confusion is placed on the retina, the patient should be allowed to do so by accommodating minimally. In patients without accommodation it is not necessary to carry out this procedure.
For patients with low astigmatism (<1.00D), the CLC is placed on the retina by adding -0.25DS to BVS or by balancing the duochrome on the green. For patients with medium-high astigmatism, no modification is required and the duochrome should be left balanced, as adding an additional -0.25DS in moderate-high astigmatic eyes may result in the CLC being placed in front of the retina and a larger cylinder being found.
In the next article we will look in detail at the assessment of cylinder, final blur checks and binocular methods.
? Tina Patel is an optometrist working in hospital and private clinics and is an examiner and assessor for the College of Optometrists