The previous article in the series discussed the role of scleral contact lenses in modern contact lens practice including their unique benefits, limitations and expanding usefulness. In this article we will address the principles of fitting and provide guidance on how to arrive at a successful fit.
The ideal scleral lens fit
The ideal scleral lens fit will provide minimal corneal clearance to avoid corneal touch after many hours of wear during which time the lens will settle back. All scleral lenses settle back with time as the scleral landing zone beds into the spongy conjunctiva. This is most significant when fitting smaller scleral contact lenses that, as a result, have a smaller baring surface and so greater ‘weight’ per unit area. In practice it is advisable to expect the tear reservoir to thin by up to 150microns during wear as the lens settles back (figure 1). The majority of this will occur during the first few hours but further settling back seems to occur during the first week or so of repeated wear.
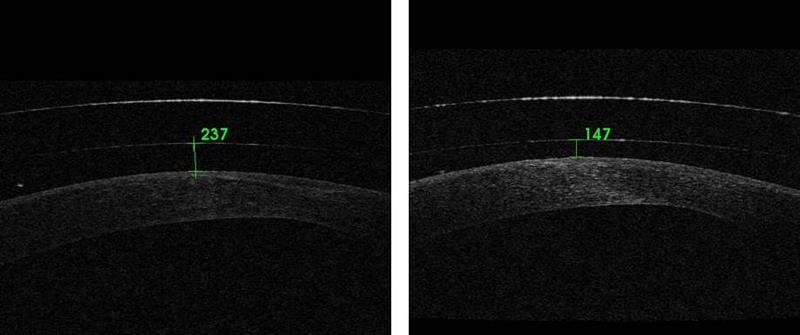
Figure 1: Settling back. OCT scans showing apical clearance of 17.00 scleral lens on insertion, left, and after three hours wear, right, of a 17mm scleral
The tear reservoir should thin gradually over the limbus until the lens comes down to bear on the conjunctival surface. Alignment with the conjunctiva should be sufficient to provide a seal, prevent the introduction of bubbles and avoid awareness of the lens edge but should not compress the ocular surface to the extent that it causes conjunctival vessel blanching, redness beyond the lens edge, displacement/bunching of the conjunctiva and discomfort. The lens should centre well and the lens should not move significantly on blink.
Before you start
When confronted with a patient who may benefit from scleral lenses there are some key considerations to make before you place a lens on their eye. Firstly, ensure the patient is fully on-board and understands what the fitting process involves. Specifically, that the process is likely to involve multiple visits and possibly lens adjustments before arriving at a perfect fit. It is also important both patient and practitioner have realistic expectations and are both trying to solve the same problems. Informing your patients what is involved in scleral lens wear and the most common limitations of scleral lenses will help set realistic expectations and prevent disappointment if any hurdles are encountered.
Despite advances in RGP materials and lens manufacturing techniques (which have given us thinner lenses made of hyper-Dk materials) scleral lens practitioners should still be mindful of the potential of hypoxia-related corneal changes during scleral contact lens wear. Those patients with a reduced endothelial cell density (eg those with corneal grafts) may be at particular risk. While monitoring endothelial cell density in at-risk patients would be ideal, it is impossible in most settings. Instead, practitioners should look for clinical signs of endothelial disease before embarking on fitting and then closely monitor for signs of corneal hypoxia or decompensation.
It is also important to consider the eye beyond the cornea. Examine the patient for any conjunctival abnormalities or other factors that may influence the success of scleral lenses. The presence of symblephron, for example, may exclude the use of large sclerals or the presence of a trabeculectomy bleb may prevent scleral lens fitting all together. The presence of a raised pingueculum may make you favour a lens with larger bearing surface or a lens that can be ordered with microvault to prevent impingement of the pingueculum. Palpebral aperture size and lid laxity should also be considered as both may cause problems with the insertion of larger lenses. On the other hand, some patients with poor dexterity or very poor uncorrected visions may find larger scleral lenses easier to handle.
Inserting and removing scleral lenses
The technique used to insert a scleral lens will vary depending on lens total diameter and palpebral aperture size. Lenses up to around 18mm can generally be inserted by placing directly over the cornea with the lids held wide apart (figure 2) while larger scleral lenses need to be inserted by sliding the lens up under the top lid while the patient looks towards their chin.
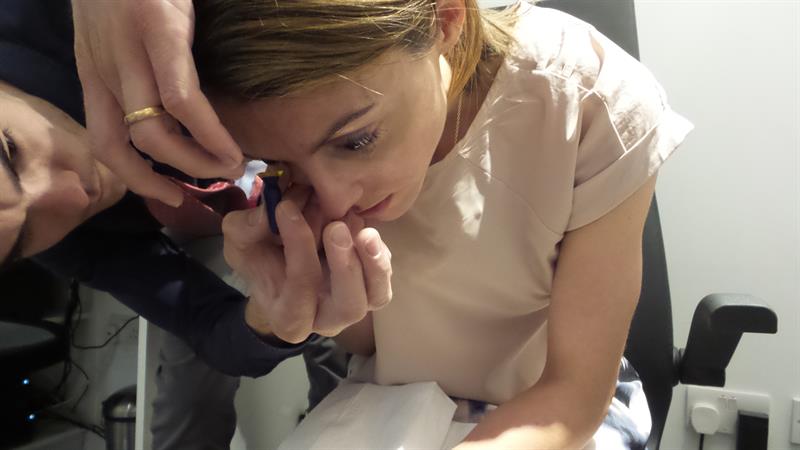
Figure 2: Insertion of a 16.5mm scleral CL directly onto the patients eye using a DMV scleral lens inserter
Regardless of the technique used it is imperative that lens is held with the anterior surface pointing down until in contact with the ocular surface. The lens must also be filled with saline prior to insertion. Failure to do so will result in insertion bubbles. The patient must be instructed to lean forward at the waist and tuck in their chin until their face is parallel to the floor.
If inserting a smaller scleral lens, the patient should be instructed to maintain fixation on the floor below and to pull down their own lower lid. The practitioner can then lift the top lid with one hand and insert the lens directly over the cornea with the other.
If inserting a scleral lens that is larger than the palpebral aperture is wide when held open, then the scleral lens should be slid up under the top lid while the patient looks toward their chin. Once the lens is under the top lid, the practitioner should slide the top lid down over the lens until the eye is almost shut. At which time the patient tends to fixate in primary position and the practitioner should quickly pull the lower lid down to ensure it is not trapped under the lens.
Removal of smaller scleral lenses is best performed using an RGP suction holder/plunger. When using a suction holder care should be taken to lift the lens from the eye using an oblique pulling force. Pulling along the line of sight is unlikely to break the seal without causing discomfort (figure 3).
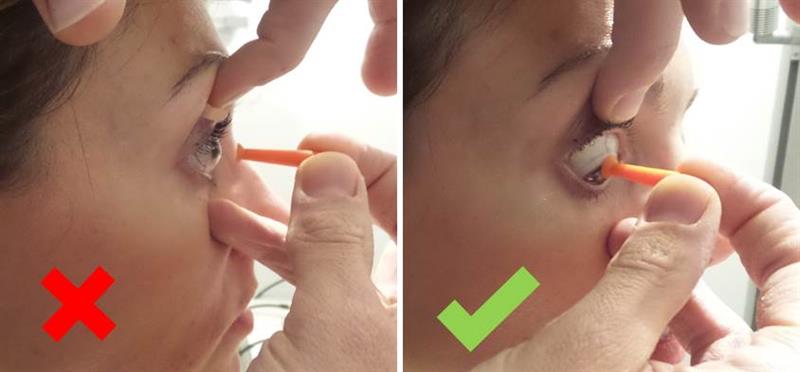
Figure 3: Correct and incorrect removal of scleral lenses using a suction holder
The removal of large diameter scleral lenses can be easily performed by manipulation of the patient’s top lid. The lid is lifted up while the patient looks down and swiped over and behind the top edge of the lens (figure 4).
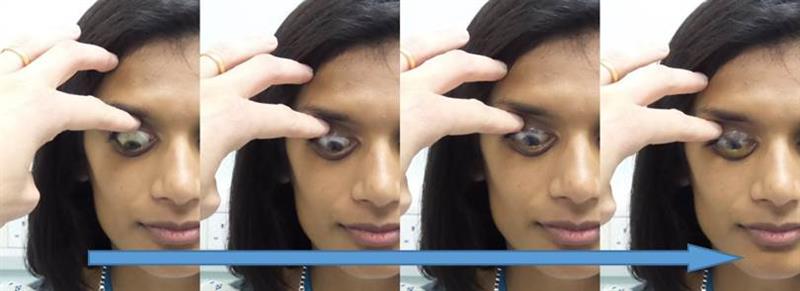
Figure 4: Technique for the removal of large diameter scleral lenses
The fitting process
Selecting a trial lens
By this stage you should have a good idea of what size scleral lens you are going to fit as first choice. From here you are faced with the task of determining the lens vault required. Central corneal topography is of little use in gauging total corneal sagittal height and therefore does not provide much guidance regarding first choice diagnosis lens. It may, however, help you decide whether to fit a prolate-shape lens (for steep corneas and more central cones) or oblate-shape (can be better for grafts, post-Lasik and peripheral steepening). Many scleral lens practitioners find it useful to view the anterior eye in profile and use this information to guide first lens choice. Do this frequently and you become familiar with the appearance of low, average, high and very high sag eyes which speeds up the fitting process. Placing fluorescein in the saline reservoir before insertion aids assessment of the lens fit.
Once the trial lens is inserted a blue pen torch allows the practitioner to quickly and easily assess for the presence of insertion bubbles or heavy corneal touch. Re-insertion is necessary if bubbles are present (figure 5) while corneal touch should prompt the immediate removal and insertion of a deeper diagnostic lens.
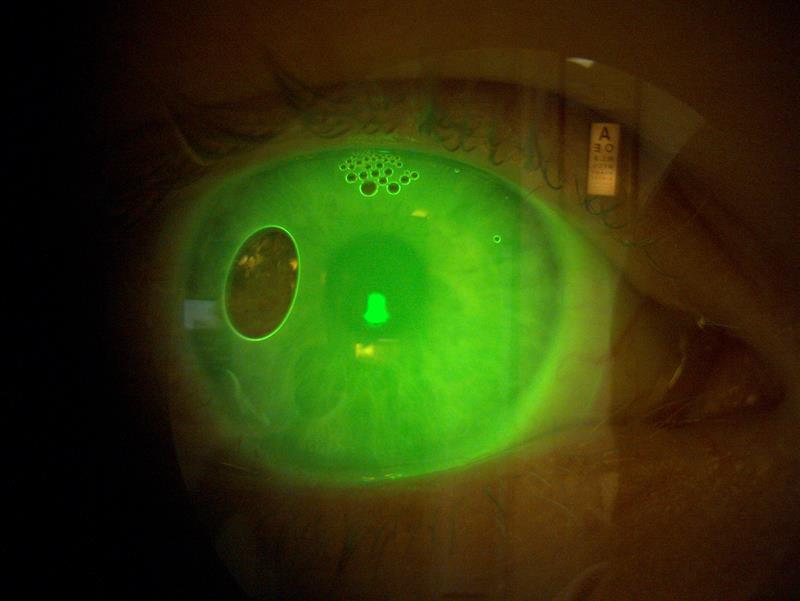
Figure 5 Insertion bubbles and the fluorescein glow
Assessing the central fit
A fluorescein glow across the entire cornea means it is time for a closer examination with the slit lamp. The degree of corneal clearance is assessed using an optic section (figure 6). If the diagnostic lens thickness is known this can act as a useful guide when assessing the thickness of the tear reservoir. Alternatively, the thickness of the cornea can provide a useful guide. The average cornea is around 650-700microns in the periphery and 550microns in the centre, however, remember the existence of inter-individual variation and the effect of any corneal disease on corneal thickness. An anterior segment OCT can be used to provide an accurate measurement of the tear reservoir thickness at any given point (figure 1).
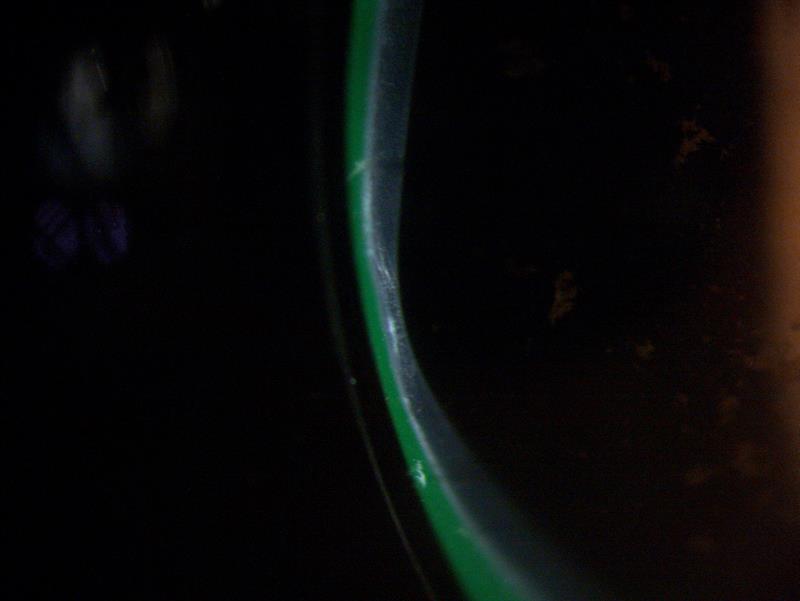
Figure 6: Slitlamp optic section used to assess the depth of the tear reservoir between scleral contact lens and cornea
Excessive clearance moves the lens’ centre of gravity forward and can result in inferior displacement of the lens. A decentred lens will not provide optimal optics and may cause conjunctival vessel blanching at the inferior lens edge. A lens that is too deep is also more difficult to insert bubble-free and theoretically reduces the oxygen permeability of the lens/tear reservoir system. Some patients accumulate tear reservoir debris during wear despite optimal fitting; an excessively deep tear reservoir in such cases would result in a greater degree of misting as the debris builds up over the pupil.
Insufficient clearance will result in lens-corneal touch during wear. This is likely to cause corneal staining, decreased comfort and lens intolerance. Through the use of diagnostic fitting sets the practitioner should identify the vault required to give 250-300microns of apical clearance on insertion. It is also advisable to allow for an extended period of settling during the initial contact lens fitting. Assessing the diagnostic lens after an hour or more of wear can help highlight problems with the fit before the lenses is ordered.
Assessing the limbal fit
After considering central clearance, the practitioner should turn their attention to the limbal area. Although the tear reservoir should be thinning over the limbus there should still be sufficient clearance to avoid compression of the important limbal stem cells. Most scleral lens designs allow the practitioner to make adjustments to the standard lens profile that result in either more or less limbal clearance.
Assessing the peripheral fit
Much of the success or failure of scleral lenses depends upon the peripheral fit achieved. Conjunctival vessel blanching can be observed when the scleral landing zone is too tight and indicates that the peripheral lens needs flattening. Impingement of the conjunctival blood flow results in vessel engorgement downstream which manifests as a red, sore eye. Other indications of a tight peripheral fit are complaints of discomfort under the top lid, or a clear impression ring on removal of the lens. A tight periphery can also be easily observed on OCT (figure 10).
A flat scleral landing zone fails to provide the necessary seal and results in the introduction of bubbles. Excessive movement also suggests the scleral landing zone in not sufficiently aligned with the scleral profile. The installation of fluorescein into the pre-lens tear film can help identify flat edges and highlight leaks (figure 7). Tightening the scleral landing zone or adding a toric periphery should rectify such problems.
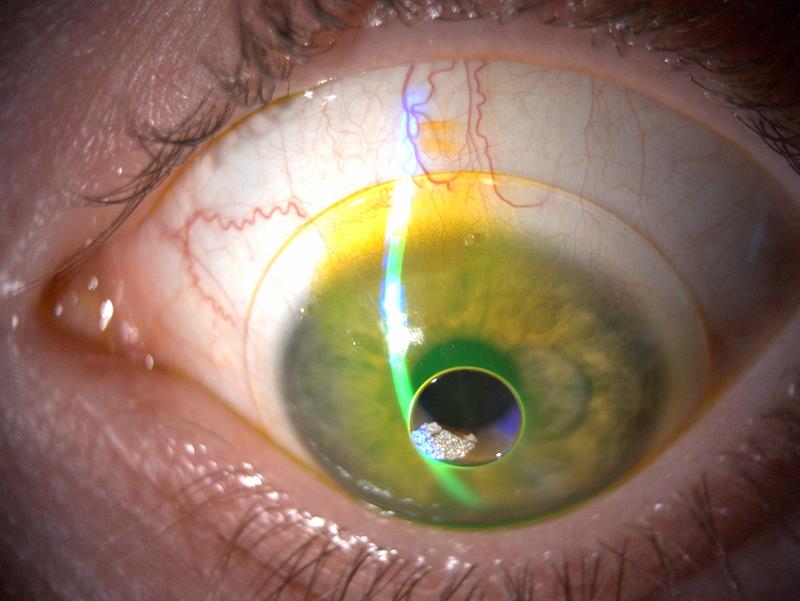
Figure 7: Spherical 16mm scleral on eye with toric sclera (steepest along vertical meridian). Fluorescein installed into pre-lens tear film highlights the misalignment
Toric periphery
Patients with a significantly toric sclera present another challenge when fitting scleral lenses. A spherical lens may sufficiently align in one meridian while being unacceptably flat or tight in the other. In these instances, a toric scleral landing zone is necessary to achieve a satisfactory alignment around the entire periphery. A spherical lens placed on an eye with a horizontal meridian significantly flatter than the vertical (ie with-the-rule astigmatism) is likely to decentre inferiorly as the lens rocks over the flat horizontal axis. You may also notice a good fit along the vertical meridian, but a tight fit across the horizontal. On removal this will often cause rebound redness at the three and nine o’clock locations, which is a good indication to add a toric periphery.
Another excellent reason to use a toric periphery is when a front surface toric prescription is needed, if spherical over-refraction fails to give adequate acuity. A front surface toric can be stabilised using prism ballast or dynamic stabilisation, but in the authors’ experience, most people have sufficient scleral toricity to stabilise a toroidal lens, which will normally provide good rotational stability for the use of a front toric optic. Note that a toric fitting set, even if it is just a few lenses, will be necessary for this type of fit as it is essential to know where the flat axis lies in order to accurately place the front surface toric axis. The flat axis should be clearly marked, usually with lasered engravings, on the anterior surface of the lens. You can rotate the slit beam to align with the markings then read off the axis from the graticule (figure 8).
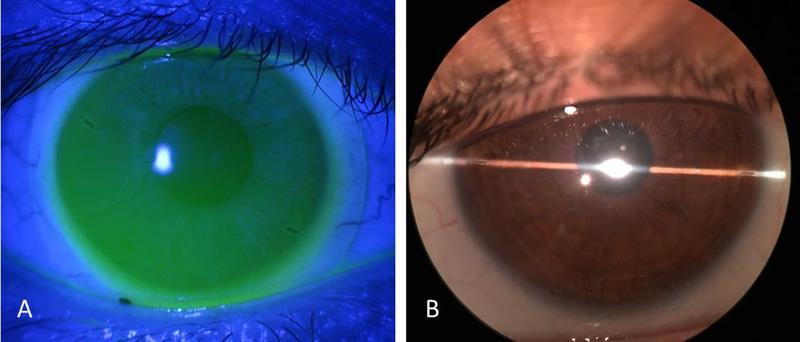
Figure 8 A: flat axis markings clearly visible on a 16mm Zenlens mini-scleral. B: slit lamp graticule roated to align with flat axis markings.
Image A courtesy of Jason Jedlicka OD and image B courtesy of John Gelles OD
It should be fairly easy to manually rotate a lens with a toric landing zone on eye, however, with a few blinks the lens should rotate back to its habitual position. A lens that is difficult to rotate manually is likely to be too tight.
Scleral lens care regimes
There is very little to no tear exchange during scleral lens wear, meaning the solution used during insertion will remain in contact with the cornea and limbus throughout wear (likely to be many hours). As a result, solution allergy/toxicity is a significant cause of problems in scleral lens wearers and should be considered as a possible cause of poor tolerance when the lens fit appears optimal. To prevent problems, the authors recommend filling scleral lenses with preservative free, non-buffered saline, especially during the first few months of wear; doing so will exclude solution-related issues as a cause of any problems. Once the patient is an established wearer it may be reasonable to experiment with alternative (generally less expensive) solutions such as saline containing smart-preservatives.
Like all multi-use contact lenses, scleral lenses should be rubbed clean on removal using a suitable RGP cleaner. Alcohol-based cleaners are useful when oily deposits are a problem while cleaners containing micro-beads (such as B&L Boston cleaner) should be avoided on plasma treated lenses. It is most economical to use standard saline to rinse off lens cleaners. Scleral lenses are more prone to surface wetting problems than other contact lens types and careful selection of the conditioning solution can help prevent and solve such problems. Quattro multipurpose solution, for example, is an excellent product and seems unique in its ability to promote a hydrophilic lens surface. Although scleral lenses can be stored dry, doing so may exacerbate surface wetting problems. A suggested scleral lens care regimen is given in figure 9.

Figure 9: Suggested care regimen to minimise incidence of solution related problems
OCT-assisted scleral contact lens fitting
Anterior segment OCT can be useful when fitting scleral lenses, however, it is far from essential. OCT provides practitioners a novel way of recording aspects of the scleral lens fit and provide reassurance that the fit is optimal.
A simple line scan can be used to record central and limbal clearance and making use of the calliper function means accurate and repeatable measurements of clearance can be made.

Figure 10: A tight scleral landing zone viewed on OCT
Assessment of the scleral landing zone is useful in assessing whether alignment is optimal. A lens that is too tight in the periphery will appear buried in the conjunctiva (figure 10) while a lens that is too flat in the periphery stands proud of the conjunctiva (figure 11). A lens edge 50% below conjunctival surface and 50% above is indicative of good alignment (figure 12). This is sometimes termed the 50:50 rule.
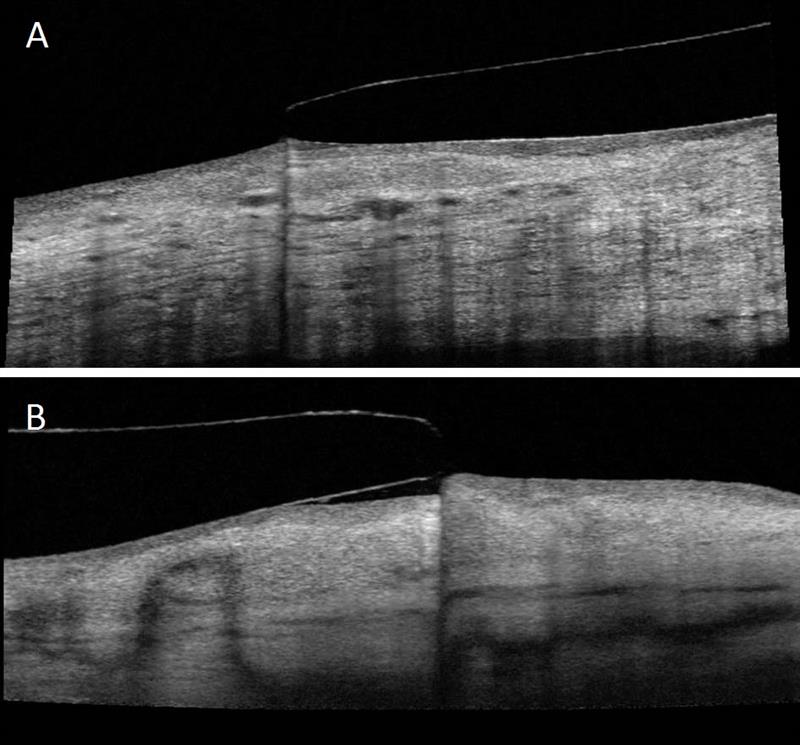
Figure 11: A: a slightly flat scleral landing zone edge viewed on OCT.
B: a very flat scleral landing zone viewed on OCT
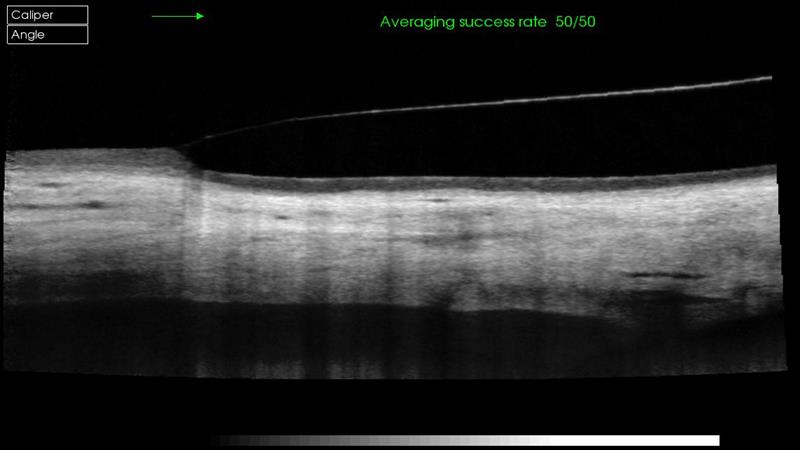
Figure 12: Optimal scleral landing zone alignment viewed with OCT
Conclusion
Fitting scleral lenses is not without its challenges, but it can also be hugely rewarding. Significantly improving someone’s quality of life by giving them a lens that gives them clear, stable vision and all-day ocular comfort not only gives great job satisfaction, but can also be a fantastic practice-builder. Getting started with scleral lenses requires a good fitting set and a lab with readily available technical support, but also a spot of courage and perseverance. You may not feel like you know what you are doing for your first fit, but very quickly you will get to know the ins and outs of fitting these lenses, how to problem solve and how to hone the perfect fit.
Sophie Taylor-West is a CL specialist working in Brighton and Matthew Carter is a specialist optometrist practising at Moorfields Eye Hospital and private practice in Kent.