The fitting or adjusting of a pair of spectacle frames is often the lasting impression the patient has of the practice. If the frame is ill-fitting, not only will the comfort and appearance be affected, but there is a risk that the optical performance will be compromised, especially with higher powered prescriptions, progressive powered lenses and freeform designed corrections. In an increasingly demanding market, the fitting and adjusting of spectacles correctly first time is essential for encouraging patient loyalty and therefore ensuring repeat business. It is impossible to look at every single aspect of fitting and adjusting in a single article. Rather, the aim here is to stimulate thought and discussion among colleagues as to how best achieve the highest professional standard as expected by the patient. After all, an extra minute or two with the fitting can avoid both extra chair time later in the spectacle wearing calendar and an annoyed patient. Remember, a satisfied patient will tell maybe one or two friends about their experience. A dissatisfied patient will tell at least 15 others.
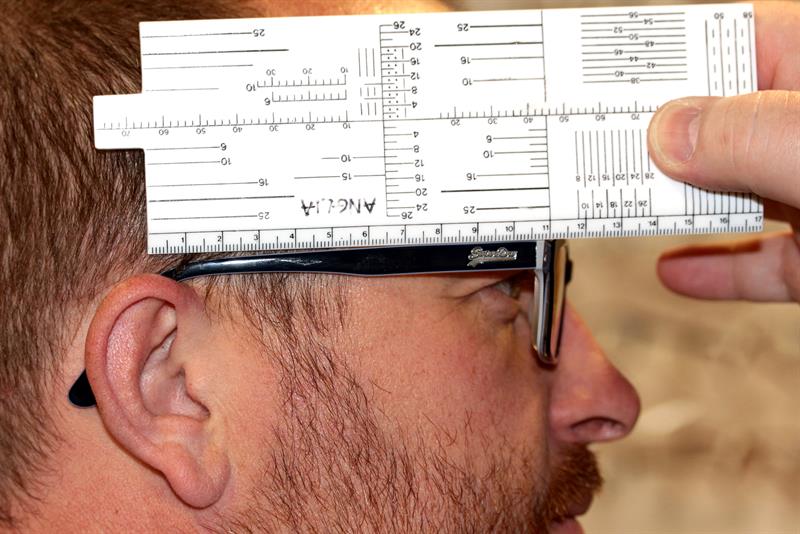
Figure 1: Side length to bend
First steps
Where does an adjustment and/or fitting start? I have often thought that a pre-emptive approach to frame fitting problem solving is the best way forward, but how can we achieve this with a pair of spectacles? If at the dispensing of a pair of spectacles the practitioner takes a few minutes to record a couple of extra measurements, we then have a starting point when the patient returns with a fitting problem.

Figure 2: Head width measurement
For example, in initially measuring the angle of side, the side length to bend (figure 1) and the head-width (figure 2), and then recording these on the patient’s record card, we have a starting reference when trying later to undo any damage or misalignment of the frame. I do understand the arguments that the practices are too busy to do these extra measurements, but in all honesty if these measurements are recorded it does save time later, and three extra measurements will add only a few minutes to the total dispensing time. This then allows us two options if the patient returns for spectacle adjustments;
- Option 1 – take the spectacle frames back to their original set-up and start from first principles.
- Option 2 – take the frames back to the aforementioned measurements from the patient. As the frame should now fit reasonably well with only minor tweaking required, this is my preferred option.
Commencing adjustment
Before we start to analyse different faults and remedies, it is useful to note a few items that may help reduce complications.
- Although it is very rare these days, when a patient presents with glass lenses, it is useful to remove the lenses from the frame before adjusting, especially in the case of metal frames. The majority of glass lenses supplied these days will be of a higher refractive index, and these are brittle in comparison to plastics lenses and therefore prone to flaking.
- Where a plastics frame needs extensive remoulding, achieved through repeated visits to the frame heater, and the lenses have an anti-reflection coating, it is again worth removing the lenses where possible in order to minimise damage to the lenses resulting from the lens and the coating expanding at different rates.
- Many patients with fixed-pad bridge frames expect the underside of the bridge to touch the crest of their nose (figure 3). Remember, however, that these frames are designed so that the load bearing is on the two pads either side of the nose.
- Mark the position of the optical centres or fitting cross positions so that, once the frame is re-fitted, the positioning of these centration points can be checked.
- Check the original order for any special instructions (eg the frame may have originally been fitted in an unconventional position and it is important to replicate this).
- Check the original order for any helpful notes, such as the supplied head-width, to aid replication of the original fitting (as discussed earlier).
- When discussing with the patient the need for the adjustment, remember to check what they say by observation as well as questioning. Remember that a patient will often exaggerate the problem in order to justify their visit.
- Once the adjustment is done, try to avoid asking ‘how it feels’. There are several reasons for this:
- If the frame was causing discomfort before adjustment, it may take a while for the pain to subside and many patients may expect instant relief. Further, usually unnecessary, adjustments are then often required to pacify the patient.
- The polite patient may feel compelled to say it feels better, perhaps an inaccurate response from someone who does not want to be a nuisance.
Let us now consider some typical case presentations and how they might be best managed.
Figure 3: A fixed pad bridge frame pressing on the crest and missing the sides of the nose. This could cause pain at the apex of the nose and cause the frame to rock from side to side
Case study 1
At a quick glance, the fitting shown in figure 4 does not look too bad, and the complaining patient may be considered as being overly fussy.

Figure 4: Complaints about this frame might, at first glance, appear unjustified
The important point to note here is that several views from different positions are essential as a full picture of the fitting is needed before a remedy can be achieved. Closer inspection shows that the nose pads are not fitting flush to the nose. This reminds us it is important to measure the frontal angles (yes, I know that this is really a fixed pad bridge measurement but it is useful as a starting point) and then set the nose pads at these angles. The left pad also angles backwards into the patient’s canthus, thus altering the balance of the frame. However, we must look at figure 5 before we fully address the pad issue. This clearly shows that the frame has a negative face form angle, which increases the vertex distance (quite significantly in this case) as the patient’s gaze moves to the edge of the lens, and aberrations will be more apparent. So, the remedy needs to be two-fold; firstly, re-bow the frame to match the patients face-form angle and then re-align the pads.
Figure 5: A significant negative face form angle
To alter the face form angle, it is necessary to make sure that both the right and left lens apertures are moved by an equivalent and appropriate amount. Although there are many suitably designed pliers available, it is probably easier to do this by hand, holding the bridge securely and slowly easing the lens rim around by the back of the hand. Figure 6 shows the thumb pressing downwards while the back of the hand pushes against the lens, the curve is then moulded back into a more appropriate position. If a plastics frame, gentle heat is required at the bridge to help mould the frame. This should be done a little at the time and checked until a smooth follow of the facial features is achieved.

Figure 6: Face form angle adjustment is best carried out by hand
Once this is completed, the nose pads should be rechecked. If the pads need attention, then by gripping the pad securely (figure 7a) and then twisting the pliers (figure 7b), the vertical alignment of the pad can be altered to follow the frontal angle of the nose.


Figure 7: Pad readjustment by gripping firmly (a) and twisting (b), in this example in an anti-clockwise motion
However, by twisting the pliers (similar to revving a motorbike handlebar) the horizontal alignment might also be adjusted. Remember that as one angle is altered, there will be a subsequent alteration to the corresponding angle. Once the adjustment is complete check the rest of the frame to make sure these adjustments have not adversely affected the side position behind the ears.
One small, but often forgotten, point is to remember to check that the nose pads are on the right way round before returning the spectacles to the patient, as this too will affect the balance and comfort of the frame. Some nose pads are quite symmetrical and can be put on either way, but with the ones in figure 8 there is most definitely a right and wrong way. I know this sounds obvious but sometimes the obvious is missed.
Figure 8: Some pads cause problems if accidentally fitted the wrong way round
Case study 2
A common sight in practice is the frame that slopes (figure 9a). It is easy to make the assumption that the angles of sides are different and they should be adjusted to straighten the front. Although this will be the cause some of the time, it is not always the case. By careful inspection of the nose pads, it can be seen the patients left pad is significantly further from the rim than the right pad, and is in need of pulling back into place. The technique is the same as that shown in figure 7a and b.
An assessment of which pad is in need of adjustment is essential to avoid making the fitting worse. In this case, if the right pad was moved to match the positioning of the left pad, the patient would find that the frame would be made to sit too high (figure 9b) which will affect the positioning of the optical centres, bifocal segment positions and fitting cross positions. It is always the case that the vision should be checked after any adjustments have been made.
Figure 9: The sloping frame
Case study 3
Figure 10 shows a similar scenario to figure 9, with a clearly visible slope on the front of the frame. The cause this time is a twisted bridge piece, as the right lens is level but the left lens slopes up towards the temple. The solution is to hold the bridge (pliers or hands whichever is preferred) and then gently ease the left side downwards as shown in the picture.

Figure 10: This sloping appearance is rectified by gently sloping the left side of the frame downwards about the pivot of the bridge
Do we tell the patient we are doing this at their own risk? This is an interesting and much argued point. Technically, if we take the frame from the patient and attempt an alteration, we are accepting that the frame is suitable to be adjusted. So if we break the frame, the onus of replacing it is ours.
Case study 4
Figure 11 shows a frame that has unequal angles of let back. This may not be evident by looking at the frame straight on, which reinforces the point made earlier to view the frame from many angles before attempting any adjustments. The patient will probably report that the frame hurts behind the right ear and on the left side of the nose. This should be confirmed by the practitioner by looking for corresponding sore spots.

Figure 11: Frame with unequal angles of let back
To remedy this, a judgement as to which angle of let back is at fault must be made. If it is a case of the patient constantly removing the frame one-handedly or the patient has fallen asleep on one side, it is likely to be just one side that needs attention. Otherwise it could be a combination of the two sides requiring adjustment. It is possible the best course of action is to set up the frame with equal angles of let back prior to reviewing the fitting. With a plastic frame, the angles can be manipulated by heating the lug area and rolling the frame. It is important to do this slowly and check regularly the progress. This is best done by actually measuring the angle as shown in figure 12. In a metal frame the easiest way to remedy is as shown in figure 13a making sure that you have the pliers the right way around and not as in 13b.

Figure 12: Measurement of angle of let back
To increase the angle of let back in 13a, the hand should rotate away from the practitioner, and to decrease, the hand should rotate in the opposite direction. It is important to get the padded side of the plier on the outside of the frame to avoid marking the frame. Many practitioners favour wrapping the frame in a cloth to prevent the marking of the frame, however, I am not a fan of this as I cannot see clearly what is happening. Pliers that have a protective pad are perhaps the favoured option.


Figure 13: Correct adjustment of angle of let back on a metal frame (anticlockwise rotation of pliers as shown). Pliers correct in A, incorrect in B
The fact that many frames are now provided with sprung loaded joints can often hide the problems associated with an insufficient angle of let back. In figure 14, the spring is constantly activated to compensate for this angle which negates the benefit of having the spring present. Although the patient will report the frame feels comfortable, there is undue tension on the joint. The remedy is as shown in figure 13a.
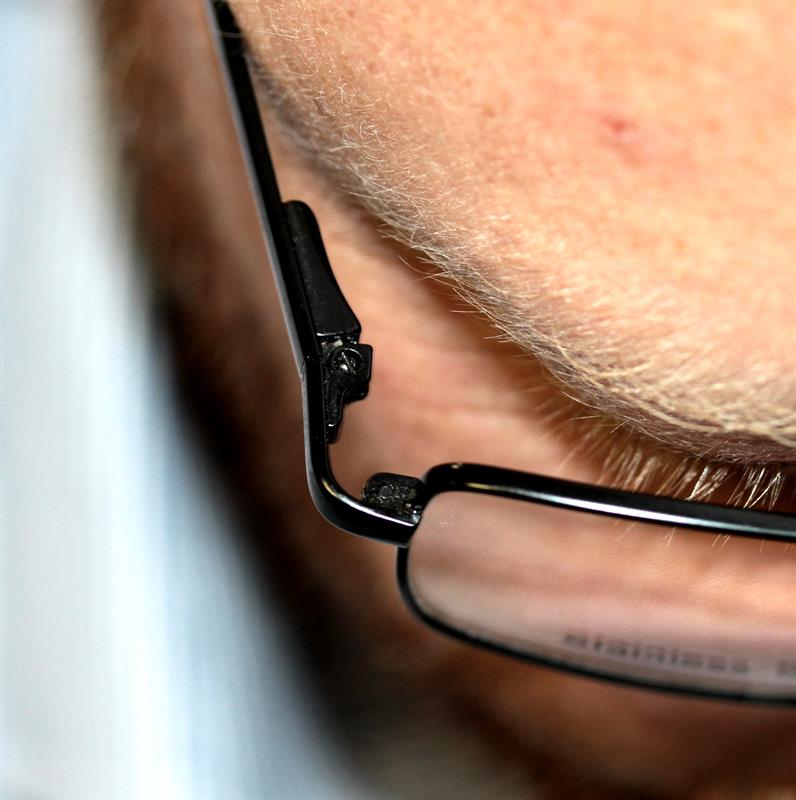
Figure 14: Incorrect adjustment of angle of let back on a metal frame
Again this emphasises the need for the practitioner to investigate the fitting by balancing the visual inspection in conjunction with the symptoms offered by the patient.
Case study 5


Figure 15: Sides made tighter by decreasing the angle of let back
Figures 15a and 15b show a common situation where the practitioner has been swayed by the patient complaining that the frame does not feel tight enough, so the sides have been made tighter by decreasing the angle of let back, so making the head width tighter. This results in the sides gripping the temple of the patient which often leaves the patient with marks down the side of the head. Ideally the frame should not touch the face before the hair line, so that the grip is at the ear point and not before. Eventually this situation will lead to the patient complaining that the frames slip forward, caused by the extra tension around the ears. If the head width of the frame is too small, then the frame will push forwards to find the natural resting place. See figures 16a and 16b for illustration of this concept.

Figure 16A - left: Too tight a head width setting will result in pressure to the sides of the head
Figure 16B - right: This results in a gradual movement of the frame forwards
The remedy is to check the head width and/or angle of let back by measuring the patient and then transferring these measurements to the frame, always remembering that whatever the patient head width is measured, the frame measurement must be compensated by reducing the actual reading by 10mm to allow the frame to grip at the ear points.
Case study 6
Figure 17 shows a frame where the side length is too short. The bend should not start in front of the ear. Instead, it should start at the ear point for maximum comfort and cosmetic effect.

Figure 17: A frame where the side length is too short
This is often the case in adults, whereas the opposite is usually the case for paediatric fittings. This is something that is much more common now than 30 years ago, mainly due to ‘dispensing from stock’ or internet dispensings.
In the event that the side length is too short, first measure the distance from the dowel point of the frame to the ear point. Then, using heat if necessary, straighten the side and mark the required length to bend. Re-bend the side at this point making sure that the downward angle of drop is such that the frame will have an appropriate fitting around the ear.
In the event the side is too long with a plastics side then shortening by re-bending will often lead to a length of drop that is too great, which is unsightly. In this instance the only real option is to order a shorter side. For a metal side, it may be possible to remove the end tip, shorten the metal aspect, then replace the end tip (shortened if necessary). It could be argued that this should never happen if we have measured the frame correctly in the first instance. Unfortunately, commercial pressures and internet competition make dispensing from stock a preferred option in practice, often assuming this is what the patient wants. It may be worth remembering that, as practitioners, we can (and should) advise the patient if a frame is going to be a poor fit and perhaps even to suggest they ought not to have chosen said frame.
Case study 7
The patient in figure 18 exhibits a classic example of where a bad remedy for the frames slipping forward has been applied. It is often a knee jerk reaction by the inexperienced (or unqualified) practitioner to tighten behind the ears by increasing the downward angle of drop to stop it slipping forward. I am sure we all remember seeing the 90° angle that digs in behind the patient’s ear. This over increase of the angle of the side tilts the frame front forward, which in turn induces further slipping as the weight drags the destabilised front forward. This causes the patient to complain that the frame slips, so we tighten this more and so on.
Figure 18: Downward angle of drop too steep. This has caused the side to be forced upwards which will in turn cause the frame front to tilt forwards. Mechanically this will destabilise the frame causing (potentially) the frame to slip forward. Optically the positions of the OC could be altered from the line of sight and in higher powers, a change in prescription
Remember that over compensation of the fitting of the downward angle of drop can cause the frame to have insufficient grip behind the ear which again cause slippage with all the previous problems (figure 19).

Figure 19: Overcompensation of the fitting of downward angle of drop causing forward slippage
Another problem that is often a side-effect of altering the downward angle of drop is shown in figure 20, where the inward angle of drop is outwards instead of inwards which rests on the ear instead of the head. This again affects the stability of the frame and will cause the patient to return to the practice.

Figure 20: The inward angle of drop is outwards instead of inwards which rests on the ear instead of the head
Conclusion
We have seen several case studies which have addressed commonly found frame issues, starting at the bridge of the spectacles and then moving out to the temples then along the sides until the ear points are reached. These can all be put together into a single assessment of the whole frame. While doing this, it is important to remember the fitting triangle, which shows how the load is spread on the face (figure 21 - pictured below).

The fitting triangle has as its base the line joining the two ear-points such that the apex should then lie over the bridge of the spectacles. When assessing the fit, the practitioner should start at the apex of the triangle and then work outwards to the temple of the frame, following down the side and finishing behind the ear. Therefore, the ear point should be the final point at which to look.
When the adjustments/fittings are complete, remind the patient that the new fitting may take a couple of days to settle. Try to avoid phrases such as ‘if you have any problems come back’ as this could make the patient feel as though there may be further issues. As discussed earlier, the question ‘does that feel better’ could be replaced with ‘that looks a lot better, see how that settles over the next couple of days’.
Liam Kite is senior lecturer and university teaching fellow at Anglia Ruskin University