In the second in our series looking at refraction, Tina Patel continues her discussion of objective techniques by explaining how to perform retinoscopy. Module C35471, suitable for optometrists and dispensing opticians.
To perform retinoscopy, as mentioned in Part 1 (Optician 31.01.14), the light from the retinoscope is oscillated across the whole eye and the movement of the light source or reflex within the pupil is observed (Figure 1 – and also view the video associated with this article online).
[CaptionComponent="2641"]
The aim of retinoscopy is to neutralise the movement observed on retinoscopy to achieve reversal (no movement), which occurs when the far point of the eye being examined coincides with the nodal point of the practitioner’s eye. There are a number of advantages and disadvantages of retinoscopy over autorefraction discussed in the Part 1 (Table 1).
Before commencing retinoscopy a variety of factors need to be considered to ensure the results obtained are accurate and reliable. These include the working distance, the lighting conditions, the fixation target and position.
Working distance
The distance from the retinoscope to the patient’s eye is known as the working distance (Figure 2). Performing retinoscopy at an infinite distance from the patient ie greater than 6m away, means no allowance needs to be taken for working distance; in other words, the results achieved represent the patient’s refractive status. However, it is not practical to do this; the reflex will be dim, difficult to observe, and it will be impractical to change the correcting lenses. As a result, practitioners perform retinoscopy at a distance less than infinity, but modify their final retinoscopy result to take account of their ‘working distance’.
[CaptionComponent="2642"]
Most practitioners use a working distance of 66cm, which requires adding a working distance lens of -1.50DS to the final result. Alternatively, a working distance allowance lens of +1.50 can be placed in the trial fame prior to commencing retinoscopy. This can help to avoid mathematical errors when deducting the working distance lens power from the final retinoscopic results (or even forgetting to deduct the working distance) and also aid as a fogging lens to control accommodation. However, the use of the working distance allowance lens can result in increased reflections and uses up space on the trial frame that may be required for the patient’s prescription.
Lighting conditions
It is ideal to perform retinoscopy in a darkened room. This will cause the pupil to dilate, making the reflex more visible; however, as a result of dilation aberrations and accommodation may be increased. The retinoscope light levels should be kept on medium. If too bright, the pupil may constrict, so inhibiting visibility.
Fixation target
In static retinoscopy, the patient fixates on a distance target. This target should ensure the patient’s accommodation is relaxed, otherwise the final prescription will be incorrect. With the advent of computerised test charts, practitioners have a plethora of targets to choose from, but the green section of the duochrome is considered to be a good fixation target as it induces the least amount of accommodation.
Retinoscopy techniques
A number of techniques for using a retinoscope have been developed. These techniques can aid in the derivation of the distance refractive error and can also be used to give clinically significant insights to the varying degrees of accommodative activity.
Dry versus wet refraction
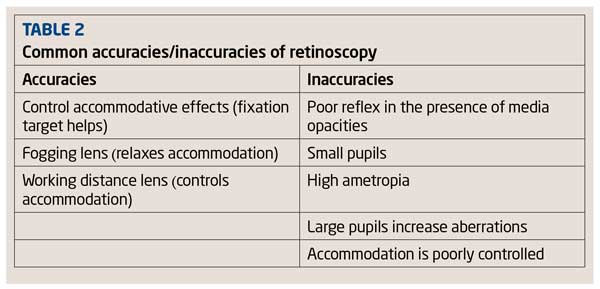
To determine an accurate refractive result, all retinoscopic techniques essentially require that the accommodative status of the eye be at a minimum or inhibited. ‘Dry’ retinoscopy refers to various techniques that can be performed to determine the refractive state of the eye without the use of pharmacological agents. When such agents are used the technique is referred to as ‘wet’ retinoscopy. In both cases the main objective during examination is to control the accommodation of the eye by either keeping it to a minimum or temporarily disabling it. Table 2 lists the potential sources of error for retinoscopy.
This article will refer to the streak retinoscope to describe the various retinoscopy techniques available.
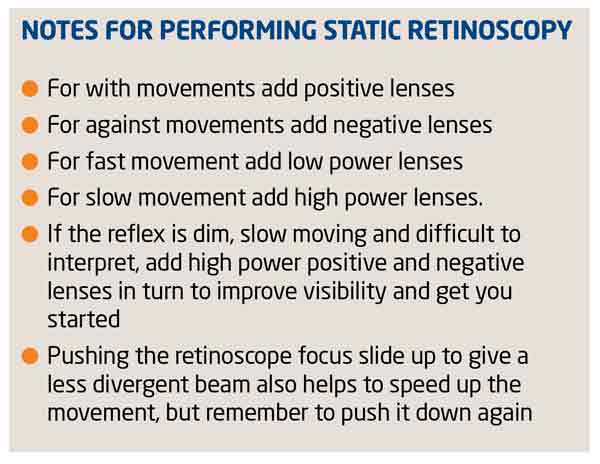
Static ‘dry’ retinoscopy
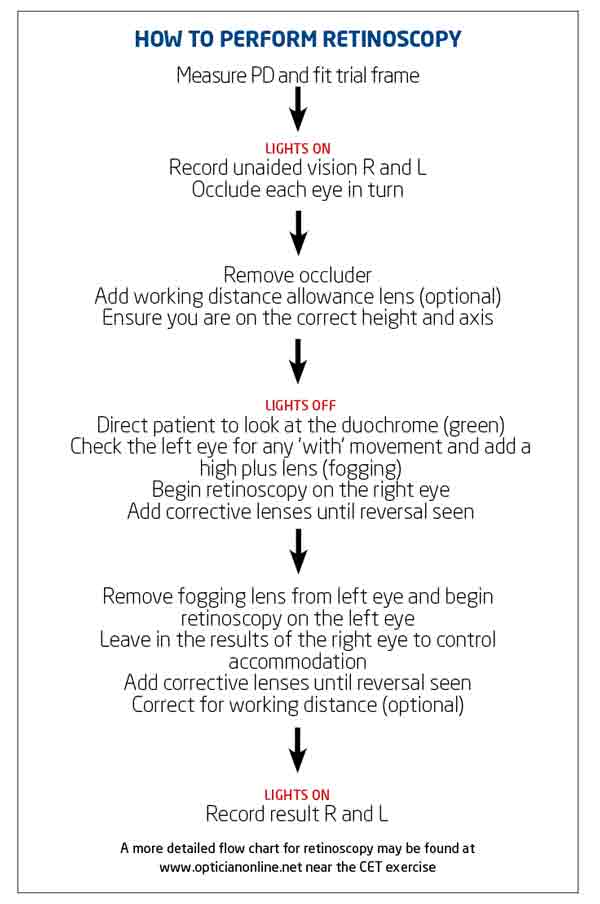
Most practitioners will be very familiar with the traditional static (dry) retinoscopy to determine the distance refractive state of the eye. In this method, the patient views a distance target generally at 6m, the technique of which is described below:
- Ensure the practitioner’s refractive error is corrected
- Measure the PD and fit the trial frame. Place the working distance allowance lens in the the trial frame
- Ensure you are sitting at the same height and eye level as the patient. Ensure your working distance is correct
- Ensure the focus slide or collar of the retinoscope is down to produce the most divergent beam of light. Pushing the slide up produces a convergent beam and the reflex movements reverse
- Direct the patient to look at a distance target with both eyes open, ideally, as previously mentioned, at the green section of the duochrome to ensure accommodation is relaxed
- Position yourself on the right-hand side of the patient. Before commencing retinoscopy on the right eye, use the retinoscope to quickly eliminate any ‘with’ movement seen in the left eye by adding positive spheres. This acts as a fogging lens and helps to prevent accommodation. A fogging lens is not required if an against movement is seen first
- Use your right eye to refract your patient’s right eye. This will help to reduce errors in parallax. Rotate the streak retinoscope through 360° to identify the band reflex. Once you have identified the band, only oscillate the retinoscope along that band and the band 90° to it
- If there is no obvious band or the reflex is very slow, use high positive spheres (with movement) or high negative sphere (against movement) to reveal a more apparent band
- Neutralise the slowest with, the fastest against or if you are faced with a with and an against movement neutralise the with movement first with spheres
- Having neutralised one meridian with a ±ve sphere you should be left with band reflex parallel to the direction you have moved the retinoscope to neutralise the sphere. The reflex should move against the direction of the retinoscope
- Place a negative cylinder with its axis parallel to the band reflex, and then oscillate your retinoscope at 90° to this, adding negative cylinders until the against movement is neutralised. At reversal, coloured fringes may be seen (chromatic aberration) or the reflex may split and scissor (spherical aberration)
- If you are moving the retinoscope along the cylinder axis but the reflex moves obliquely, you have placed the cylinder at the incorrect axis. To correct this, rotate the cylinder axis within the trial frame towards the direction of the reflex within the pupil. When the correct axis has been identified and you drive the light along the cylinder axis, the reflex within the pupil will move in the same direction (Figure 3)
- Keeping the results of the first eye in place, move to the patient’s left hand side. Remove the fogging lens and repeat the process for the left eye
- Remove the working distance allowance lens or add -1.50DS to the sphere only of both eyes. Measure the visual acuity of each eye monocularly.
[CaptionComponent="2643"]
Static retinoscopy relies heavily on ensuring the patient’s accommodation is as relaxed as possible. Listed below are tips to control accommodation during examination.
- Ensure the patient is focusing on a distance target like the green rings on the ducochrome. Using this target has been shown to have the least accommodative effect on the patient’s eye
- Ensure the patient informs you if your head obscures the duochrome/distance target, otherwise the patient may focus on your head and accommodate
- Add a fogging lens to eliminate any ‘with’ movement seen in the eye not being checked first. Often using a working distance allowance lens will eliminate any ‘with’ movement seen
- In the presence of high ametropia, use large diptoric intervals when changing lens powers. This will ensure neutralisation is reached quickly and reduces the accommodative effect of continually changing lenses in the trial frame
- Neutralise the with movement reflex first.
Mohindra ‘near’ retinoscopy
The Mohindra technique (also referred to as near retinoscopy) is a very useful technique with children. Studies have shown a good correlation between this technique and ‘wet’ retinoscopy in low/medium hyperopia. However, a poor correlation is shown in children with esophoria or esotropia and the actual hyperopia present.
- Measure the PD and fit the trial frame (optional dependent on age)
- Darken the room lights as much as possible
- Position yourself 50cm away from the patient on the same height and visual axis
- Occlude the left eye (preferably by the person holding the child)
- Dim the retinoscopic light and ask the child to fixate on the dim light
- Neutralise the two principal meridians as described in static retinoscopy using spherical and cylindrical lenses
- Occlude the right eye and repeat for the left eye
- Apply the adjustment value (see fourth point in Dynamic retinoscopy section).

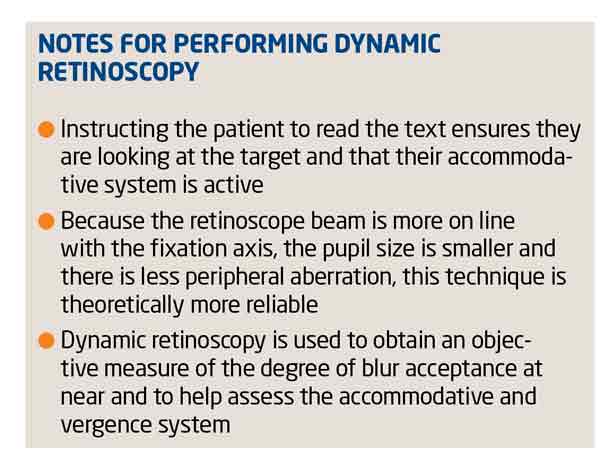
Dynamic retinoscopy
This technique measures the refractive status of the eye when it is accommodating at near and whether the patient is accommodating too much, too little, unequal or sluggishly. Dynamic retinoscopy can be useful for providing near lenses for presbyopic patients who may or may not be aware of any near difficulty depending on whether they have sufficient near demand to elicit the problem.
Various techniques have been described to determine the accommodative status of the patient’s eye, the main difference being the manner in which the positive lenses are added to obtain neutralisation.
Measure the PD and fit the trial frame
- The room lights can be kept on
- Start with the patient’s distance prescription in place
- Hold your retinoscope 50cm from the patient and use a target consisting of a block of reduced Snellen letters clipped to your retinoscopy. Pictures can be used for small children
- Instruct the patient to start reading the text or to describe the pictures out loud
- With the distance correction in place, a ‘with’ reflex should be seen
- Add plus lenses binocularly until neutralisation is seen
- An adjustment value of 0.50D is then made to the final prescription to allow for the accommodative lag.
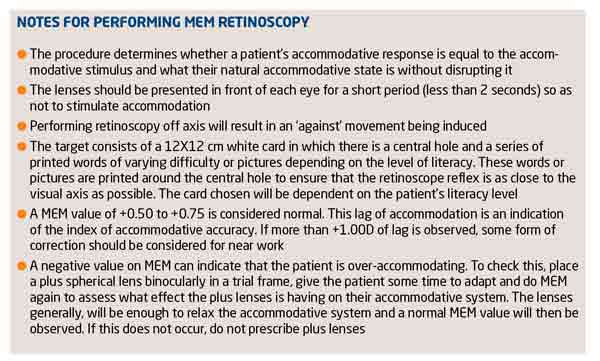
Monocular estimate method (MEM) retinoscopy
The technique is performed monocularly. The aim is to determine the accommodative lag by estimating the reflex motion without disturbing the accommodative state. This technique is particularly useful for observing a patient’s spontaneous accommodative response to a detailed target at their normal working distance.
- The patient is asked to wear their habitual near prescription
- The ambient illumination should be set so that there is enough illumination to allow the viewing of small print
- Position yourself slightly lower than the vertical midline but on axis, to emulate a typical reading posture at the patient’s habitual near working distance
- Clip an appropriate MEM card (see notes below) to the retinoscope and ensure the radioscopy beam is passing through the central aperture of the card
- Begin by shining the retinoscope beam on the bridge of the patient’s nose. Ask the patient to read the words on the card or to name the pictures
- Move the retinoscope beam across the horizontal meridian of one eye and then the other. A slight ‘with’ movement should be seen, for which the speed of the reflex is observed
- Place a positive spherical lens in front of the eye for two seconds or less so as not to change accommodation
- Continue to change the lenses until neutralisation is seen
- Repeat the procedure for the left eye.
Cycloplegic ‘wet’ retinoscopy
Cycloplegic refraction is indicated when patients present with symptoms of either decreased vision not corrected to a predicted level, variable and inconsistent end point of refraction, amblyopia, suspect latent hyperopia, suspect pseudomyopia, uncooperative/non-communicative patients, accommodative esotropia or uncompensated esophoria.There are significant risk factors linked to previous family ocular history and suspected malingering.
Cycloplegia can be achieved using various drugs. Cycloplegic drugs inhibit the accommodative power of the eye by blocking the action of the ciliary muscle, allowing the total refractive error of the eye to be measured.
A variety of cycloplegic agents are available, but in optometric practice, cyclopentolate 0.5 per cent or 1 per cent is commonly the choice of drug used. With this, the onset is quick and recovery is shorter compared to other cycloplegic agents.
Performing cycloplegic refraction
- Explain to the patient and parent what you will be doing and why
– Ensure the parent is clear why you want to use a cycloplegic drug and consent from the parent has been given
– Explain that using drops will temporarily cause the vision to blur, the pupils to dilate and have an increased sensitivity to light. It is helpful to inform the patient and parent how long dilation may last
– Advise the patient and the parent to attend for cycloplegic refraction on a day when important visual tasks are not going to be performed.
- Select a drug that will provide adequate cycloplegia with minimal side-effects (see Table 3 for drug choice available in optometric practice).
– Instilling drops can be daunting especially in young children, and it is best to explain the process without using words or terminology that might scare the child and/or parent
– Check that the patient has not had any previous adverse reactions or know of any contraindications to using a topical diagnostic drug
– As with all topical agents, note the expiry date, dosage and drug type that is being used, along with the number of drops being instilled and the time at which the drops are being instilled.
- Prior to instillation, check and note the patient’s amplitude of accommodation. Looking at the amount of mydriasis alone is not a sufficient method for checking if adequate cycloplegia has been achieved
- Instil one drop in each eye and ask the patient to either take a seat in the waiting room or return in 30 minutes as this is the approximate time it will take for the drops to gain maximum effect
- Recheck the amplitude of accommodation to ensure there has been sufficient reduction. If this is not the case, instil another drop and recheck the results in 10-15 minutes
- Cycloplegic refraction is carried out in a similar fashion to dry static retinoscopy
– Direct the patient to look at a distance target (duochrome) with both eyes open
– Due to pupil dilation and peripheral aberrations, the retinal reflexes may be distorted. Concentrate on the central 3-4mm reflex within the pupil
? If possible, attempt a subjective refraction; however, due to spherical and ocular aberrations the final visual acuity may be slightly reduced.
Prescribing after cycloplegic refraction
Following cycloplegic refraction, the final prescription given will depend on what the patient’s needs are, what they will be able to adapt to and what will give them the best acuity and alignment.
- Binocular status – in patients with esotropia <4 years of age, prescribe the full refractive correction. For patients with esophoria, prescribe the full correction if binocular instability is noted
- Ciliary tonicity – reduce the prescription by 0.50 to 1.00D
- Age – prescribe closer to the manifest refraction to alleviate symptoms but do not blur the distance vision
- Prescription history – if glasses have not been worn previously, reduce the prescription for adaptation purposes.
Follow-up visits
It is likely the patient will need to return for a follow-up visit to reassess their vision with the final prescription issued. The recall period will depend on the patient’s initial symptoms, if the prescription had been modified and how well the patient is adapting to the glasses.
Conclusion
Autorefractors have become a useful tool for providing a starting point for subjective refraction within the optometric practice. New and improved designs have made them easy to use, repeatable and fast. New models are also able to provide keratometry measurements, displaying corneal mapping and detect corneal irregularities.
Poor fixation, accommodative fluctuations and media opacities are common sources of errors that lead to inaccuracy of results when using autorefractors. Manufacturers have, however, made several improvements to instruments to improve their accuracy.
An accurate retinoscopy result can drastically reduce the time spent on a subjective refraction. It is a particularly useful tool for determining the refractive state in young patients, patients with learning difficulties and those who do not speak English. It also provides a wealth of information about the visual system using various retinoscopic techniques. Retinoscopy relies on ensuring the patient’s accommodation is as relaxed as possible, where dry retinoscopy does not yield reliable results. ‘Wet’ retinoscopy can be used to determine the ‘true’ refractive state of the eye and is particularly useful in children or patients presenting with symptoms that do not match the expected level of results. ?
- Tina Patel is an optometrist working in hospital and private clinics and is an examiner and assessor for the College of Optometrists