The initial selection of the lens was discussed in the first article (Optician 05.10.2018). In this article, I will first consider the handling of RGP lenses and then go on to look at the methods of assessing and recording the fitting characteristics.
Handling RGP lenses
When handling RGP lenses in a clinical setting, a number of factors need to be taken into account. The lens itself is rigid, and it has a rather sharp edge. This gives it the potential to cause an unpleasant injury to the eye. In addition, the patient is likely to be nervous. Research has suggested that many patients are more nervous when having their eyes tested than when visiting the dentist, and the prospect of having something uncomfortable inserted is unlikely to help them relax. It is therefore important that the practitioner be a source of calmness and confidence.
This is much easier to achieve if the practitioner is actually calm and confident, and competence in the handling of lenses will soothe the nerves of both parties. The only way to achieve competence is by practice, but a little bit of gamesmanship can go a long way.
Figure 1 The ‘pinch’ technique involves controlling the upper and lower lids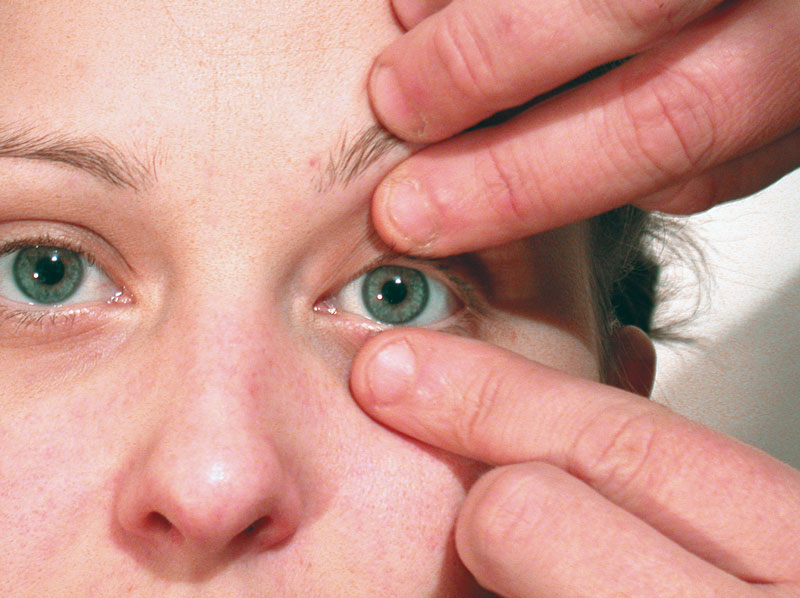
Insertion (Application)
When it comes time to insert the lens, do not give the thing too much of a build-up, and a little bit of spin goes a long way. A casual, brisk manner works wonders at this point, so get on with it.
Before the practitioner touches any part of a patient, including the eyelids, thorough washing of the hands should occur, and the patient should see it happen. This will set a good precedent, reassure the patient about hygiene and hopefully influence their own approach to this vital area. The hand washing can even be a bit exaggerated, in the same way as looking in the mirror during your driving test.
The conditioning solution should be applied to the lens, but it should be spread over the lens surface rather than used to fill the concave bowl formed by the back surface. You will then find that you can turn the lens upside down or in any position and it will still stay on your finger until the moment that the surface tension of the tear layer pulls it onto the patient’s eye. Most students put the lens on the first finger for their early attempts at lens insertion, but for many practitioners the middle finger is longer. If the lens is placed on the end of this finger the extra length may allow some bending of the finger, which may assist insertion. Whichever finger is used, the lens should be placed on the fingertip, so that the area of contact between the finger and the lens surface is minimal. This makes it easier for the tear film to pull the lens from the finger.
Figure 2 The ‘pull and blink’ method. The lens is centred interpalpebrally (a) and then tension applied by movement toward the outer canthus (b)
A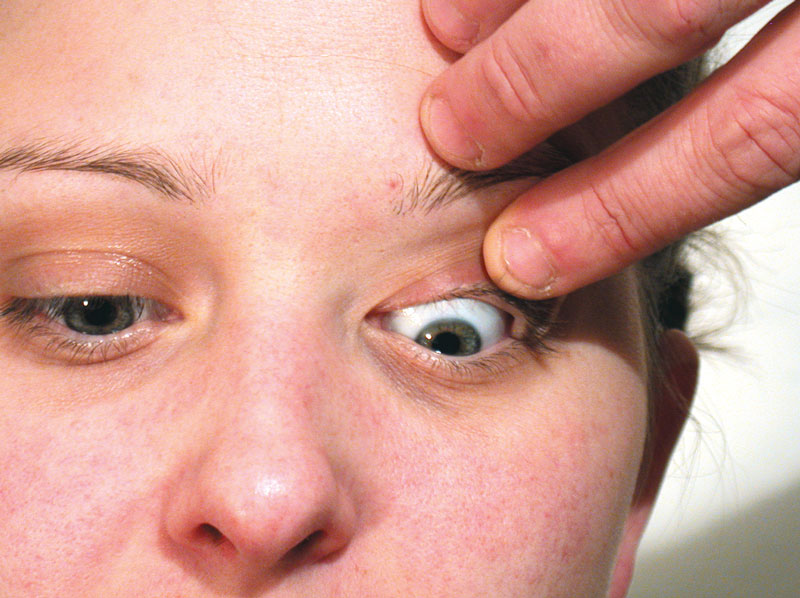
B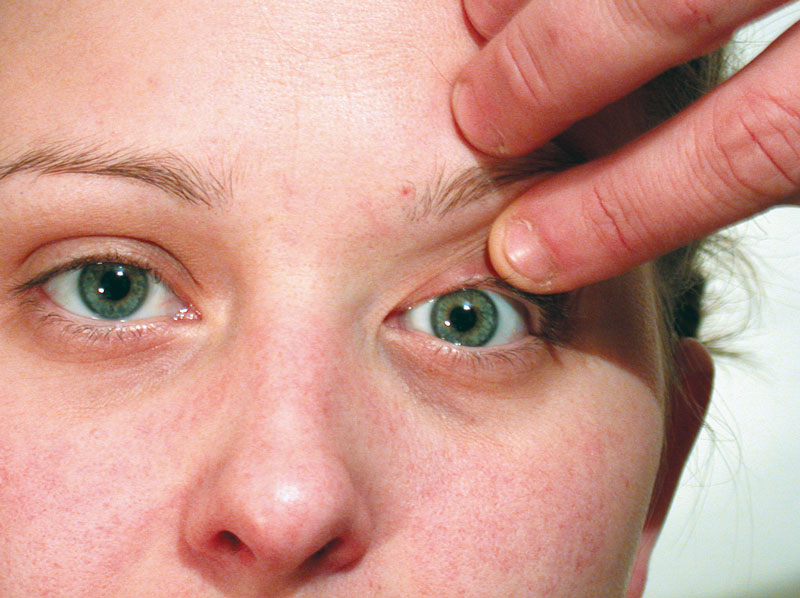
Next, consider how best to approach the eye. There are few things more unnerving for a patient than the sight of a hard thing with sharp edges approaching the eye. Throw in the shaking hands and slow approach of the nervous practitioner and the odds for the lens going in the eye don’t look very good. The most likely outcome is for the patient to lose their nerve completely, back away sharply and close their eyes. To prevent this, get the patient to lean the head back against the headrest of the chair.
Raise the upper eyelid with the thumb of your free hand. The palm and fingers of the hand are then available to apply gentle but firm pressure should the patient show a tendency to move their head. Usually this would be the practitioner’s left hand for the patient’s right eye. It is worth approaching the eye from a point off the visual axis, so get the patient to look slightly down, preferably at some tangible target such as an electricity outlet on the wall. This will help to keep the eye still, especially if the practitioner keeps saying things like ‘keep watching the plug...keep watching...keep watching all the time.’ Moving targets are much harder to catch. With a particularly nervous patient, it might be worth the practitioner standing well to the side or even behind the patient’s chair, out of the line of sight. Once the patient is positioned, head on the headrest, looking down, the approach with the lens can proceed.
Figure 3 The V method
The lower eyelid should be controlled with one of the fingers of the hand bearing the lens, usually the one next to the one carrying the lens. This steadies the hand and also provides some protection for the cornea if the patient panics and moves forward suddenly. The approach to the eye should not be too slow. Firstly, this gives the patient more time to lose their nerve, and secondly, both the conditioning solution and the tear film can dry out.
If it does dry out, the lens tends to stay on the finger of the practitioner. The place to aim for is the upper part of the cornea. This allows an approach oblique to the visual axis and the lens is traveling down when it contacts the eye. Gravity will therefore assist the transfer of the lens from the finger to the cornea. If we were to approach the cornea along the visual axis, it is more likely that we would provoke a defensive lid closure that would be accompanied by Bell’s phenomenon, an upward roll of the eye that protects the cornea. The lens is likely to end up on the lower sclera, which, while easily remedied, does tend to upset a nervous patient. There is also the possibility of corneal insult from the lens edge. If the upper cornea is targeted, Bell’s phenomenon usually results in the lens landing on the central cornea. If the patient maintains fixation, the lens will contact the tear film and slide gently down upon it to a central position, expelling any air bubbles behind it. Generally, the lens should be aimed such that about a quarter of it overlaps the limbus.
Once the contact lens is on the cornea, the patient may not be very comfortable, but both the discomfort and the resultant tearing and blepharospasm can be limited if the practitioner keeps talking to the patient. ‘Rest your head back on the headrest, and look down... that probably feels better already.’ Suggestion is a powerful tool. Should the patient fail to respond to your blandishments, however, consider the following possibilities:
- There is an air bubble trapped under the lens
- The lens edge is damaged
- There is a foreign body under the lens
- The patient is reacting to the conditioning solution
As a damage limitation exercise, remove the lens promptly, clean, rinse thoroughly and reinsert, provided the cornea is undamaged. If the lens is still unacceptably uncomfortable, it is probably not an air bubble causing it, so have a look on the slit-lamp.
Some patients show an exaggerated response to foreign body irritation, termed an axon reflex. This involves efferent fibres of the trigeminal nerve, which cause an inflammatory response. In these cases, the eyes go pink, the lids swell up, and the wise practitioner considers whether RGPs are really the best option.
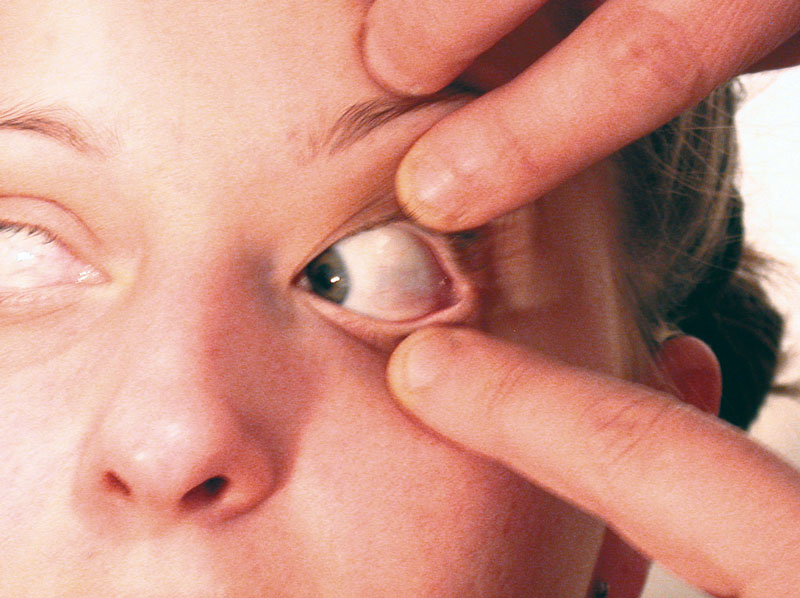
Should the lens settle on the sclera, no attempt should be made to move it onto the cornea. The reduced edge clearance of modern RGP designs make this a very dubious procedure now, and the likely result is damage to the limbal area from the edge of the lens. Any damage to the cornea increases the risk of serious infection and the limbal area is where the corneal stem cells reside. If the lens displaces onto the sclera, take it out and reinsert onto the cornea. You might have to push it round to the temporal sclera first in order to be able to get at it. The ‘pinch’ technique is appropriate here to remove the lens.
Removal
This brings us rather conveniently to removal. There are a number of methods, each with advantages and disadvantages.
1 The ‘pinch’ technique involves controlling the upper and lower lids by placing a finger or thumb on the lid margin of each (figure 1). Starting with the lids parted somewhat wider than the total diameter of the lens, gently bring them together so that the lid margins burrow under the periphery of the lens, thus popping the lens out. If the lids are controlled and positioned correctly, almost no force is required to break the surface tension holding the lens in. The lens should release from the cornea with a gentle ‘pop’ to be collected. The pinch technique is probably the most commonly used technique these days, but it does not work on everyone. Some patients respond to touching of their lid margins by going into blepharospasm.
2 The ‘pull and blink’ method used to be the first choice when peripheries had a rather more generous clearance. However, it still works well on many lenses, often in those patients who respond badly to the pinch technique. The patient fixates an object chosen so that the cornea, and the lens, is positioned between the lids at the point where the interpalpebral distance is at a maximum. The patient is then told to open their eyes as wide as they can. The lids are tensioned by pulling at the outer canthus until the surface tension of the tear film is broken (figure 2). This can be done with a finger, but is usually more easily done with the practitioner’s thumb, which has a greater contact area. If the eyes are positioned correctly and the lids tensioned evenly, little force may be required. However, sometimes the tensioning of the lids is insufficient to break the surface tension, and this must be achieved by asking the patient to blink.
3 The ‘V’ method is also worth practicing, as it often works on those patients on whom the other two methods do not work. The patient is instructed to look at an object placed so that the eye is abducted. The lids are tensioned by the practitioner using fingers or thumbs so that they form a V, or rather a > with the point at the inner canthus (figure 3). The patient is then instructed to look in towards the nose. The surface tension is broken as the lens catches in the V of the lids, while the eye cornea continues towards the inner canthus.
Rarely, a patient may panic and develop blepharospasm – thus keeping their eyes firmly shut. This can make removal of the lens impossible. Fortunately, there is a trick which almost always works in such an emergency. In a calm, confident tone of voice, address the patient thus: ‘When I say go, open your mouth as far as you can… Go!’ It is almost impossible to close the lids tightly and open the mouth wide at the same time. We are simply not wired that way. Secondly, the drawing of attention towards the mouth, away from the eye, may also contribute to the effect. Either way, it will usually give you enough time to get the lens out.
Assessing the fit
When assessing the fit of a rigid contact lens, textbooks tell us that we must consider two things:
1 The dynamic fit, or how the lens moves and centres on the eye.
2 The static fit, or how the back surface of the lens relates to the cornea.
Dynamic fit
On an established wearer the way that the lens moves and centres is important but, on a patient new to rigid lenses, the dynamic fit can be misleading. A tense patient is likely to have tighter lids than usual. The tear film will be abnormal both in volume and viscosity as reflex tearing in response to foreign body overlays the normal background tear secretion. For this reason, some authorities advocate the use of a local anaesthetic during the fitting assessment, though their use may make the corneal epithelium a little less resilient and the degree of comfort of the lens cannot be assessed. When lenses are ordered empirically, it is customary to arrange the time to teach the patient how to handle the lenses to follow on from the checking of the fit. Obviously in these circumstances an anaesthetised eye would be dangerous. The tearing may be exacerbated by white light examination on the slit-lamp. If the light is unnecessarily bright even more tearing can take place. It is therefore not surprising that many lenses inserted on patients unused to RGPs move about somewhat enthusiastically. Inexperienced practitioners may conclude from this that the lens is flat fitting.
When observing an RGP lens in these circumstances, it is important not to get too carried away with the fact that the lens has less centration. Provided it stays within the limbus, it will probably get better once the tear film has normalised. If the lens is moving vertically with the blink cycle, it is probably not flat. Flat lenses tend to go sideways, or arc around in a semicircle. Lenses that decentre horizontally are not always flat. Lid geometry can sometimes do this, so it is useful to part the lids with the fingers and see what happens. If the lens does the decent thing and centres up, there is probably little to be gained by changing the central fit. Measures must be taken to reduce the influence of the lids, and that usually involves reducing diameters or thicknesses.
On an adapted patient, the centration and movement of the lens is more representative provided we are not attempting photocoagulation with the slit-lamp. It is a very good idea to use a diffuser when looking at contact lens fit, for both RGP and soft lenses. It spreads the light source, enabling us to see the whole lens evenly illuminated without too much glare for the patient. What we are considering for the most part is how the lens interacts with the lids, because by adjusting the total diameter of the lens, by changing the thickness of the edge or the weight of the lens we can increase or decrease ‘lid hitch’ as required.
Fluorescein assessment of contact lens fit
The relationship between the back surface of the lens and the cornea is investigated by instilling fluorescein into the tear film. This enables us to see a map showing the thickness of the tear layer under the lens. The cobalt blue filter on the slit-lamp causes fluorescence to occur while eliminating wavelengths that have little effect. This reduces veiling glare. In order to improve contrast, a yellow barrier filter may be placed before the observation system, either built in or attached to the observation system of the instrument or as a cardboard-mounted accessory widely available from contact lens manufacturers. This filters out the reflected blue light from the eye and the background fluorescence of the cornea.
Figure 4 Separating the contact lens into two zones; (a) central and (b) mid-peripheral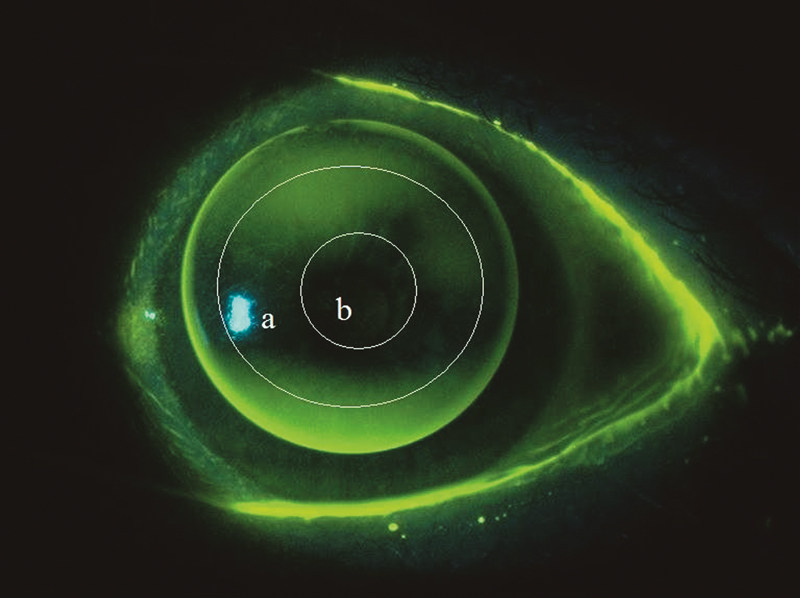
The amount of fluorescence emitted by the fluorescein will depend on tear thickness but it is also proportional to concentration, pH and the amount of light used to irradiate it.
Concentration of the fluorescein affects the minimum thickness of tears that will fluoresce. At higher concentrations even very thin layers, such as those found under an aligned lens, will fluoresce, albeit weakly. As the tears dilute the concentration, the same thickness of tears will produce no detectable green fluorescence. It is still the same tear film though. The absence of fluorescence does not necessarily indicate touch. It just means that the tear layer under the lens is too thin to fluoresce at the current concentration. If in doubt, put some more in and see what happens. However, if the concentration of fluorescein is too high, it may fluoresce rather feebly. This ‘black hole’ effect is due to collisions between molecules resulting in non-fluorescent energy release. The technical term is ‘quenching’. If this happens, the best thing to do is wait a few seconds, resisting the temptation to put even more fluorescein into the eye. See Optician 05.10.18 for more information on fluorescein.
Static Fit
The static fit of the lens consists of two elements, which should be considered separately:
1 The central zone
2 The periphery
It is important to consider the position of the lens on the cornea when assessing the fluorescein pattern. The central curves of the lens are usually designed to align with the central area of the cornea, and this can only be assessed if the lens is centred correctly. On new patients, centration may be poor, and the practitioner may have to control the position of the lens with the patient’s lids. Failure to do this will result in misinterpretation of the fluorescein pattern. The classic error occurs when a flat lens is allowed to drop so that the central zone of the lens is sitting on a more peripheral part of the cornea. In most patients, the peripheral cornea is rather flatter, and the result can be that pooling of fluorescein will occur under the lens. The lens can then be interpreted as steep. This error can prove expensive.
Figure 5 Good peripheral clearance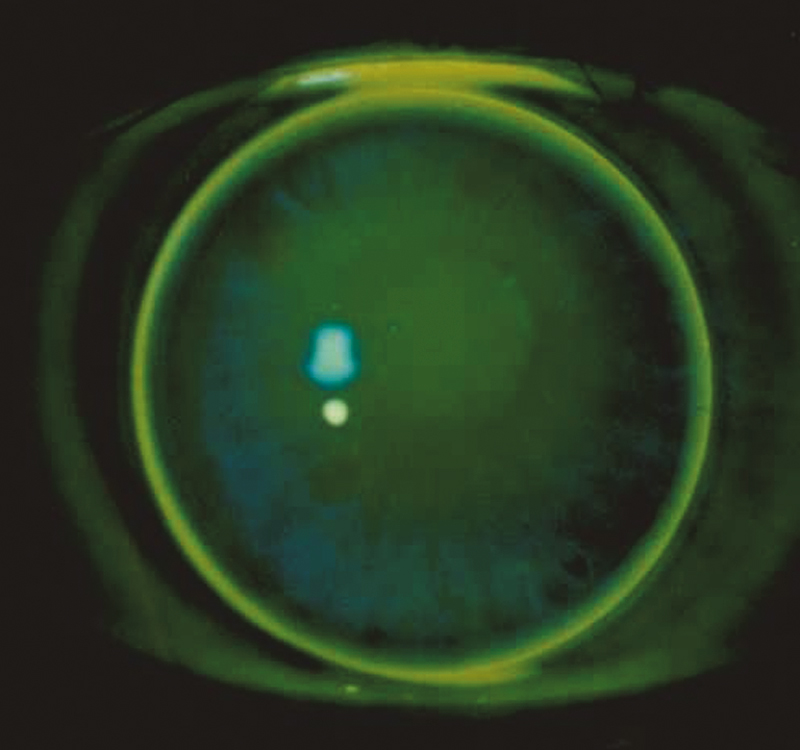
Central fit and alignment
It is the area under the optic portion of the lens that we should consider first, as it influences centration and movement, flexure and oxygen supply. Usually we are aiming for an ‘alignment’ fit. In other words, we want the tear layer to be uniformly thin over as much of the optic zone as possible. We need, therefore, to consider what this looks like. A thin tear film with a high concentration of fluorescein will have a slight greenish glow. As the fluorescein dilutes, that greenish glow will cease. Provided that the periphery allows efficient tear exchange, an aligned lens should go from high concentration to low rather quickly. Therefore, an aligned optic zone will either have a slight greenish glow or none, depending on how much fluorescein you put in and how long ago you put it in. So how do you tell if it is aligned?
The optic zone must be subdivided into two imaginary zones, central and mid-peripheral (figure 4).
To assess the central fit, simply compare the amount of green visible in the two zones:
- If there is more green visible in the central zone than the mid-peripheral one, the lens is steep. As the fit becomes progressively steeper, the diameter of the central green zone contracts, and the contrast between the two zones increases. This is because the tear exchange under the lens is compromised. This also has the effect of prolonging the fluorescein pattern, so a steep lens tends to look the same for minutes on end, rather than the seconds that an aligned pattern may persist.
- If the central area shows no fluorescence but the mid-peripheral zone does, the fit is flat. With increasing flatness, the size of the blue area of ‘touch’ in the centre will contract. It should be remembered that ‘touch’ is a misnomer. A thin tear film is present, but not enough to fluoresce detectably.
An aligned fit should show either a hint of green under the whole optic zone or blue touch. If in doubt, put some more fluorescein in and have another look, when the green glow and its demise should occur in quick succession. However, if the periphery is tight you may not be able to get enough fluorescein under the lens to create a glow even initially. If there is no central glow at any stage, look at the peripheral zone to see if that could be the problem before changing central curves.
The fit should be recorded as aligned, steep or flat with some indication of degree.
Peripheral fit
The degree of edge clearance that a ‘system’ lens will show depends on the design of the lens and the shape factor of the patient’s cornea. It is inadvisable to alter the BOZR and BOZD in order to adjust edge clearance. The parameter to address is edge lift, which with modern computer assisted lathes can be easily varied for any given central zone. In general, good peripheral clearance looks like a band of green 0.5-0.75mm wide under the periphery of the lens (figure 5). If the green band is too narrow, check that it is actually under the lens, as a sealed periphery may show a thin green band around the edge (figure 6).
Figure 6 Too little peripheral clearance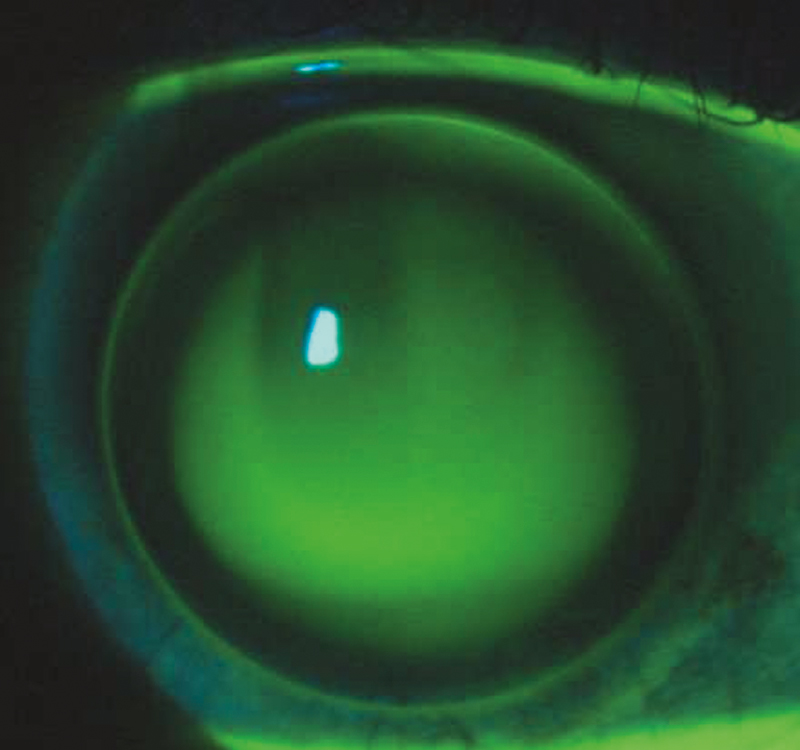
Ideally, the green band should gradually blend into the blue area of ‘touch.’ An abrupt change from green to blue indicates a sharp transition. This can compromise tear exchange and cause corneal trauma and the periphery may need ‘blending’ with intermediate curves.
As discussed in the first article, edge clearance is ultimately required to allow tear exchange under the lens and lens removal. The precise physical dimensions required depend on the oxygen transmission and surface characteristics of the material.
It is worth observing the peripheral fit as the lens moves with blinking and excursions of the eye. Dark areas of touch may appear. These may indicate ‘grounding’ of the lens edge, which may result in physical trauma to the cornea. A tight periphery may also restrict movement of the lens. This can cause the lens to decentre, usually downwards. If the lens tends to decentre, look for peripheral touch on the opposite side to the direction that the lens has decentred.
Astigmatic corneas
Spherical lenses on astigmatic corneas produce a characteristic ‘dumb-bell’ shaped fluorescein pattern. For example, let us consider a cornea that shows ‘with the rule’ astigmatism, that is one where the flatter meridian of the cornea and the negative cylinder axis is roughly horizontal. If we fit a spherical optic zone to align with the flatter horizontal meridian, it follows that the lens will be rather flatter than the cornea’s steeper vertical meridian (figure 7).
Figure 7 Fluorescein pattern indicating a toric cornea
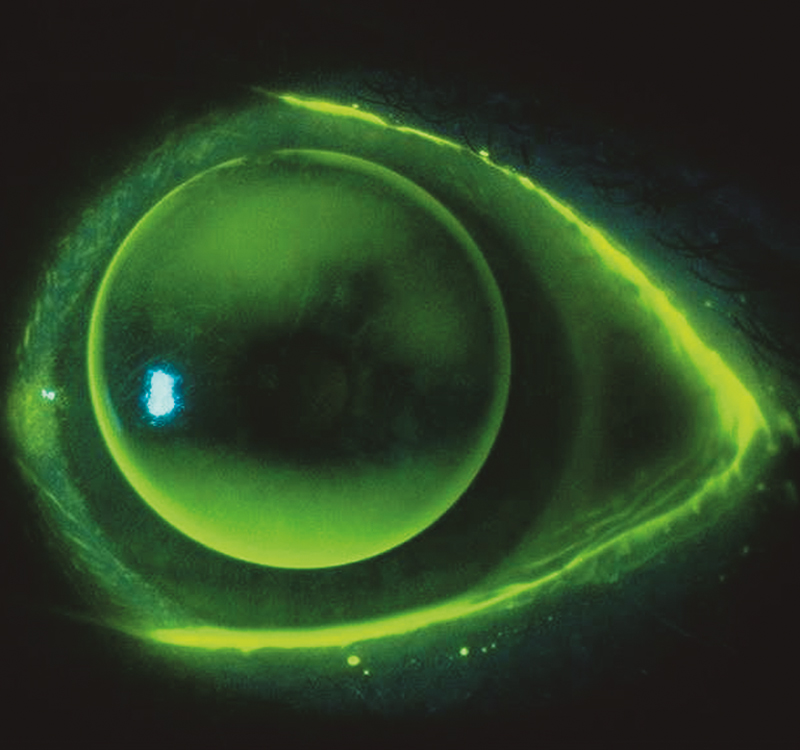
‘Against the rule’ and obliquely astigmatic corneas will produce similar patterns but at a different orientation. The trick to interpreting these patterns is to identify the principal meridians and consider the fluorescein distribution along each of them in turn. This avoids the classic student error, where the lens is pronounced flat as opposed to ‘with the rule aligned’, for example, on the evidence of only one meridian. Further consideration of the fitting of astigmatic corneas will be found in the third and final part of this refresher series. •
Andy Franklin is an optometrist specialised in contact lens practice based in the south-west.