Careful slit lamp examination of the anterior eye is an essential part of contact lens practice. Guidelines from professional bodies, such as the College of Optometrists specify that contact lens practitioners must have a slit lamp microscope.1 The guidance further specifies that the practitioner must carry out a detailed assessment of the anterior eye which might be affected by wearing contact lenses – for example, the cornea, conjunctiva, limbus, lids and tear film. This article will consider how the slit lamp examination should be performed during contact lens fitting in a systematic manner to ensure all relevant information is captured and used to inform contact lens selection.
Technique and Set up
Correct set up of both the slit lamp and the patient is essential for accurate observations.
Instrument focusing
It is essential to focus the slit lamp prior to commencing examination as a slightly out of focus image at low magnification will become indistinguishable once the magnification is increased. The aim is for the microscope to be focused at the same plane as the illumination system, which typically has a fixed focus and cannot be altered. Accurate focusing can be achieved using the focusing rod placed in the pivot hole of the slit lamp, together with a high magnification and a medium width beam.
Eyepieces should be rotated fully anti-clockwise, producing maximum plus, before each eyepiece is focused individually by rotating the eyepiece clockwise, decreasing the plus, until the grainy appearance of the slit beam on the focusing rod is clear. Care should be taken not to rotate the eyepieces further than this point as this will induce accommodation in younger users. When both eyepieces have been focused their separation should be adjusted so as to allow a comfortable and clear binocular view of the focusing rod surface.
Patient position
Before you position your patient, do not forget to clean the slit lamp.
The College of Optometrist’s Guidance for Professional Practice emphasises the importance of clear and effective communication with our patients 2 so it is important to explain to the patient the nature of the examination including what they should expect. It is also advisable to make sure that they are seated comfortably; the examination becomes significantly more difficult if the patient becomes uncomfortable and continually shifts position. Optimal position is achieved when the patient’s head is central on the chin rest, with the outer canthus aligned with the guide on the head rest
Slit lamp routine
A slit lamp routine is something that a practitioner develops over time and can vary according to the patient and their presenting symptoms and history. While the exact order of the examination will vary between practitioners, typically the examination will start with low magnification and diffuse illumination for general observation, with the magnification increasing and more specific illumination techniques employed to view structures in greater detail. Throughout the routine different magnification and illumination techniques are used in order to carefully view different structures of the anterior segment (table 1). These techniques are described in detail by various authors.3-6
Table 1: Summary of structures and conditions viewed at each stage of the slit lamp examination
With practice, practitioners will be able to utilise a combination of viewing techniques to systematically examine the anterior eye to detect abnormalities or issues which may affect contact lens fitting (table 2). A wider or diffuse beam with a low magnification will enable the practitioner a general overview at the same time as providing a greater depth of focus, while narrowing the beam and increasing magnification allows a more detailed observation but with significantly less depth of focus. By continually varying magnification, beam widths and observation techniques different structures can be assessed with accuracy and efficiency.
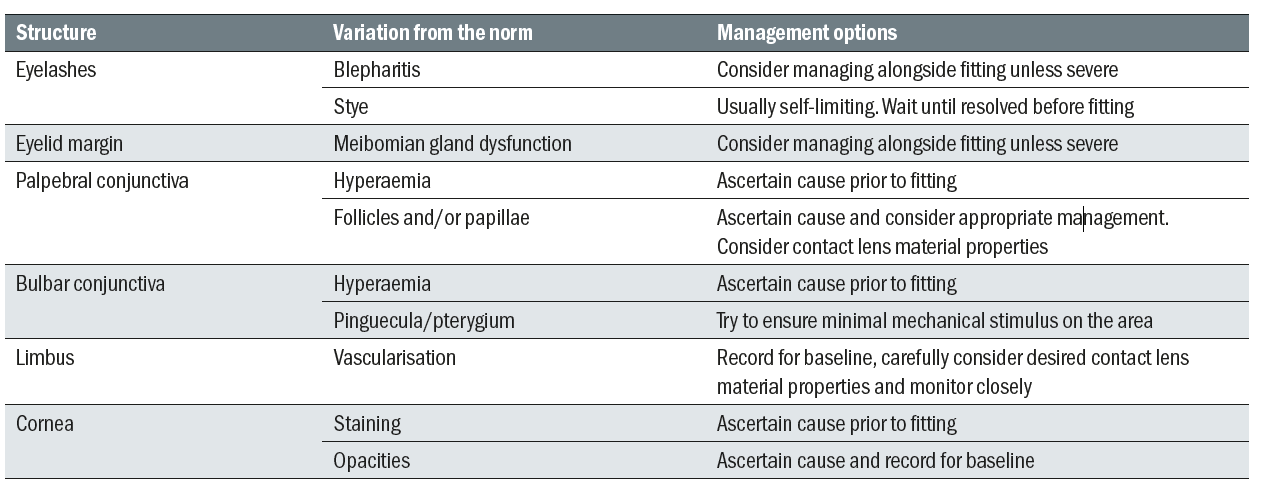
Table 2: Variations from normal that need to be considered in the initial slit lamp examination
Overall view – Low magnification
It is best to begin most examinations with low magnification (6 to 10x) and a wide beam, preferably with diffuse illumination to allow for general observation of the ocular structures (figure 1).
Figure 1: Overview of the ocular adnexa, lids and lashes using 6x magnification and diffuse illumination
Several sweeps across the adnexa should be performed, focusing attention sequentially on different anterior structures. Starting with the lids closed, the lid margins and lashes can be examined for signs of blepharitis or styes. Instructing the patient to open their eyes will allow the upper and lower lid margins to be examined for any signs of meibomian gland dysfunction and to assess the position of the puncta. Patency of the meibomian glands should not be assessed at this stage as expressing lipid into the tear film will affect later tear film evaluations. Assessment of blink patterns can be performed at this stage if this has not already been noted.
Once the lids have been observed, attention and focus should move to the bulbar conjunctiva to assess the level of hyperaemia and the possible presence of any irregularities of the conjunctival surface such as pinguecula or pterygium as these may potentially impact contact lens fit and comfort (figure 2).

Figure 2: Grade 1 pinguecula slit lamp photograph, taken at 10x magnification with diffuse illumination
Tear film examination – Medium to high magnification
With higher magnification (16 to 24x) and a thinner beam (2 to 3mm) tear film quality and quantity can now be assessed. It is important to examine the tear film at this early stage in the slit lamp routine as prolonged exposure to bright light may induce reflex tearing, leading to inaccurate findings. Note should be made of the tear film quality with respect to any debris, eg makeup, presence of any frothing and thickness of the lipid layer by observation of the interference pattern 7 seen with specular reflection (figure 3).
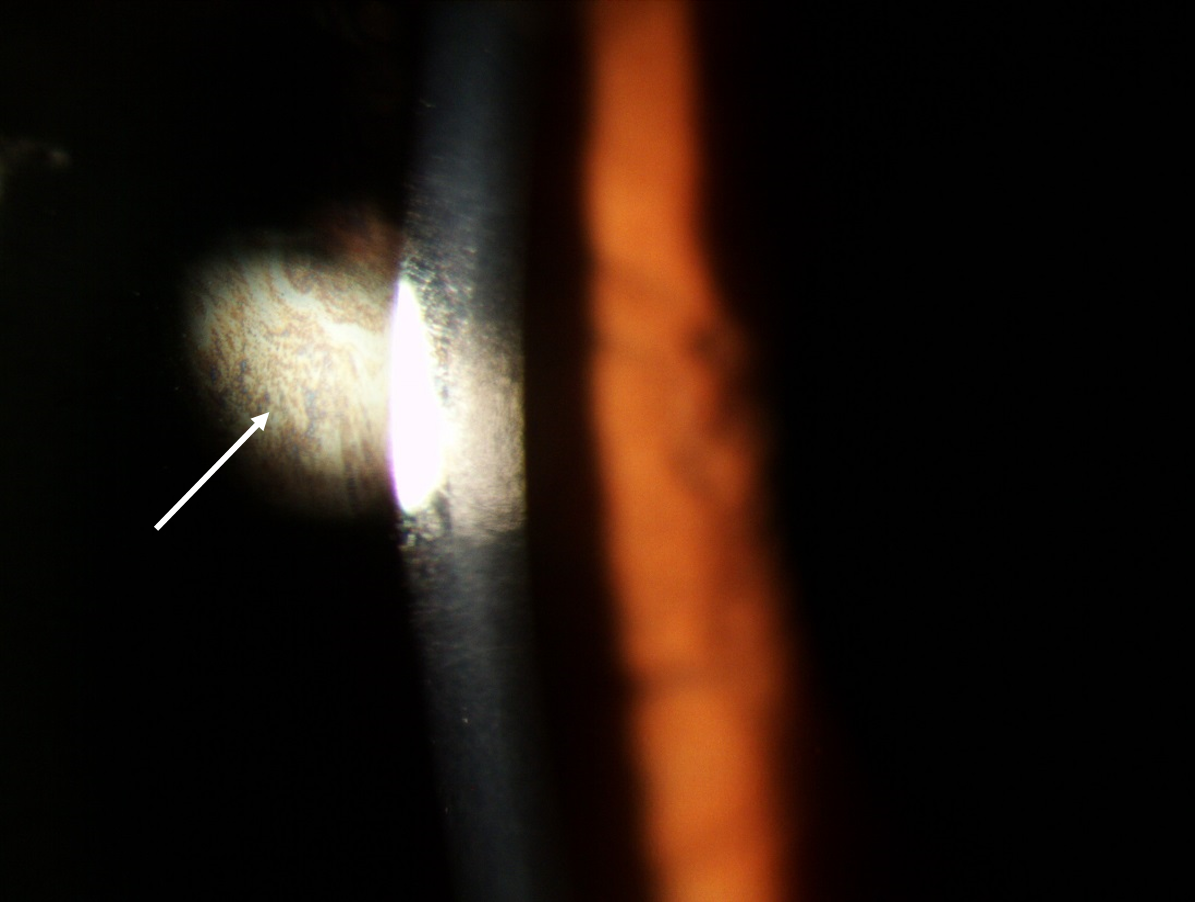
Figure 3: Observation of lipid layer coloured fringes (white arrow) using specular reflection
Tear volume can be measured using a horizontal slit beam and adjusting the slit width to match the tear meniscus height centrally along the lower lid (figure 4).
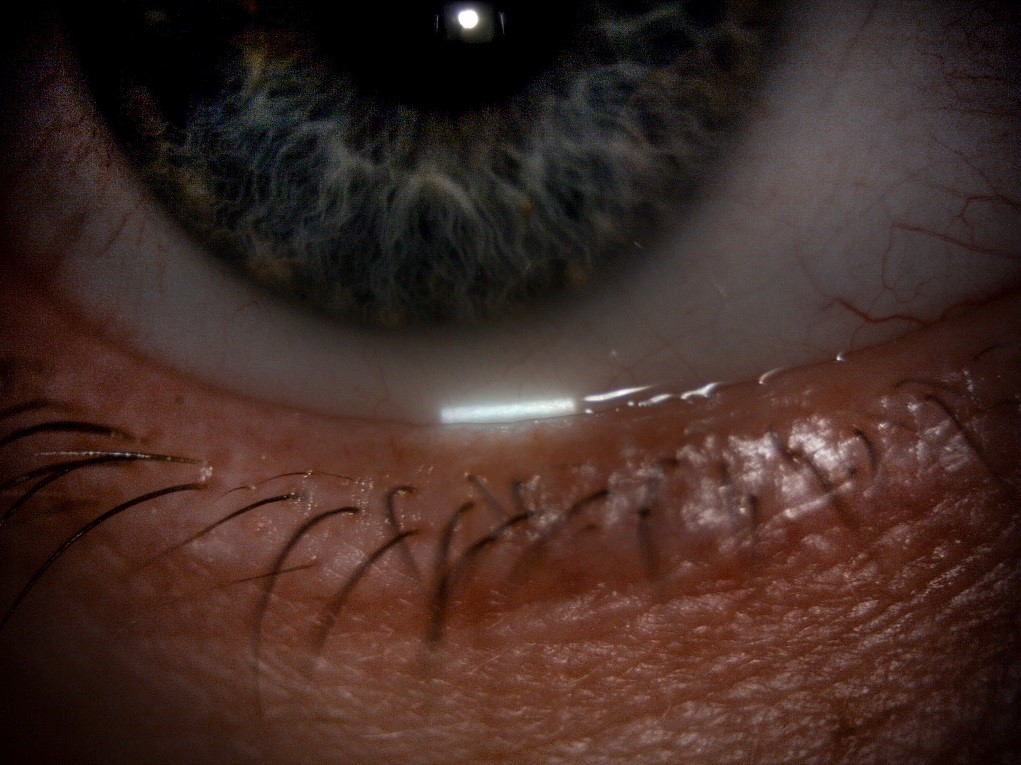
Figure 4: Measurement of tear meniscus height using the slit beam width, with the illumination rotated by 90 degrees
Corneal and limbus examination – medium magnification
Continuing the examination, attention should now move to the cornea and limbus. Some practitioners like to use sclerotic scatter at this stage to check for any corneal opacities or localised corneal oedema. This technique involves decoupling the slit lamp and directing a slit beam of 1-2mm thickness on the temporal limbus at an angle of about 40 to 60 degrees in order to achieve total internal reflection within the cornea. Sclerotic scatter will result in a halo of light around the limbus and the objective is to detect any scatter within the cornea which should appear dark. To enhance the contrast of any light scatter, ambient room lighting should be minimised.
With the slit lamp re-coupled, a narrow beam (1 to 2mm) of medium brightness and approximately 10-16x magnification should be used to examine the cornea, beginning at the limbus and sweeping across the cornea to detect gross abnormalities. Physiological corneal vascularisation (blood vessels overlying clear cornea) should be differentiated from any neovascularisation (new vessels growing into clear cornea). Blood vessels are seen using both direct illumination (figure 5), looking directly at the illuminated area of the cornea, or indirectly, looking to the side of the illuminated cornea, simultaneously. Retro-illumination may also be used whereby vascularisation is viewed by illumination resulting from diffuse scatter coming off the iris and illuminating the vessels from behind. A red-free (green) filter can aid observation of vascularisation. During observation of the limbal region, the presence or absence of peripheral infiltrates should be noted.
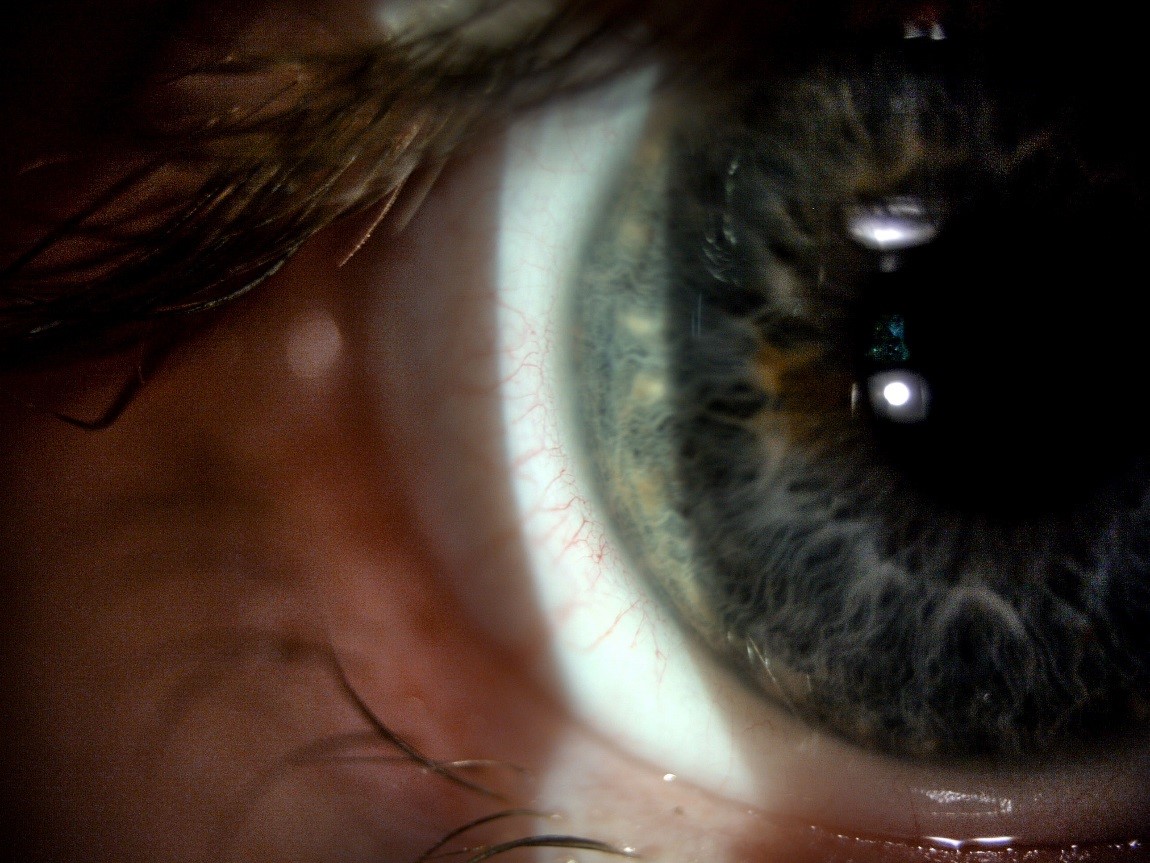
Figure 5: Observation of normal limbal vasculature using medium magnification
Corneal examination – high magnification
After gaining a gross overview of the cornea, the slit width should be reduced to its minimum to allow observation of the cornea in cross section (figure 6).
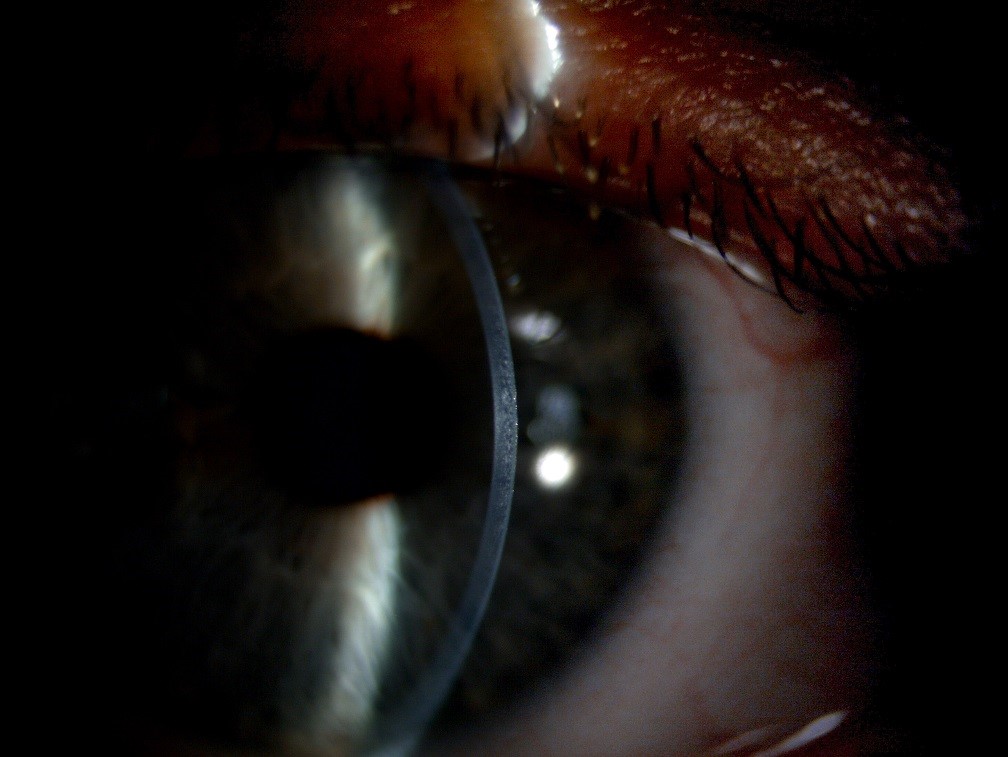
Figure 6: Optical section of the cornea, showing the epithelium, stroma and endothelium
The clarity of the section is determined predominantly by the width of the slit; the thinner the slit the better the quality of the section. With high magnification and illumination, systematically sweep the cornea, taking care not to miss any part. Any opacification should be recorded, with the cross-sectional view allowing the depth to be determined. Though highly unlikely to be seen, especially in a contact lens neophyte, epithelial microcysts, a sign associated with corneal oedema typically secondary to hypoxia, can be observed at this stage by viewing the cornea with direct retro-illumination (figure 7).
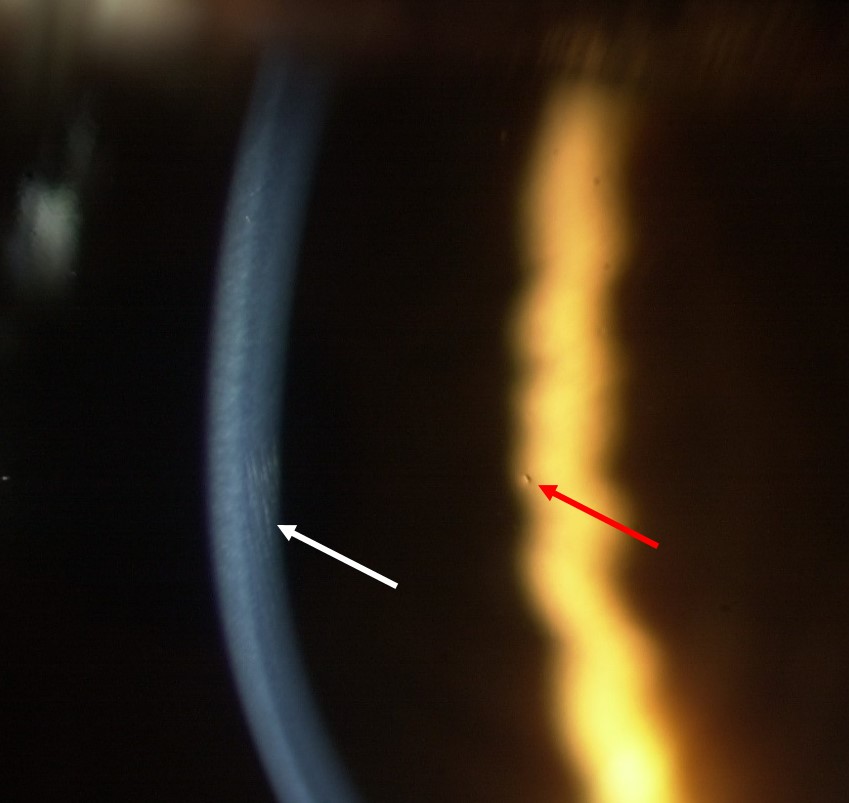
Figure 7: High magnification of the cornea showing simultaneous observation of striae in the optical section under direct illumination and a microcyst by direct, retro-illumination
The final part of the corneal examination is to observe the endothelium using specular reflection. The endothelium will be visible monocularly as a dull patch to the side of the slit beam (figure 8).8
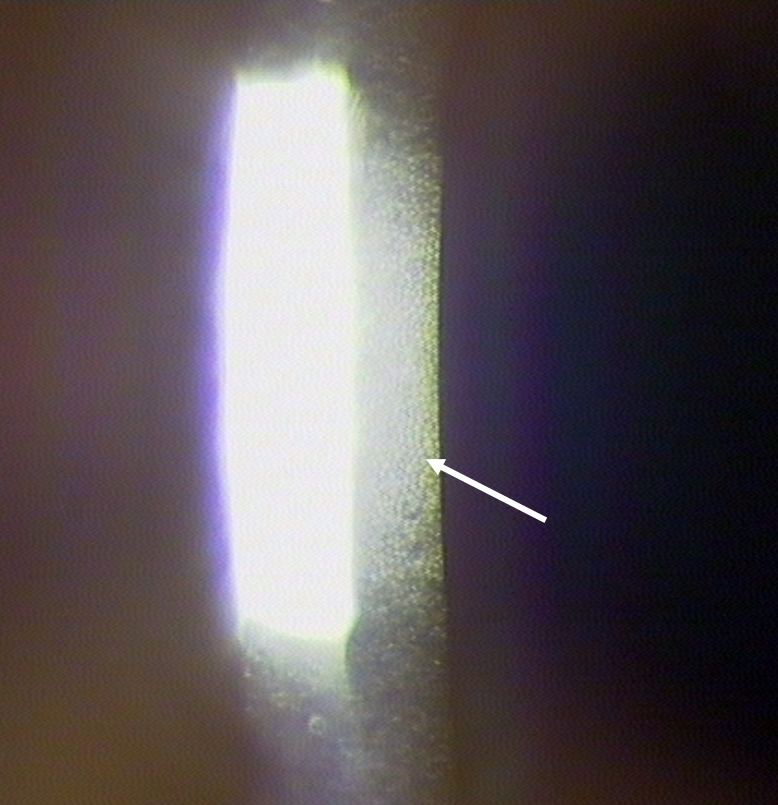
Figure 8: Observation of the endothelium with specular reflection using high magnification. Endothelial cells are seen to the right of the bright reflection, as indicated by the white arrow
With a good slit lamp that has high resolution and magnification it is possible to view individual cells, however, in some cases it is only possible to make a gross clinical judgement. Should more detail be required, a specular microscope needs to be employed. Endothelial polymegathism describes a significant variation of apparent cell sizes; the extent of polymegathism increases throughout life, however, it is important to note any excessive changes outside of expected age-related changes which may be caused by chronic hyopoxia.9 Fortunately, endothelial changes are very rarely seen with modern contact lens materials.
Stains
The most commonly used stain in optometric practice, and critical during contact lens fitting and aftercare is sodium fluorescein. Sodium fluorescein is often referred to as a vital stain but is actually a fluorescent pH indicator that will fluoresce more in an alkali environment. As the deeper layers of the cornea are more alkali, any breach of the epithelium will cause fluorescence or ‘staining’, with the intensity of fluorescence increasing with depth. The appearance of the green fluorescein may be enhanced by filtering out the blue excitation light by placing a yellow barrier filter over the observation system.
Corneal fluorescein staining should be observed using medium magnification, a narrow beam and high illumination, systematically sweeping across the cornea to detect small area of staining with gaze directed up, down and straight ahead (figure 9). The conjunctiva should also be assessed in this way, with any staining noted accurately graded and recorded.
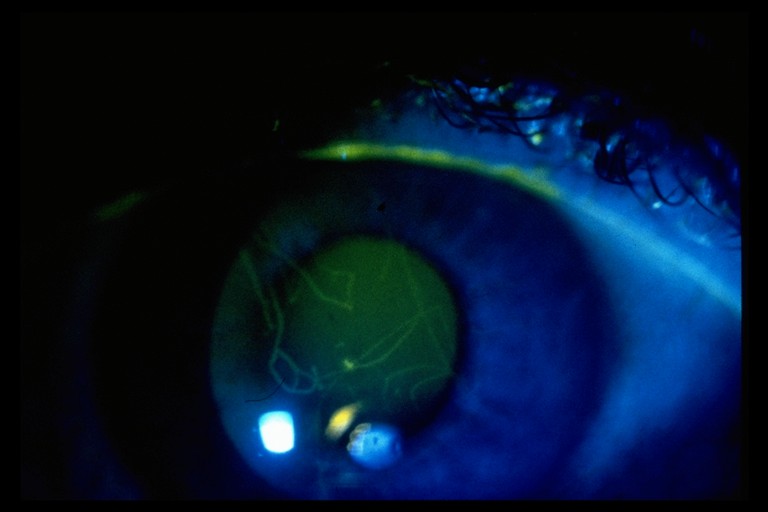
Figure 9: Foreign body stain showing light fluorescence, indicating damage has not breached the epithelium
As well as being useful for examination of corneal and conjunctival integrity, fluorescein can also be used to evaluate the tear film stability and puncta patency. Following instillation, the time taken in seconds after a blink for areas of tear thinning and interruption of fluorescence should be recorded (figure 10). After instillation, sodium fluorescein will usually drain away after a few minutes. This may take a little longer with older patients due to narrowing puncta. It is useful to note if the sodium fluorescein takes longer to clear as it may indicate a blockage in the drainage mechanism.
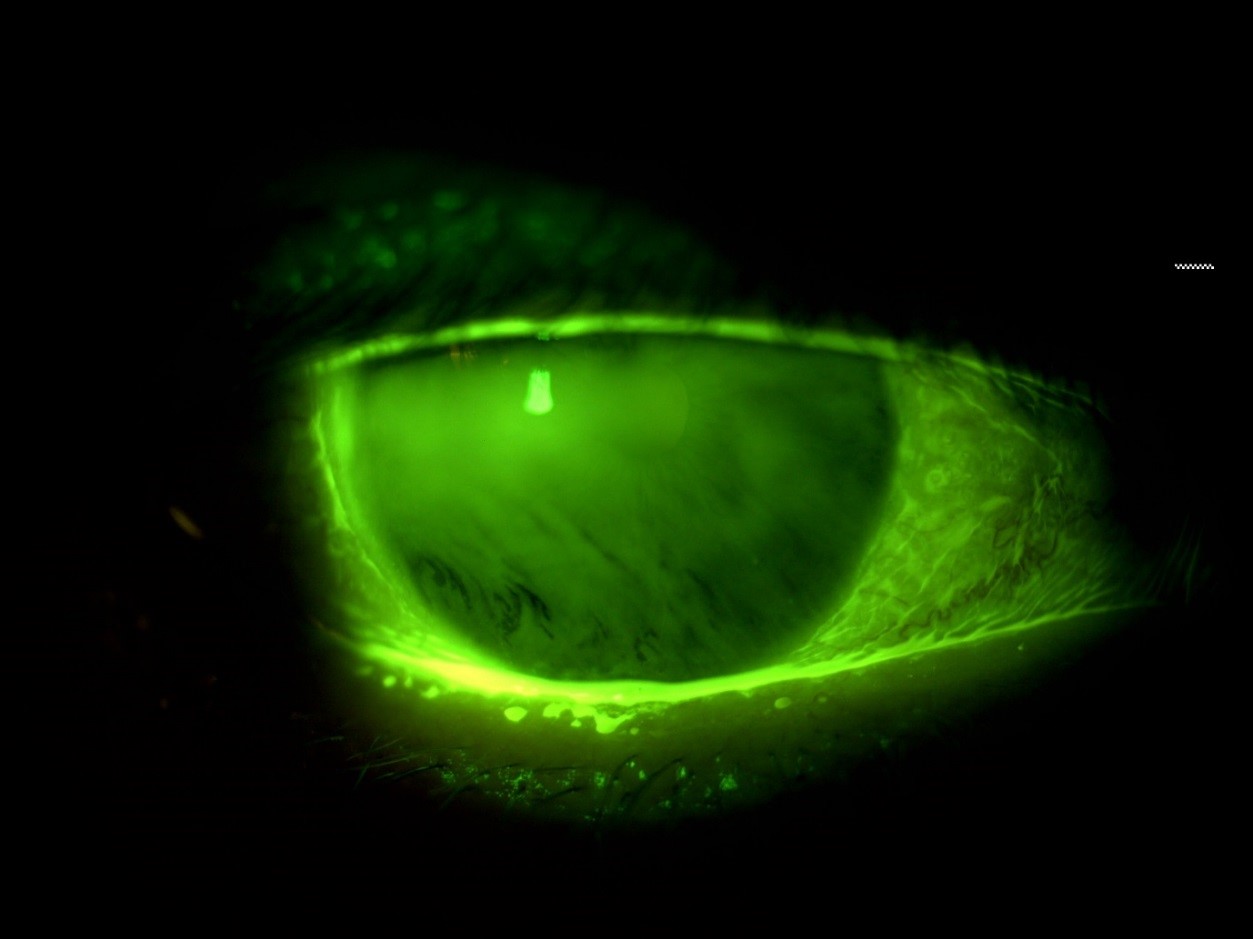
Figure 10: Examination of tear film break up using fluorescein. Break up is seen as the black ‘streaks’ inferiorly
Invasive examination of the lids
With the tear film evaluations complete, the patency of the meibomian glands can also be evaluated by applying gentle pressure to the lid margin to observe and grade any secretions. This is best observed using a diffuse beam with low to medium magnification and using a Meibomian Gland Evaluator (figure 11) to apply standardised pressure to the lid margin.
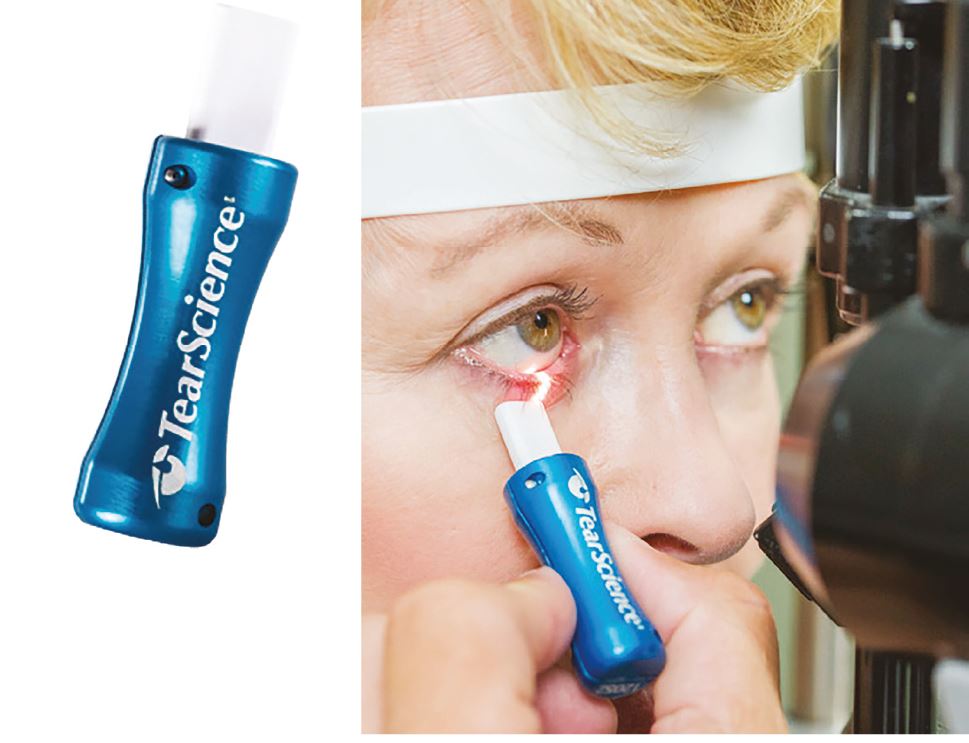
Figure 11: The Meibomian Gland Evaluator (a) used to provide a standardised and repeatable evaluation of meibomian gland function by applying the pressure of a deliberate blink (b)
Using low magnification and a wider beam, lid eversion should now be performed to assess the inferior and superior palpebral conjunctiva for hyperaemia and papillae (figure 12). Any residual fluorescein will pool around the boundary of papillae that might help their visualisation.
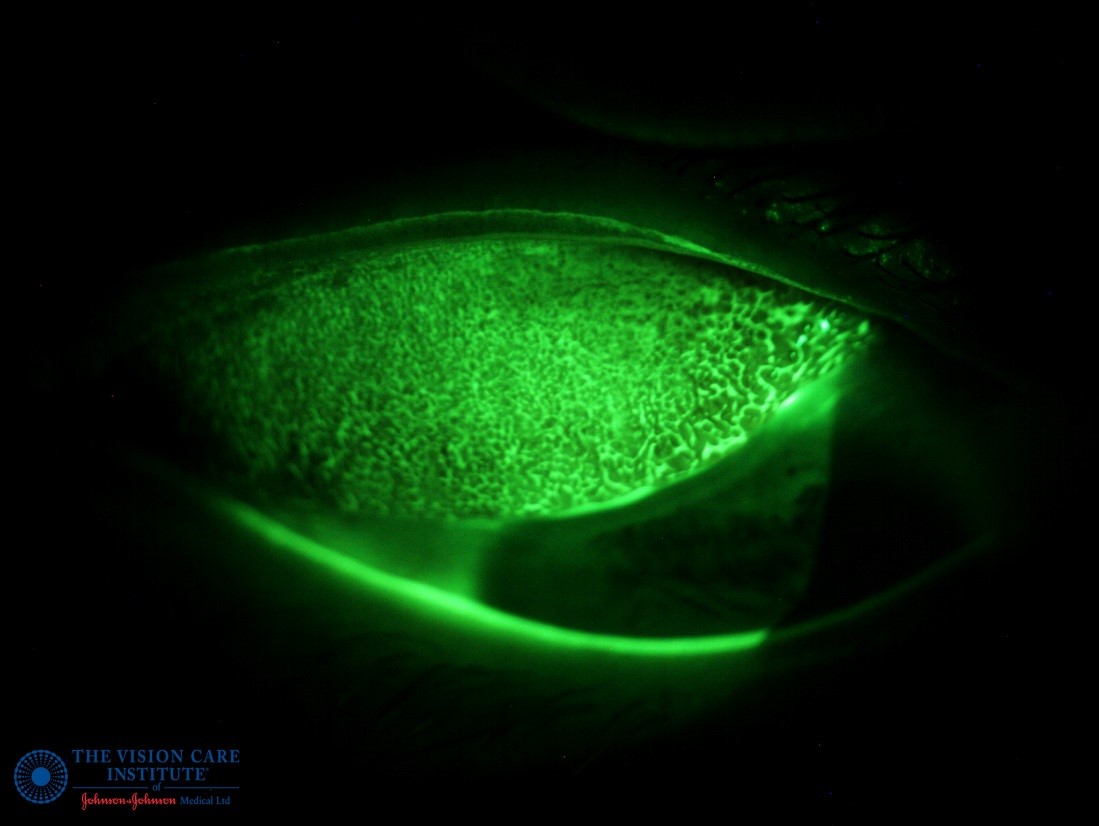
Figure 12: Examination of the super palpebral conjunctiva using fluorescein to enhance visualisation of papillae
Recording results
The accurate and detailed recording of examination findings should not be underestimated; time should be taken to carefully record and quantify what is seen. Where possible grading scales should be used (figure 13).
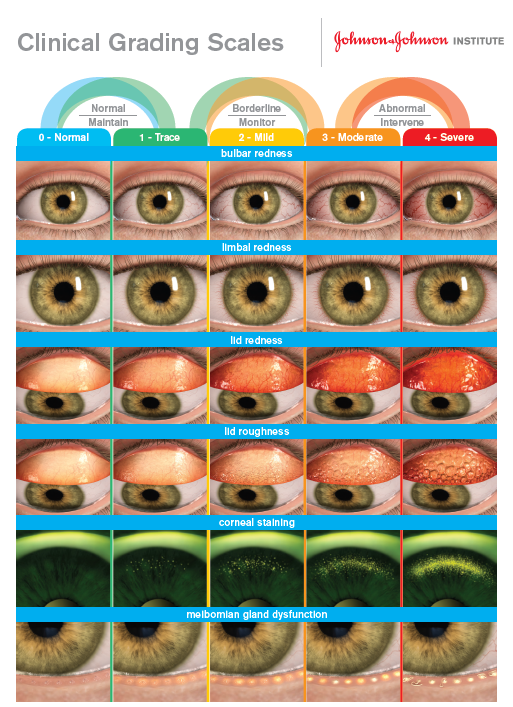
Figure 13: Example grading scale which can be used to record and monitor abnormalities
Table 3 lists structures that can be objectively measured or subjectively graded.
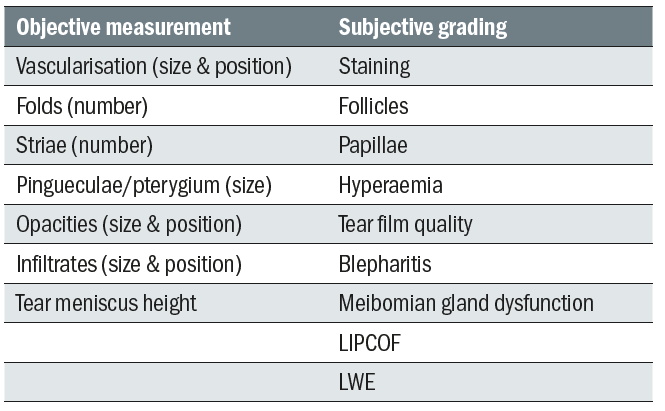
Table 3: Structures and lesions requiring measurement or grading
Grading schemes may be quantitative, eg corneal staining (table 4) or banded according to clinical judgement (table 5).
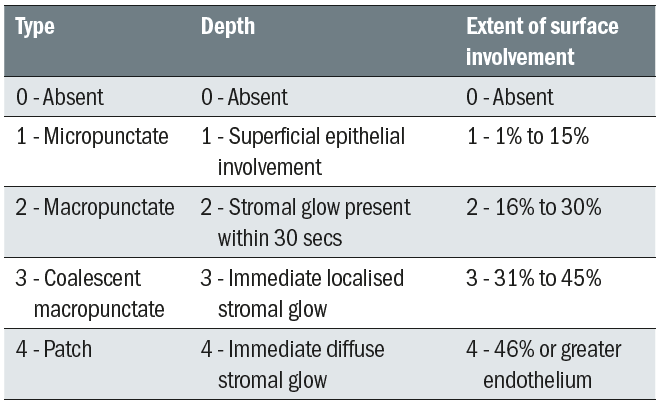
Table 4: The CCLRU grading for corneal staining 10
There are several different grading scales available to practitioners which have been validated for clinical use. While each grading scale has its advantages and disadvantages, it is important the practitioner – and indeed a practice – sticks to (and notes) the use of one system.
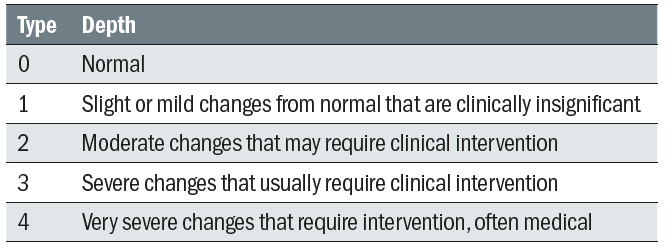
Table 5: US FDA clinical grading
Summary
The slit lamp examination is probably the most important aspect of contact lens practice. It is vital for assessing the potential for contact lens wear and for monitoring the established wearer. The examination must be comprehensive and objectively recorded so that when considered with the patient’s history and symptoms, refraction and any other initial examinations the practitioner can give their patients the best advice and ultimately determine the best lens for the patient’s individual needs thereby fulfilling the GOC Standards of Practice.11
Amanda Davidson is an optometrist and a paid consultant faculty member for the Johnson & Johnson Institute, UK. Dr Rachel Hiscox is a Professional Education & Development Manager, UK & Ireland for Johnson & Johnson Vision Care.
This article is part of a revised and updated ‘Essential Contact Lens Practice’ series, originally authored by Jane Veys, John Meyler and Ian Davies. This article was produced without further input or review from the original authors.
References
- The College of Optometrists. The College of Optometrists Guidance for Professional Practice, 2018. Contact lens equipment and facilities, A286, Page 68
- The College of Optometrists. The College of Optometrists Guidance for Professional Practice, 2018. Partnership with patients, C2, Page 116
- Jones L, Veys J and Bertrand P. Slit- lamp biomicroscopy — how to expand your routine. Optician, 1996 part one 211 (5542):19-22; part two 211 (5545):16-19; part three 211 (5550):30-32
- Chauhan K. The Slit-lamp and its use. Optician, 1999; 217 (5692):24-30
- Brandreth R H. Clinical slit-lamp biomicroscopy. 1978, Blaco, San Leandro.
- McAllister C. Slit lamp biomicroscopy – Part 1. Optician, 2006; 232 (6065):20-27
- Wolffsohn JS et al. TFOS DEWS II Diagnostic Methodology report. Ocul Surf. 2017 Jul;15(3):539-574
- Morris J and Morgan P. The cornea. Part II examination, assessment and measurement. Optician, 1994; 207 (5146):16-21
- Efron N (1996) Contact lens induced endothelial polymegethism. Optician 1996; 212 (5575):20-28
- Terry R et al. The CCLRU standards for daily and extended wear contact lenses. Optom and Vis Sci, 1993; 70 (3):234-243
- General Optical Council. The GOC Standards of Practice for Optometrists and Dispensing Opticians, 2016