A simple observation of spectacle wearers on any high street shows that as an industry, opticians have either lost the ability to carry out the simplest of adjustments, or have failed to educate patients as to when they should return for an adjustment to get the best optical and visual performance from their spectacles. When even the leader of the Labour Party (figure 1) wears spectacles that are so badly fitted it makes headline news, surely, it is time to take note?

Figure 1: Jeremy Corbyn’s ill-fitting frames made national headlines because they were so distracting during his recent leadership debates on national TV (Photo Andy Rain/EPA-EFE/REX/Shutterstock)
It is noticeable when travelling in those European countries where ophthalmic dispensing is more fully regulated and carried out only by registered or qualified opticians that spectacles fit better. Relative to income levels, spectacles are cheaper in the UK, but what is the point of having an accurate refraction and sophisticated high-technology ophthalmic lens if the overall effect is compromised, even a little, by a poorly fitted frame.
Every dispensing optician and optometrist early in their career experiences the patient who cannot read in their new varifocals, and having checked the centres and prescription, is at a loss as to what to do next. A quiet word with a supervisor or other experienced colleague results in them carrying out a 30-second adjustment that elicits ‘that’s it!’ from the patient, and ‘what did you do?’ from the trainee. Most practitioners, and many optical assistants, know that the ‘magic’ adjustment in this case is pantoscopic tilt, but how many understand why? And how many are capable of carrying out this adjustment on the full range of modern frames?
When dispensing, centration distance and heights are routinely measured, but how many practitioners take sufficient measurements to set up the frame prior to collection such that it will fit, more or less perfectly, when the patient arrives? To accomplish this, it is necessary to take some basic measurements at the time of dispense – length to bend, head width and the angles of side necessary to achieve the required pantoscopic angle – and dispensing in this way prevents the selection of frames that cannot be appropriately adjusted in the first place.
The right tools for the job
As practical examiners, the authors often see students who, while competent in making every day adjustments by hand, struggle with the finer adjustments where tools are required. Indeed, many are unable to name the tools presented to them in examinations, let alone describe what they are used for, or demonstrate their competent use.
Many long serving dispensing opticians boast that they can carry out almost any adjustment with nothing more than their bare hands and a frame heater. With experience and the benefit of a self-selected frame range, this may well be true, but there are scarcely any adjustments that cannot be made easier with a high-quality tool that has been designed specifically for the job.
The arthritic fingers and thumbs of veteran dispensing opticians and technicians are testament that reducing the strain they place on their hands is likely to be a good thing over the longer term, and as frame profiles have thickened in recent years, and some adjustments become more difficult, many tool manufacturers have introduced gadgets to aid even the most routine of them.

Figure 2: The Bionic Thumb takes the strain out of adjusting length to bend
Even straightening and re-bending sides has been made much easier with Hilco’s Bionic Thumb (figure 2), Norville’s Temple Tamer (figure 3) and a variety of pliers from several manufacturers. Sides should be adjusted to have a length of drop of 35 to 40mm, with downward and inward angles of drop of around 50 and 20 degrees respectively. Where the length of drop is excessive then the side should be shortened if possible or the frame ordered with shorter sides if available. And failing that, the spectacles should be remade with an appropriately fitting frame. Sadly, many patients, especially children, are seen with frames where the length of drop is excessive, and it reflects poorly on the supervisors, of this legally restricted category of dispensing. Fortunately for them the regulator considers issues relating to the fitness for purpose of spectacles as a consumer issue rather than one of poor standards of professionalism.

Figure 3: The Temple Tamer enables straightening of sides as well as bending to a specific length of drop
Trainee dispensing opticians are required to have certain hand tools as part of their training including: parallel pliers, rimless bracing pliers, side cutters and a variety of flat and round snipe nosed pliers. Over and above these a number of other pliers should be considered indispensable: pad adjusting pliers, pad arm pliers and wide jaw angling pliers to name a few. Wide jaw angling pliers are indispensable for adjusting angle of side (and thereby pantoscopic tilt). Small recesses on the jaws are aligned with the screw head to avoid squashing it and preventing the future use of a screwdriver. Parallel pliers come into their own when a firm grip of a parallel sided frame part is required as they are much less likely to slip than convention pliers whose jaws may be inclined to each other depending on the thickness of the item being gripped. Both parallel pliers and wide jaw angling pliers enable a joint to be supported either side of the hinge so that the frame is bent from the lug rather than the delicate charniers or spring hinge mechanism (see figure 4).
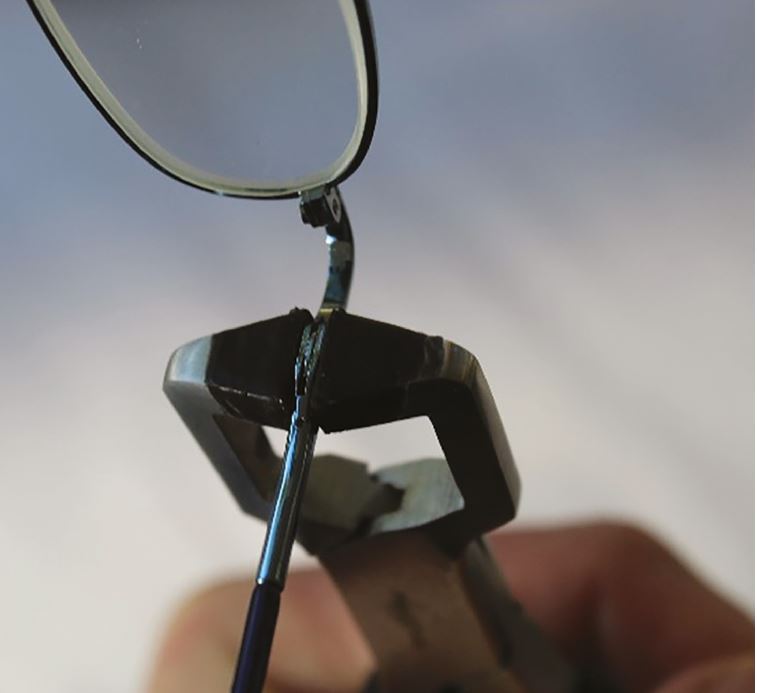
Figure 4: Wide jaw angling pliers. The jaws of this pair have been dipped in Plasticote to aid grip
Standard Alignment
Before learning to adjust frames practitioners must be able to set a frame up straight – so-called standard alignment – where the sides have an angle of let back of approximately 0 to 5 degrees, ie are parallel or very slightly splayed, and the angles of side are equal and around 5 to 10 degrees (depending on style and the position of the joint – the higher the joint the greater the angle of side). The frame should always be placed upside-down on a flat surface when checking to see if it is straight as it is the alignment of the ear-points that is important not the ends of the tips which may vary slightly if the sides are slightly different lengths.
Even when a frame has been selected that fits perfectly ‘off the shelf’ it is still likely to need some readjustment once it has been glazed. Even moderately powered lenses will affect the wrap of the frame significantly. Wrap is also known as bow, face-form angle and dihedral angle and the terms are used interchangeably. Minus lenses have flatter base curves and will often cause the bow of the frame to flatten which in turn has the effect of splaying the sides and increasing the head width, sometimes quite dramatically.
Many practitioners will have had the experience of dispensing prescription sunglasses when strictly speaking a higher base curve is required, and if a standard lens is used the sides are so splayed it is impossible to bring them in sufficiently to achieve a secure fit.
Moderate to high plus lenses can have the opposite effect on the face-form angle, increasing it dramatically and thereby decreasing the let-back (probably making it negative) and producing a head width that is less than the temple width which will result in undue pressure on the side of the head even with spring hinges.
Achieving standard alignment is not therefore as straightforward as it might at first seem. A face-form angle between 0 and 5 degrees is usually appropriate unless it has been otherwise specified (in sports eyewear or tailormade progressives for example). It is possible with most plastic frames to adjust the face-form angle by heating the bridge to the appropriate temperature, gently reshaping it, and holding it in position until it is cool. The frame in figure 5 has a narrow head width that can be increased by flattening the bow of the frame.
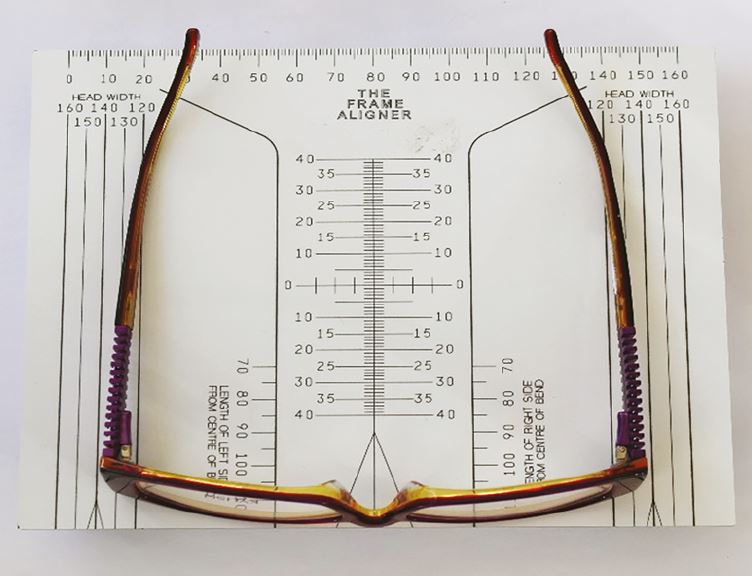
Figure 5: A narrow head width may be increased by flattening the bow of the frame
When heating the bridge of a plastic frame care should be taken to protect the lenses using a cloth or other device to avoid damage to the coating. An alternative method of increasing the let back of sides, that is appropriate when the face form angle is already flat, is to file the butt end of each side or the back plane of the front at an angle so the sides splay a little more. Care must be taken to keep the file level, recognising that metal reinforced sides take a fair amount of effort in order to remove sufficient material whereas it is very easy to go too far on a plastic front.
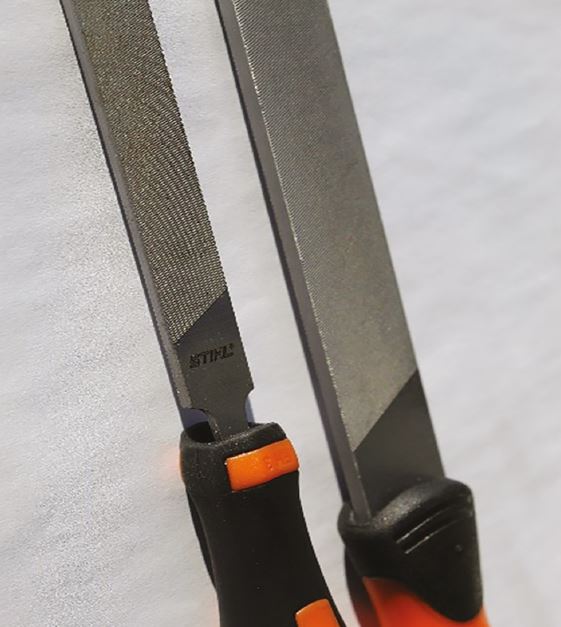
Figure 6: File with a safety edge
Choose files that have a safety edge, one with no teeth on the edge, to avoid damage if the file slips (figure 6) or else be sure to protect the front and sides. Figure 7 shows a ‘B&S Henry’ silicone lens protector (available through Dibble or Hilco) and sticky tape has been applied to the side in readiness for filing.
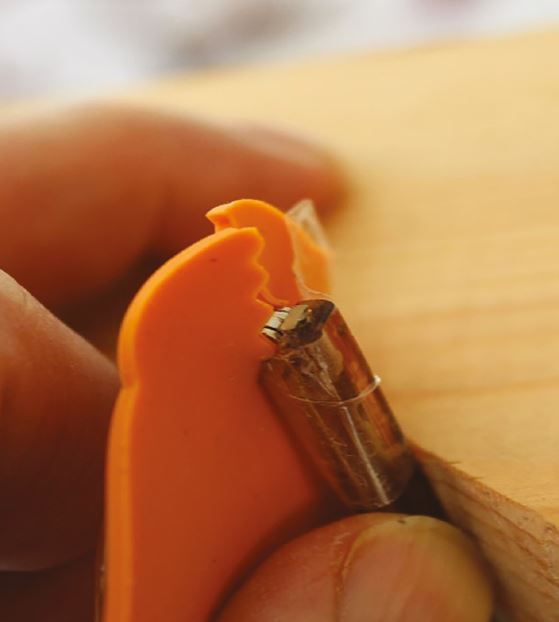
Figure 7: ‘B&S Henry’ silicone lens protector
To reduce the angle of let back, the side should be brought in from the lug. This is straightforward with most metal frames using two pairs of half nylon pliers – one to support the solder and prevent the rim from twisting, the other to affect the adjustment.
Reducing the let back on an acetate frame requires heating the lug and pushing it against a smooth flat surface as in figure 8. Care is necessary to avoid misshaping the lug and (again) lens protection is needed to avoid anti-reflection coatings parting company with the lens when subject to heat. This method is only possible where the lug is substantially thicker than the front. On some acetate frames, especially those with pinned joints where the whole front including the lugs is of uniform thickness, such as the classic RayBan Wayfarer, the only option is to bow the front and bow the sides as much as possible. However, where for example standard minus lenses have been ordered as prescription sunglasses to such a frame, it is unlikely that standard alignment is achievable without ordering lenses on the correct base curve (in this case +6.00DS).
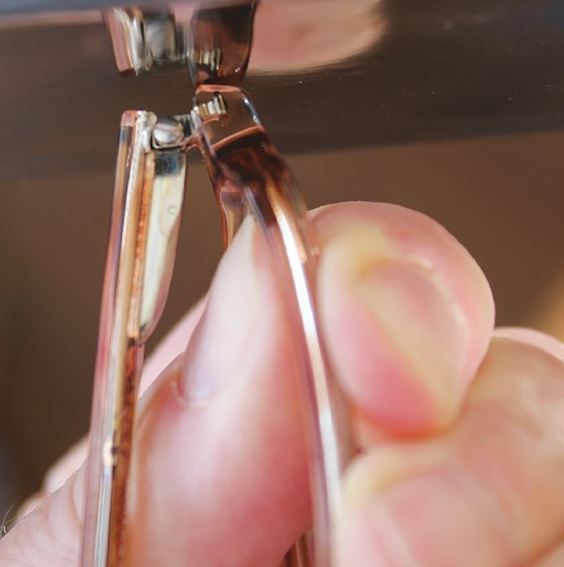
Figure 8: Reducing the let back on an acetate frame
Plastic frames, end tips, etc, usually require heating so they do not crack when adjusted. However, metal parts can be adjusted without heat. Depending on the design it is usually prudent to support the frame by bracing it so that it only bends in the required position and not elsewhere (figure 9), putting strain on solders or spring hinges for example which could easily cause the frame to break.
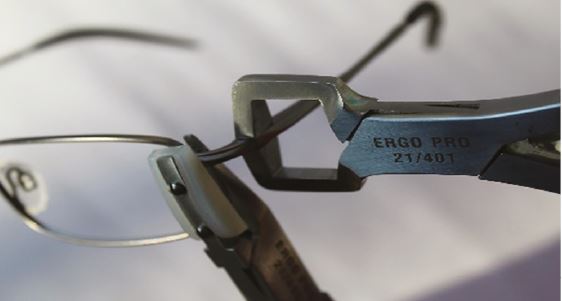
Figure 9: Correct bracing of a frame avoids unwanted bending
With rimless frames the mount should always be supported to avoid breaking the lens. Figure 10 shows plugged rimless bracing pliers, and figure 11 shows bracing pliers suitable for both ‘nut and bolt’ and plugged types, including those with the plugs oriented vertically. Care must be taken with screwed rimless to ensure the bolts are not bent while the lens is being braced.
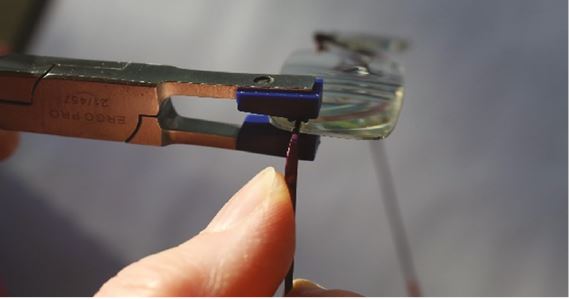
Figure 10: Plugged rimless bracing pliers
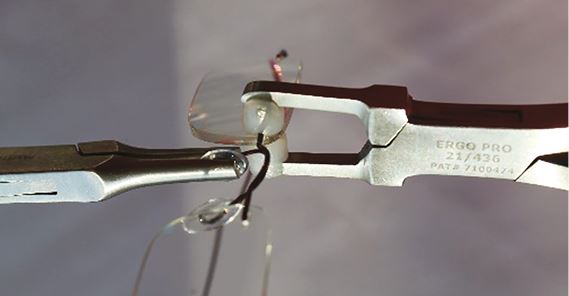
Figure 11: Bracing pliers suitable for both ‘nut and bolt’ and plugged types
Optical effects of poor frame fitting
Misaligned frames are a daily occurrence in practice and can have significant visual consequences. A frame that slips down the nose will cause the effective power of the lenses to be more positive, and while this may be beneficial for reading, it may reduce distance visual acuity significantly. For example, a +16.00D lens that slips 7mm down the nose would render a patient capable of 6/6 visual acuity to have an acuity of just 6/60 and be well outside the legal limit for driving as they would effectively be over-plussed by more than 2.00D.
Frames that slip, or fit further away, can be problematic for even low powered lenses, especially varifocals. Even with identical centration and prescription, if the vertex distance is increased then the field of view, especially for intermediate and near, is significantly decreased, and is a significant cause of complaint. Metal frames with adjustable pads on arms give us the flexibility to change not only heights but also vertex distance by manipulating the nose pads. It is rare to want to increase the vertex distance unless the patient’s lashes are rubbing on the lenses. However, figure 12 shows, in greatly exaggerated form, the difference in vertex distance that could potentially be achieved with some designs of pad arm.
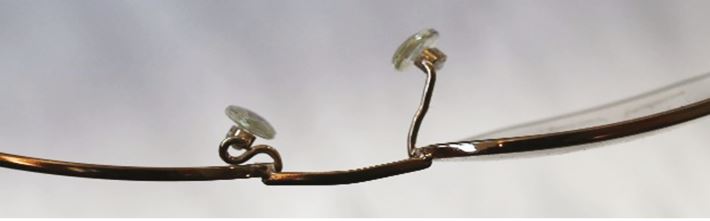
Figure 12: Impact of pad arm design upon back vertex distance
A frame that is no longer level and is higher on one side than the other can induce several problems including differential prismatic effect or the two eyes to be focused at different distances through varifocals. So, in addition to issues of discomfort from a poorly fitting frame, the patient may also experience asthenopia (eye strain), headaches or even diplopia.
Adjustment training is often oversimplified. For example, it is said that ‘if right side is down then the right side should be moved down’, but this is not necessarily correct. It is necessary to check the alignment of the joint where the side meets the front – it might be that the left side needs to go up, rather than the right side down. To carry out one when the other is required will significantly impact the pantoscopic tilt and again could adversely affect the optical performance of the lenses introducing oblique astigmatism when none previously existed.
For tailor-made personalised lenses the pantoscopic tilt needs to be as originally specified, whereas for non-personalised progressives it should be as close to 9 degrees as possible and certainly within the range of 7 to 12 degrees if the lens performance is not to be compromised, especially for near.
In single vision, to be sure of the appropriate pantoscopic tilt, it is also necessary to check the vertical centration – there should be 2 degrees of tilt for every millimetre the optical centre is below pupil centre.
Pantoscopic tilt is an ‘as worn’ measurement and is adjusted by changing the angles of side. The pantoscopic tilt is always the same right and left (unless the bridge is twisted inappropriately) whereas the angles of side are often different right and left if compensating for the fact that many patients have one ear higher than the other.
Pantoscopic tilt must be measured in relation to the vertical plane and requires a gauge that utilises gravity to be sure of this as in figure 13 which shows a pantoscopic angle of 17 degrees that is far too great for conventional non-personalised progressive lenses and would require inappropriate decentration (8.5mm below pupil) in single vision. The challenge here is that the sides are so thick it is not possible to simply bend the half joint to adjust the angle of side. If the butt end of the side is ornate then the only option to change the pantoscopic angle would be to bend the side upwards or downwards at some point around halfway along the side, or to ‘roll’ the side to create a downwards or upwards bow. This can often create cosmetic issues that are not to the satisfaction of the patient, or mean the spectacles no longer fit in their case.

Figure 13: A pantoscopic angle of 17 degrees is far too great for conventional non-personalised progressive lenses
In this case, however, as the sides are relatively plain a reduction in angle of side/pantoscopic tilt can be achieved by filing the side at an angle to allow space for the necessary upward realignment to take place. Figure 14 shows the frame braced ready for filing – random offcuts of wood held in a vice are often useful for this purpose. It would be better to protect the back of the front lens with a silicone lens protector that has been removed here to better show the frame.
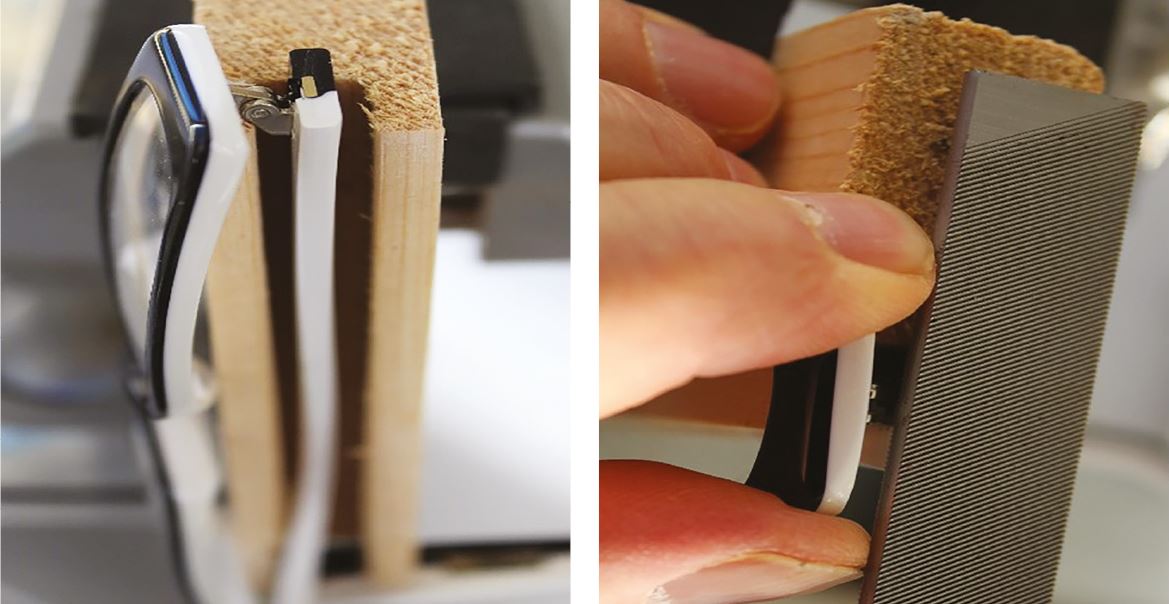
Figure 14: showing use of wood offcuts to ensure adequate frame bracing
Figure 15 shows the extent of the material that has been filed away, the side is now ready for realignment, as shown in figure 16 (note the difference in angle between the left slide and the blurred right side in the background).
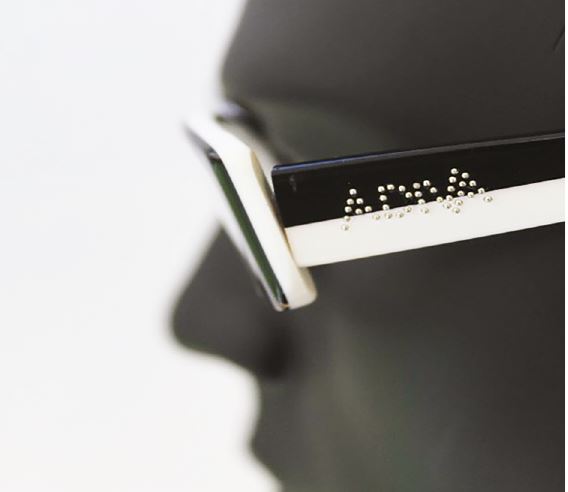
Figure 15: Illustration of the amount of field away material during adjustment
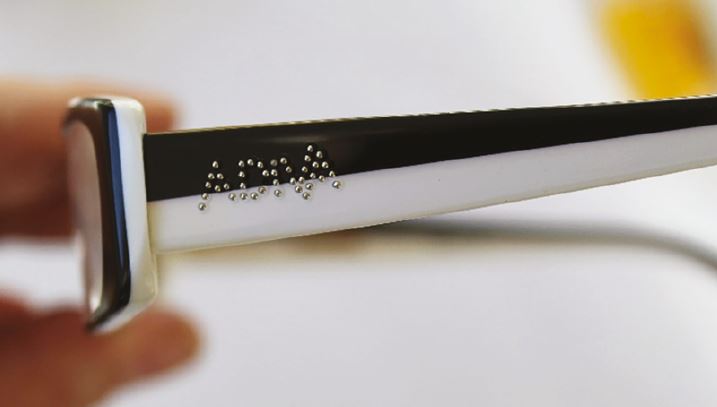
Figure 16: Side of frame ready for alignment
The whole process is repeated with the other side and the frame refitted to its new pantoscopic angle of 9 degrees (figure 17).

Figure 17: Frame refitted at new pantoscopic angle of 9 degrees.
Conclusions
It is difficult within an article of this nature to do justice to the subject of adjustments. There is no substitute for hands on practice with a variety of frame materials and types. Practicing on redundant frames lessens the chance of breaking a patient’s frame and it is essential to be able to correctly identify the frame material at the outset. Most practitioners have broken a lens while adjusting a rimless mount, but usually this is due to a failure to adequately support the mount before making an adjustment. Investing in a wide range of tools and keeping up to date with the latest tools and gadgets by visiting trade shows (such as Optrafair and 100% Optical) can make many everyday tasks much quicker and easier.
Many patients, including no doubt Jeremy Corbyn, are deeply frustrated by the discomfort and compromised vision caused by ill-fitting spectacles. Sadly, the importance of setting up dispensed frames to individual patient specifications at the point of verification is often replaced by just a prescription check on an automated focimeter and the spectacles simply placed in a case awaiting their collection. The first experience for the patient is often disappointment and does nothing to demonstrate the skill set of the optician and is an opportunity lost for the practice as well as the profession.
It is clear from the large number of ill-fitting spectacles seen every day emphasis needs to be placed on getting the basics right first time with the setting up of spectacles given the importance it clearly deserves so that when a patient puts on their spectacles for the first time they fit almost perfectly, and only very minor adjustments are needed to give that perfect fit.
Patients tend to want to all collect their glasses at the same time – after school, last thing before closing, or at the weekend. A benefit of setting frames up to fit first time is that when patients collect their spectacles, not only will they get a better first impression of the finished article, they can be dealt with much more quickly and efficiently. Advertising, marketing and clinical optometric equipment are things opticians now take very seriously allocating significant budgets to these areas, but a well-fitting pair of spectacles is the best advert money can buy and is after all what gives a lasting impression of the practice.
Too many frames fitting like Jeremy Corbyn’s and a practice could find itself out of business no matter how slick its marketing or clinically excellent its optometric services. When it comes to spectacles comfort is king, and adjustments are key.
Peter Black MBA FBDO FEAOO is senior lecturer in ophthalmic dispensing at the University of Central Lancashire, Preston, and is a practical examiner, practice assessor, exam script marker, and past president of the Association of British Dispensing Opticians.
Tina Arbon Black BSc (Hons) FBDO CL is director of accredited CET provider Orbita Black Limited, an ABDO practical examiner, practice assessor and exam script marker, and a distance learning tutor for ABDO College.
Useful reading
- Brookes C and Borish I. System for Ophthalmic Dispensing, 2007, 3rd edition.
- Wilson D and Dara S. Practical Optical Dispensing, 2014, 3rd edition.
- Griffiths A. Practical Dispensing, 2000. ABDO Publications
- Jalie M. Ophthalmic Lenses and Dispensing, 2000, BH.
- Obstfeld H. Spectacle Frames and their Dispensing, 1997, Bailliere Tindall
- Goersch H. Handbook of Ophthalmic Optics, 1991, 2nd edition, Zeiss.
- Eskridge JB. Clinical Procedures in Optometry, 1991, Lippincott Williams and Wilkins