The verifiable accuracy and reproducibility of contact lenses these days has led most of us take for granted the precision with which a whole host of very specific designs are generated, usually at high volumes, from a range of very different materials and with excellent repeatability. The aim of this article is to summarise the main production techniques and so act as a reminder of some underlying differences between commonly prescribed lenses.
Historical Background
Like many others, I have always thought that the contact lens was a concept originally thought up by Leonardo da Vinci circa 1500s and involving dunking your head in a bowl of water. This original idea progressed to various other, seemingly tortuous, devices such as that designed by René Descartes in 1636. This consisted of tubes made from heavy, blown glass attached to the eye with wax. Imagine trying to sell that to your patient!
Thomas Young somewhat improved upon the basic idea by designing an eyecup that was filled with fluid and at least allowed the wearer to blink. Many further designs followed, including those reported by Sir John Herschel, Adolf Eugen Fick, Eugene Kalt and August Miller. These days, some of these designs and claims about them have been contested, but what remains clear is that contact lens design and manufacture has progressed a lot (figure 1).
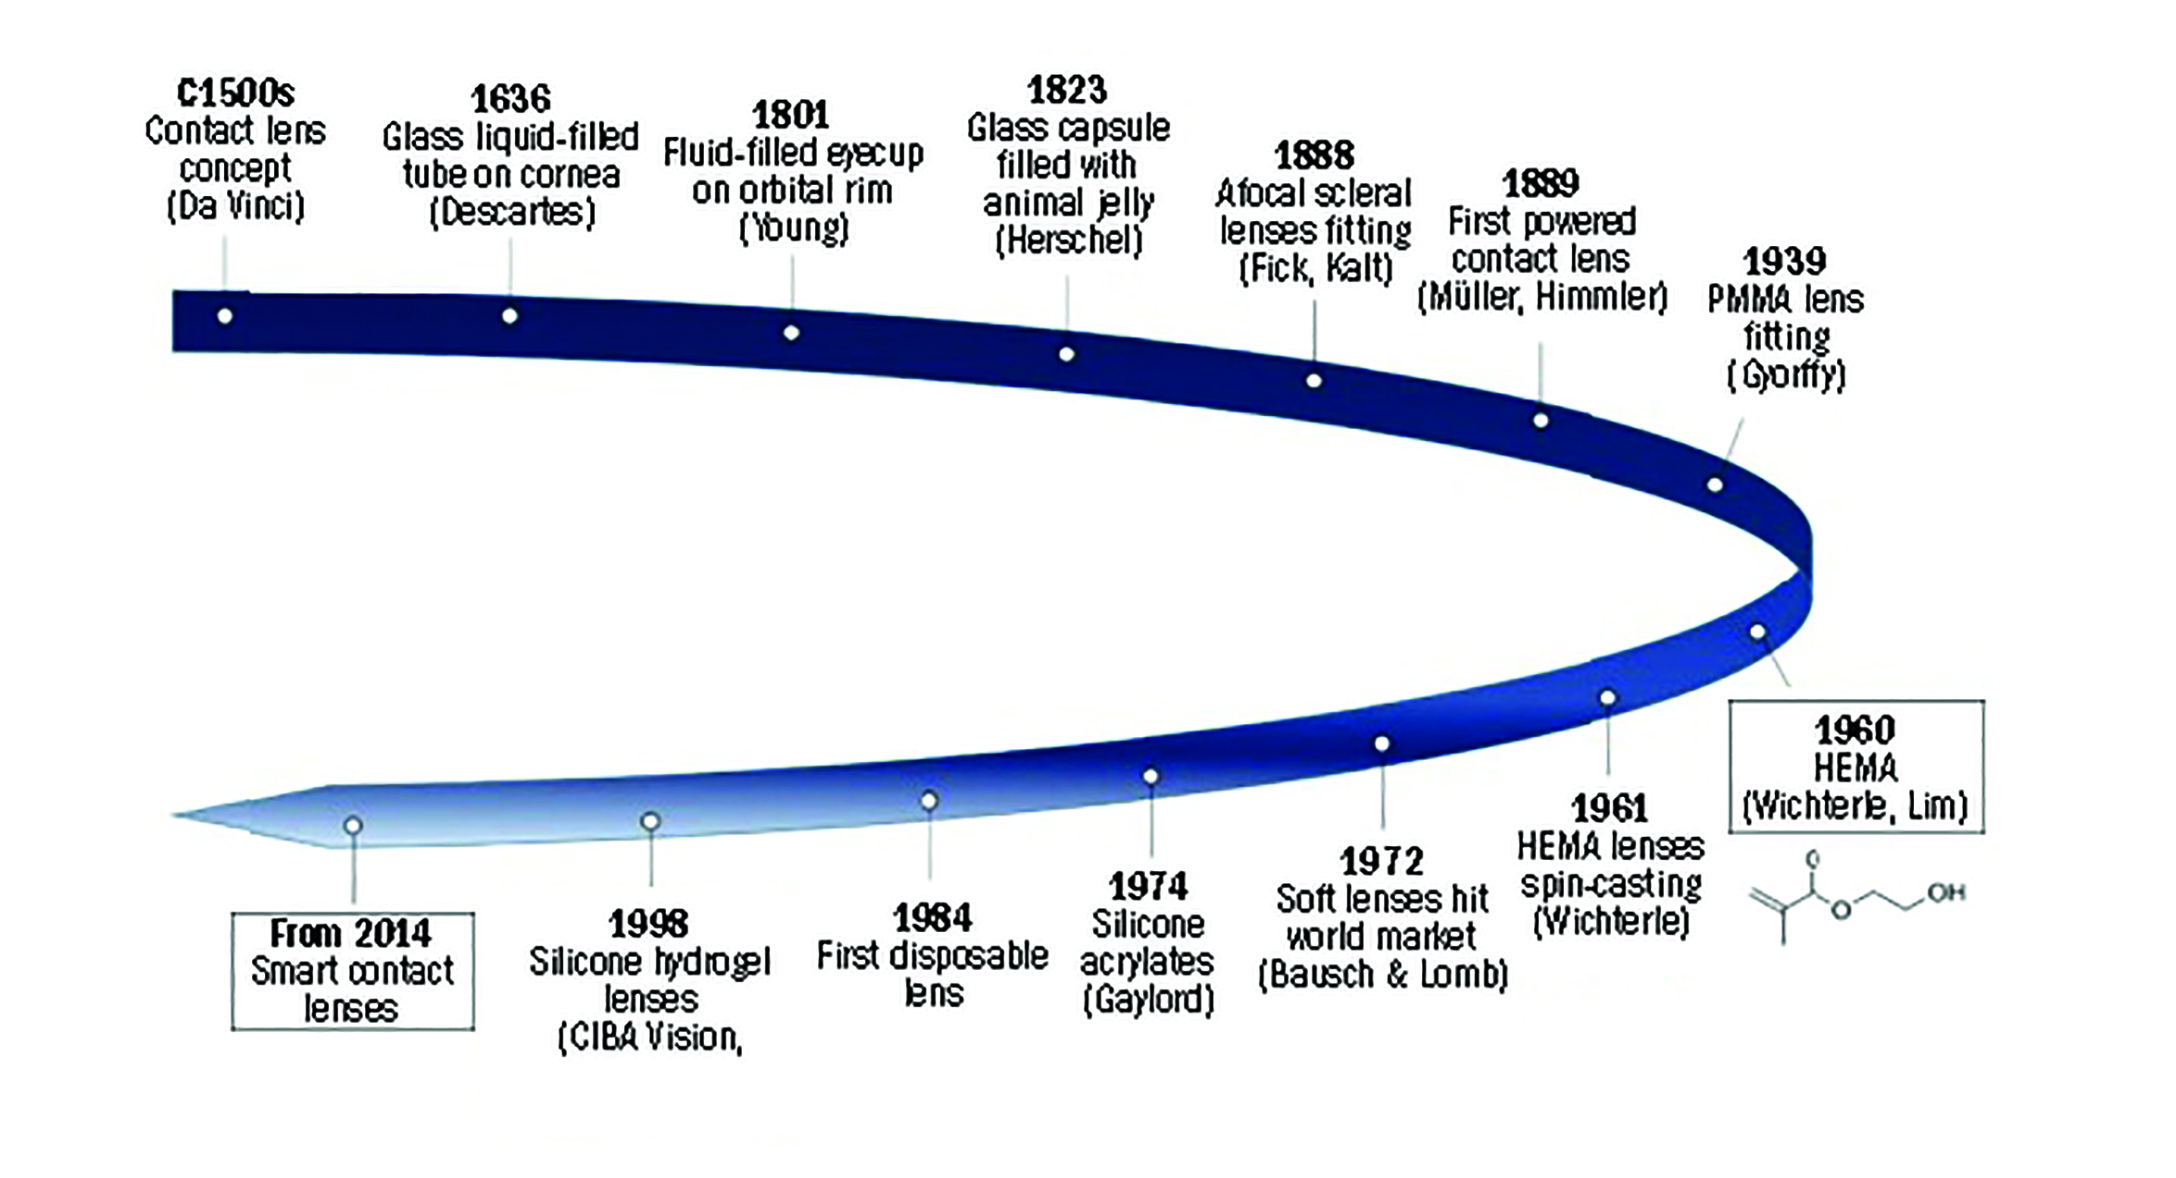 Figure 1: Early developments in contact lens design
Although many people would still squirm at the thought of putting contact lenses into their eyes, the continuing development of both materials, designs and manufacturing over the years has ensured excellent comfort and vision for wearers, making them a life-changing addition to people’s lives. This goes some way to explain the fact that there are more than 3.6 million contact lens wearers in the UK1 and in excess of 140 million wearers estimated worldwide.2
Contact lenses are produced by over 14 manufacturers in the UK alone, alongside over 23 in the USA and many more globally. They all offer a multitude of lens materials, supplied by over six manufacturers, and are mostly produced by one of two methods:
- Lathe-cutting; able to produce both soft and RGP lenses as well as hybrid lenses and prosthetic shells
- Moulding; available for soft lenses
Table 1 summarises the main methods of manufacture.
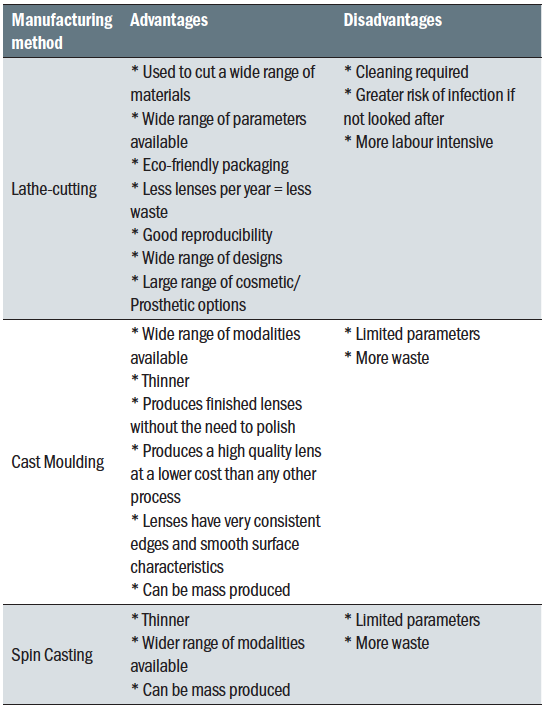 Table 1: Advantages and disadvantages of methods of contact lens manufacture
Lathe-Cutting
In the 1930s, a major breakthrough was made in the history of contact lenses. Polymethyl methacrylate (PMMA) was synthesised and found to be a material that was both easy to fabricate with lathes, as well as being lightweight and inert to the eye.
These first PMMA lenses were lathe-cut as scleral lenses and it was not until the late 1940s that corneal lenses were introduced. These lenses were still made with a flat surface, so comfort was not a consideration until 1950 when George Butterfield thankfully added a curved surface to the designs.
Lenses were still thick, but in the late 1950s Frank Dickinson, Wilhelm Söhnjes and John Neil created thinner lenses, bringing the centre thickness down to 0.20mm, and in the 1960s further improvements were made to make them thinner again. However, one problem that remained was the lack of oxygen passing through the lens. Some of us may cringe at the recollection of PMMA wearers we have seen over the years, while others will remember how many of their long-term hard lens wearers got on so well for so long, and the rest will, thankfully, only read about PMMA in historical accounts.
During the 1950s, Professor Otto Wichterle took another great step forward in the development of contact lenses by developing hydroxyethyl methacrylate (HEMA). Alongside Dr Robert Morrison, he was then able to lathe-cut contact lenses made from this soft material providing a much more comfortable and biocompatible lens; and, at last, a lens that provided some route for oxygen to reach the eye under the lens. Since then, developments in manufacture have been ongoing but lathe-cutting still remains a much-needed method of manufacturing. Figure 2 shows a flow chart summarising the key steps in the process.
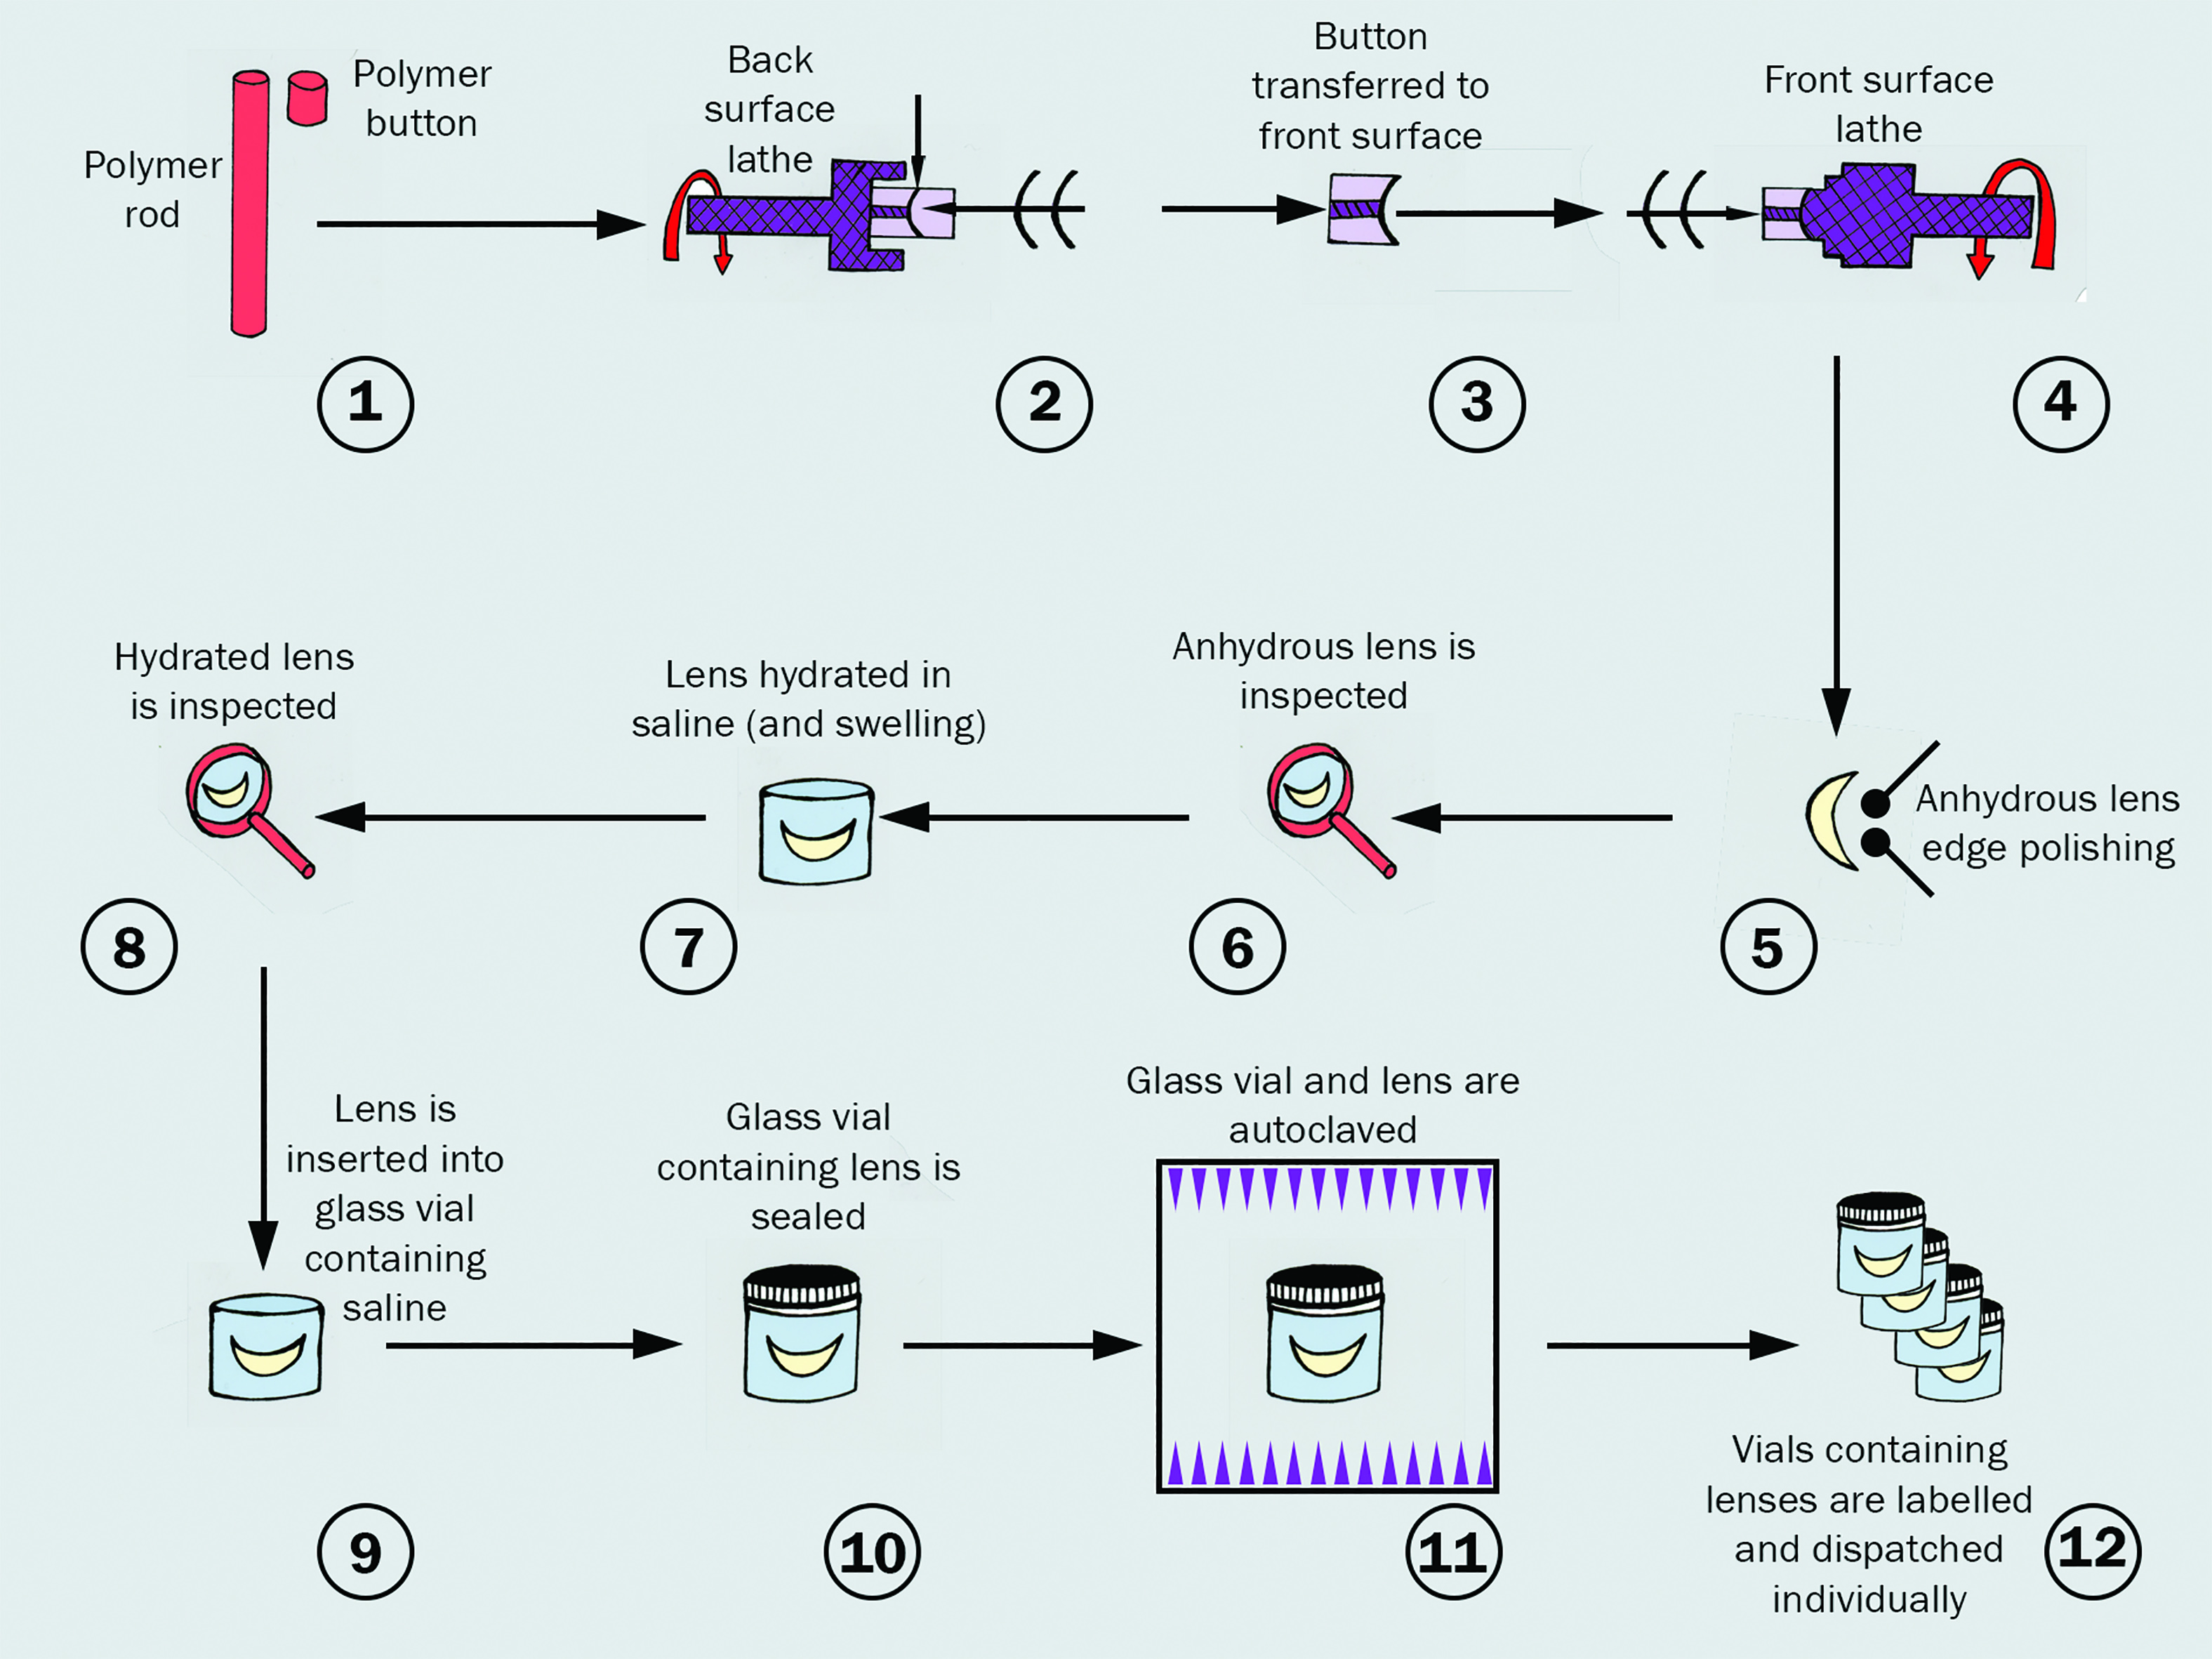 Figure 2: Flow chart of the key steps in the lathe cutting process of contact lens manufacture
Polymerisation
Each contact lens starts its journey as a list of ingredients that have been put together by scientists, mixing different combinations until the perfect recipe is obtained. Each recipe for each different material has different ingredients, and just like those scientists I am a sucker for following a recipe when it comes to baking, although I do know many people who can just throw it all in and get very tasty results, I like to stick with the science that someone has already worked hard to obtain the perfect results.
A lathe-cut contact lens, whether it be soft, RGP or hybrid, has not only a list of ingredients but a method that must be followed to ensure a perfect bake. Just as different flavoured cakes have different ingredients, the finished lens will depend on which ingredients are required, for example PMMA and HEMA lenses only have one main ingredient, whereas modern RGP and soft materials can have up to 12 different ingredients, or monomers. A monomer is a single molecule that can form chemical bonds with others to form a larger compound or polymer.
All the monomers are mixed together (figure 3), before adding the final ingredient of an initiator. The initiator represents a source of any chemical species that reacts with a monomer to form an intermediate compound capable of linking successively with a large number of other monomers to eventually form a polymeric compound. This is known as polymerisation.
 Figure 3: Monomer liquid and initiator before being poured into the rod moulds which are then put into vats where, at controlled temperature, the polymerisation takes place (image courtesy of Contamac)
The mixture is poured into rod shaped moulds, which are filled almost to the top, sealed and then put into vats. It is a slightly longer cooking process than a cake, but it is still cooked by a process of carefully controlled temperature in the vats which starts the polymerisation. The rods can stay in the baths for up to four days, with the temperature being maintained 24 hours a day, and just like an overbaked cake, it comes out solid.
The solid rods are removed from the mould and placed into vacuum ovens for 48 hours. This melts the rods, turning them into liquid form again, which allows any stress tension that has built up within the rod to dissipate before they solidify again.
Lathing
The lathing process then begins as the rods are placed into lathes and cut into buttons. A lathe is a machine which is used for shaping a piece of material, in this case plastic, it does this by rotating rapidly along its axis by pressing a fixed cutting tool against it. When contact lenses were originally invented, the lathes were all operated manually. Manual lathes are still used today in the contact lens world, especially for more complex or distinct designs such as prosthetic shells. However, most modern contact lens lathes, such as those made by Optoform (figure 4), are automated two axis machines which use air-bearing spindles and slide to ensure a smooth, polish-free surface. The buttons are cut to various sizes depending on material and the final lens design. They are then despatched to contact lens manufacturers who carry out the next part of the process.
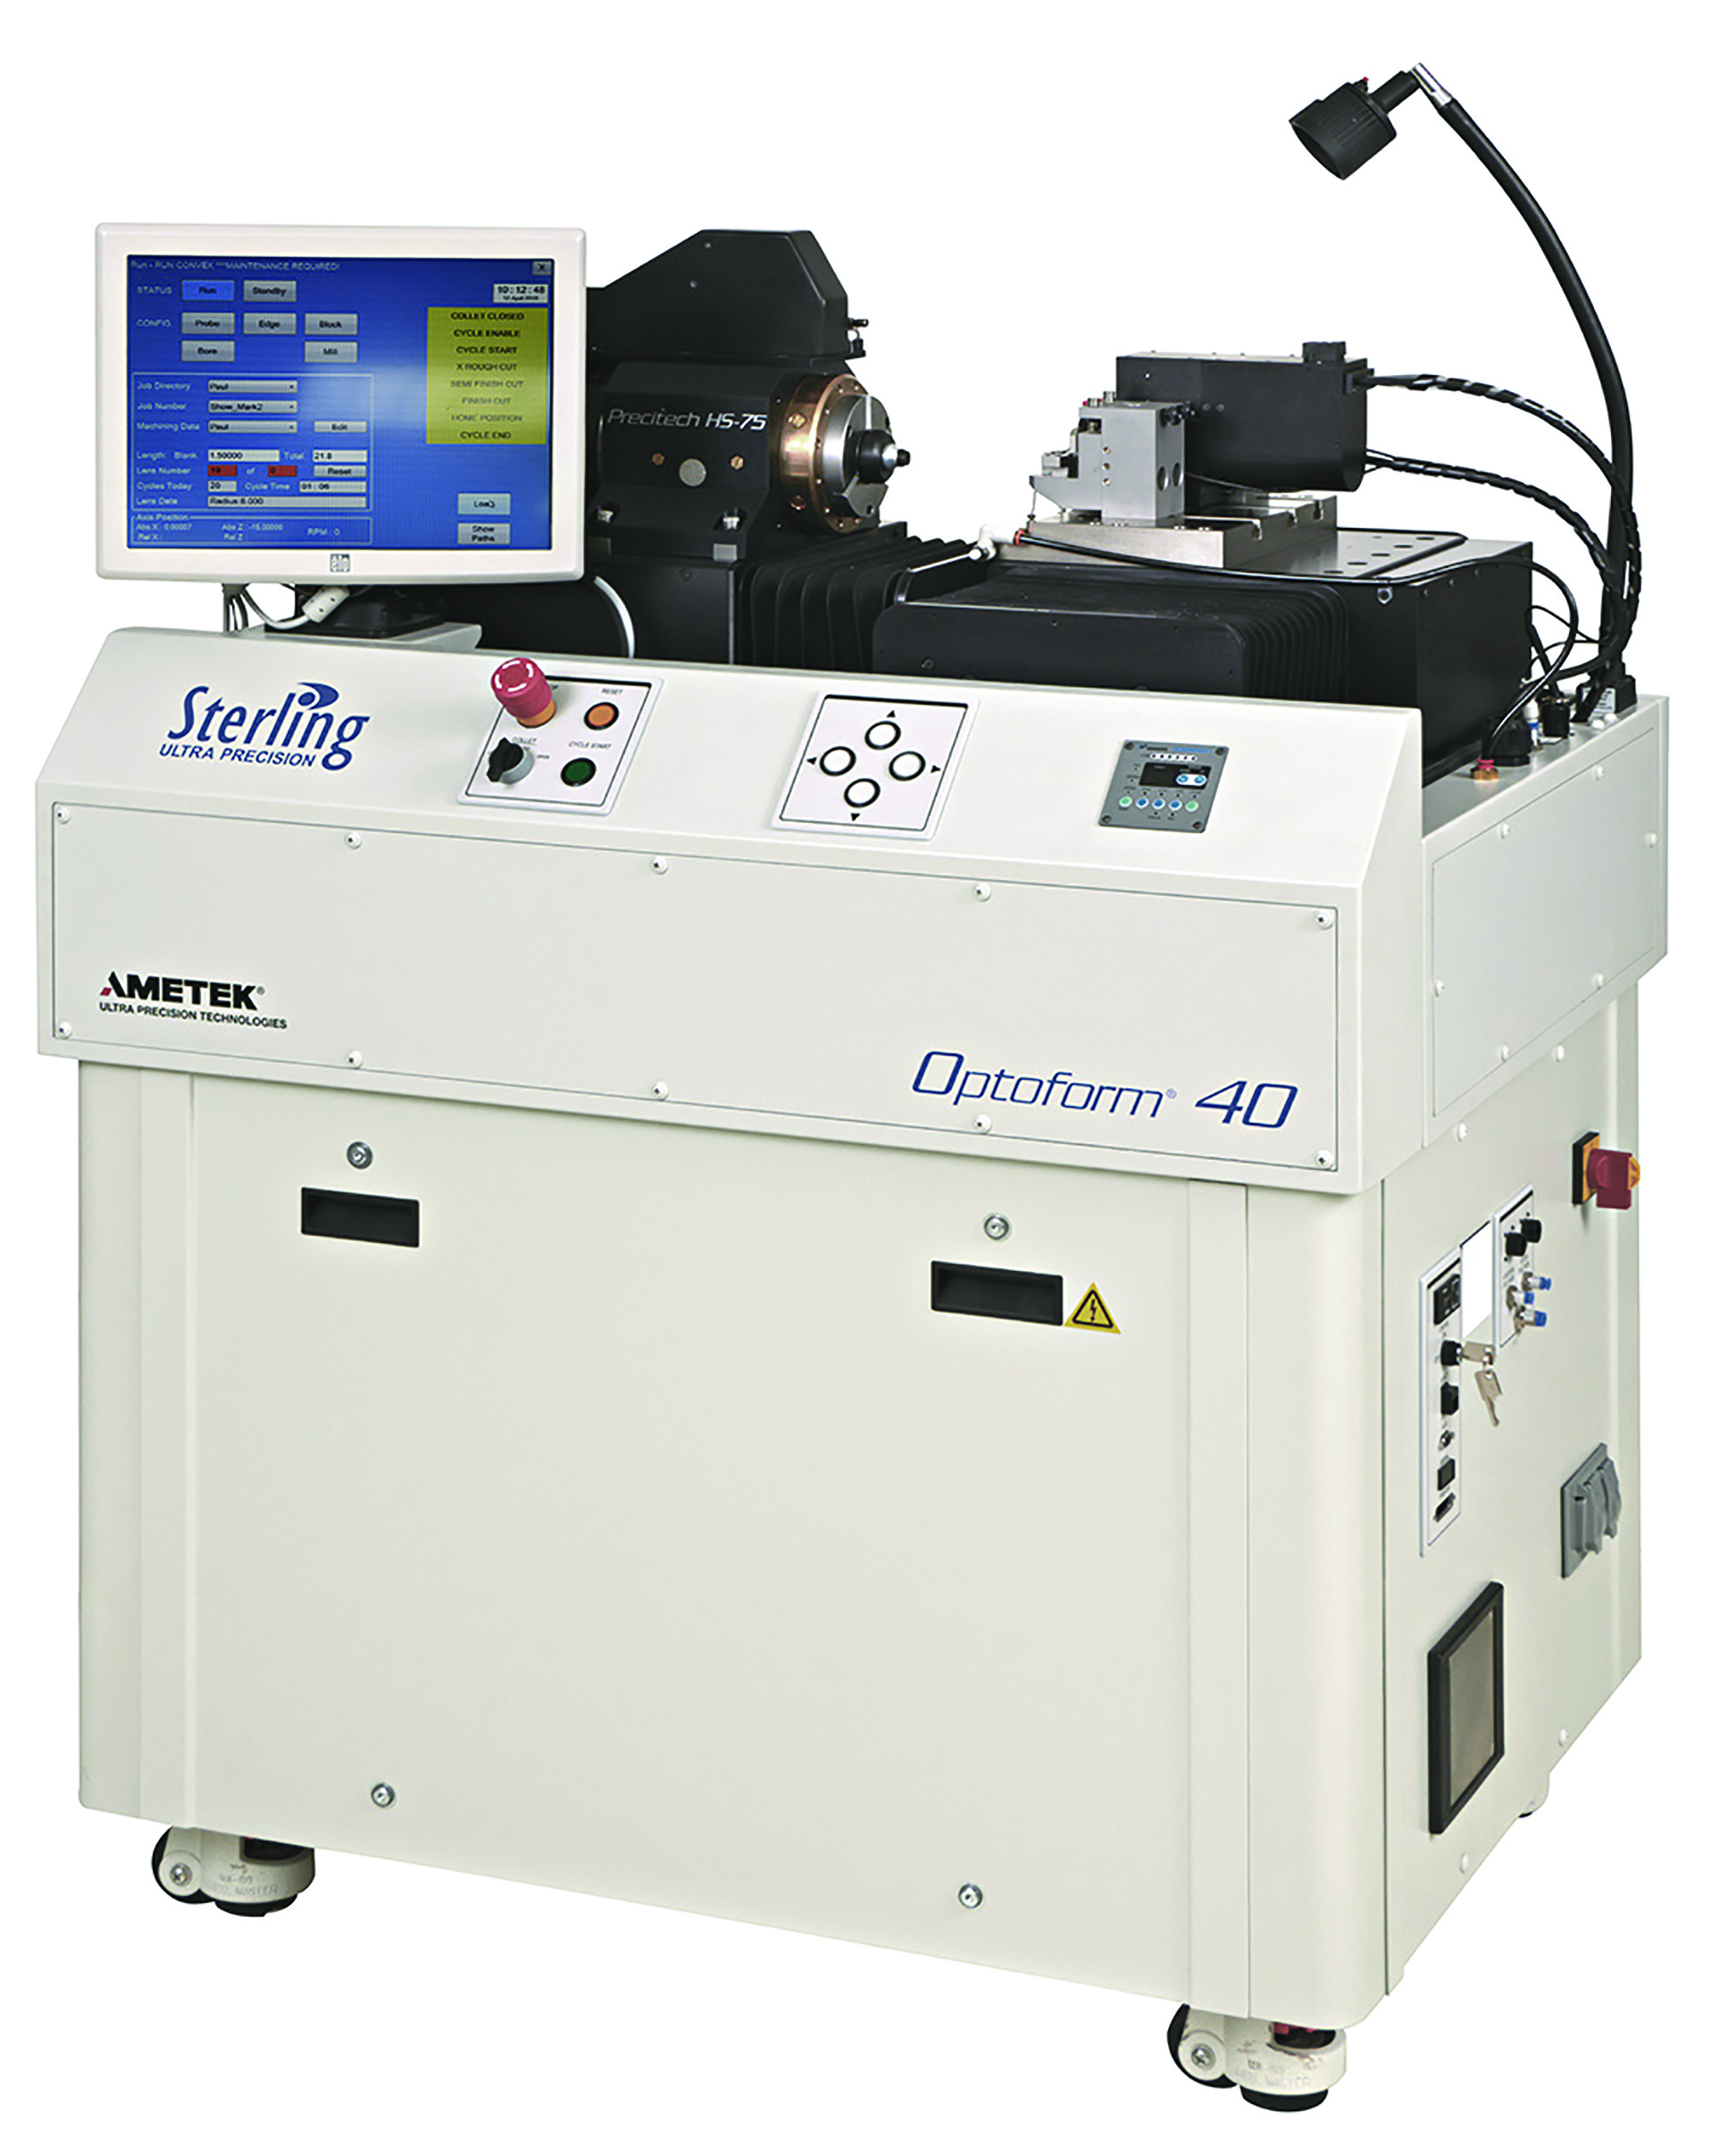 Figure 4: Optoform 40 precision lathe
Although the buttons at this stage will look very bright in colour (figure 5), this is solely due to the thickness. As most of the material is cut away, the final product will usually only have a pale handling tint, unless no colour at all has been added to the mixture in order to produce clear buttons.
 Figure 5: Brightly coloured buttons ready for blocking (image courtesy of Contamac)
The manufacturer will select the required button according to material and lens design ordered by the eye care professional. The button at this stage will be around 5mm thick and will be attached to a metal mount using hot wax. This process is known as blocking. Blocking wax is available in different forms, each with a different melting point and suited to a particular contact lens material. It usually will be sent to the manufacturers in rods. The blocked lens will then be attached to the relevant mount for the diameter to be cut with computer-controlled diamond cutting tools.
The diamond will be set to rotate at the necessary speed which is dependent upon the material being cut and the lathe being used. After the correct diameter has been cut, it will then start to cut the back surface of the lens to the required base curve. For rigid gas permeable materials this will be the base curve ordered, while for hydrogel materials the process is slightly more complex. The curve and diameter to be cut need to be calculated by the manufacturer to allow for the swell factor once the lens is hydrated. Each hydrogel material will have a different swell factor and so requires different calculation. It is imperative that the correct data is imputed into the lathe otherwise, when the lens is hydrated, the base curve and diameter will not be correct. Every new batch of material needs to be tested to ensure the swell factor is correct for that material type.
The wax is then melted so that the semi-finished button can be removed from the mount. A new mount is then selected to match the base curve that has just been cut and the button is blocked again before being transferred to a front surface lathe. The radius of the front curve will be determined by the power of the lens required and, once again, takes into account any swell factors.
For optical freeform designs, such as toric lenses and multifocals, a special add-on known as an FTS (Fast Tool Servo) is used in order to cut the additional curves. This is also used for manufacturing other non-rotationally symmetric contact lens features, such as prism ballasts and slab offs.
Polishing
Most modern high precision lathes generate lenses with such high accuracy and precision that polishing can harm their optics, so the need for polishing has been removed.
If polishing is required, it will often only be for a matter of seconds and this will be carried out using a polishing machine. Over polishing can not only harm the optics, it can cause a change in radius, warpage and can damage the surface, so extreme care must be taken (figure 6). The polishing machine often consists of a bladder tool covered in a polishing cloth and will be used with a special polish. The bladder moulds itself to the shape of the front or back surface.
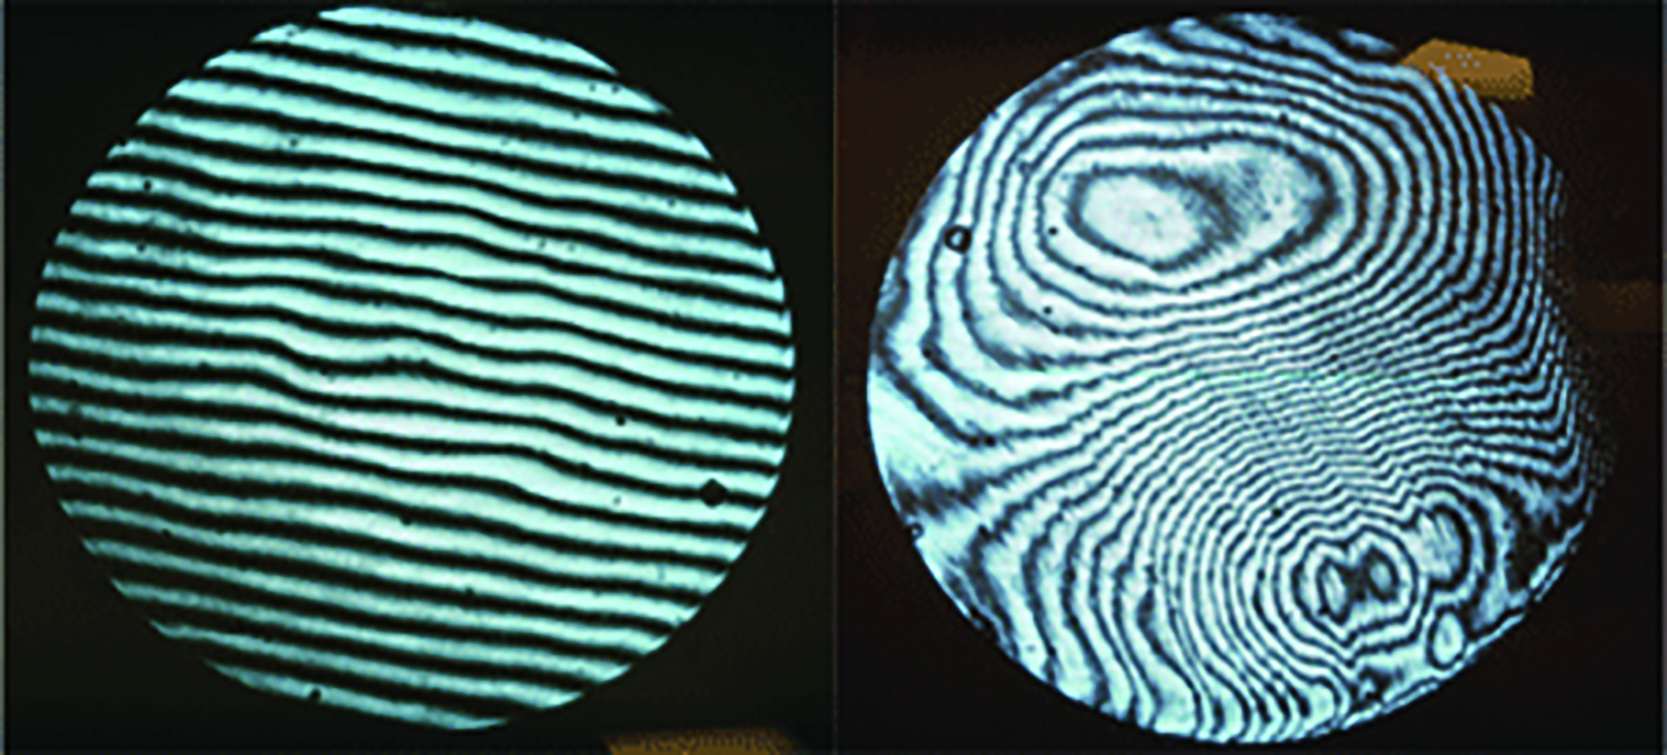 Figure 6: Interferometry shows how polishing a lens can induce aberrations (image courtesy of Dr Brian Chou)
Quality Control
If no polishing is required, the lens will be deblocked, engraved (if required, usually with a laser) and checked to ensure the power and base curve are correct. The lens will also be checked for any surface faults, such as chips, stress marks, and rings, which can all occur if the integrity of the diamond cutting tool is deteriorating. These days, such faults are very uncommon due to the high quality of the lathes used. On the odd occasion a button is faulty, it will usually break during the manufacturing process due to the amount of pressure that is put on the lens. If the lens does survive the manufacturing process, it is highly unlikely that a patient will be able to damage it significantly as long as they adhere to the correct handling and care methods.
Tinting and Colouring
The next part of the process depends on the lens type. If it is an RGP lens the lens will be packaged either in solution or in its dry state, labelled and sent to the eye care professional to be dispensed. If packaged in solution the label will show a solution expiry date, after this date the solution must be replaced, so it is important the lens is removed and cleaned before this date. If a hydrogel button has been cut, then it will be hydrated and inspected once again. At this stage it may be tinted, printed or painted.
Tinting contact lenses involves skill and precision timing. A multitude of tint colours are available in varying densities, allowing the creation of artificial pupils of different pupil diameters, irises of differing colour and diameter, and areas of a lens may be rendered opaque as well as non-opaque. Such colouration can be used to change the colour of the eye for cosmetic and prosthetic purposes, including special effects for films (figure 7), or to assist as a therapeutic lens, for example in the management of aniridia (figure 8).
 Figure 7: Cillian Murphy wearing specialist cosmetic lenses for filming Peaky Blinders
The lenses are either dipped into the dye, or are placed on a mount and are masked depending on what area of the lens needs to be tinted and the required diameter of any iris and/or pupil. A few drops of the dye are then placed onto the area to be tinted for a specific amount of time depending on the colour and the density required. The excess solution is then rinsed off and the lens is dropped into a bath containing a developing solution which will fix the tint. This ensures that the tint will not diffuse back out during wear or care of the lenses. The process may need to be repeated if an alternative-coloured pupil is required. If an opaque tint is required, the lens is soaked in a solution which opens up the matrix of the lens so that, when the opaque solution is added, it penetrates into the lens. The lens matrix is then closed with another solution and the lens tint is secured.
Screen printing is sometimes used to add patterns, most commonly iris patterns, to a lens. This is often the method that is used to produce ‘fun’ lenses, such as cats’ eyes and Halloween lenses. The lens is placed onto a plate and the screen is lined up over it. The dye is then washed over the lens, while care must be taken to ensure that the screens are not damaged and that the lenses are lined up correctly to avoid leeching of the pattern. Patterns and colours can be built up using this method.
Both soft and RGP lenses can be printed using special pad printing machines. This is a very successful way of adding a pattern to the lens, allowing colours to be built up and layered to achieve many different results.
Hand painting is an excellent way to produce a natural looking iris and pupil. Once again, skill is needed to ensure the correct colours are used and remain on the lens for the required amount of time before developing. The paint colours are not always what they seem; for example, to obtain a blue colour, the artist paints with a yellow pigment dye. In some cases, such as with the Cantor Prosthetic lens (figure 8), the lens is printed in its dry state with layers on the front surface of the lens and sealed with a heat process, the lens would then be hydrated.
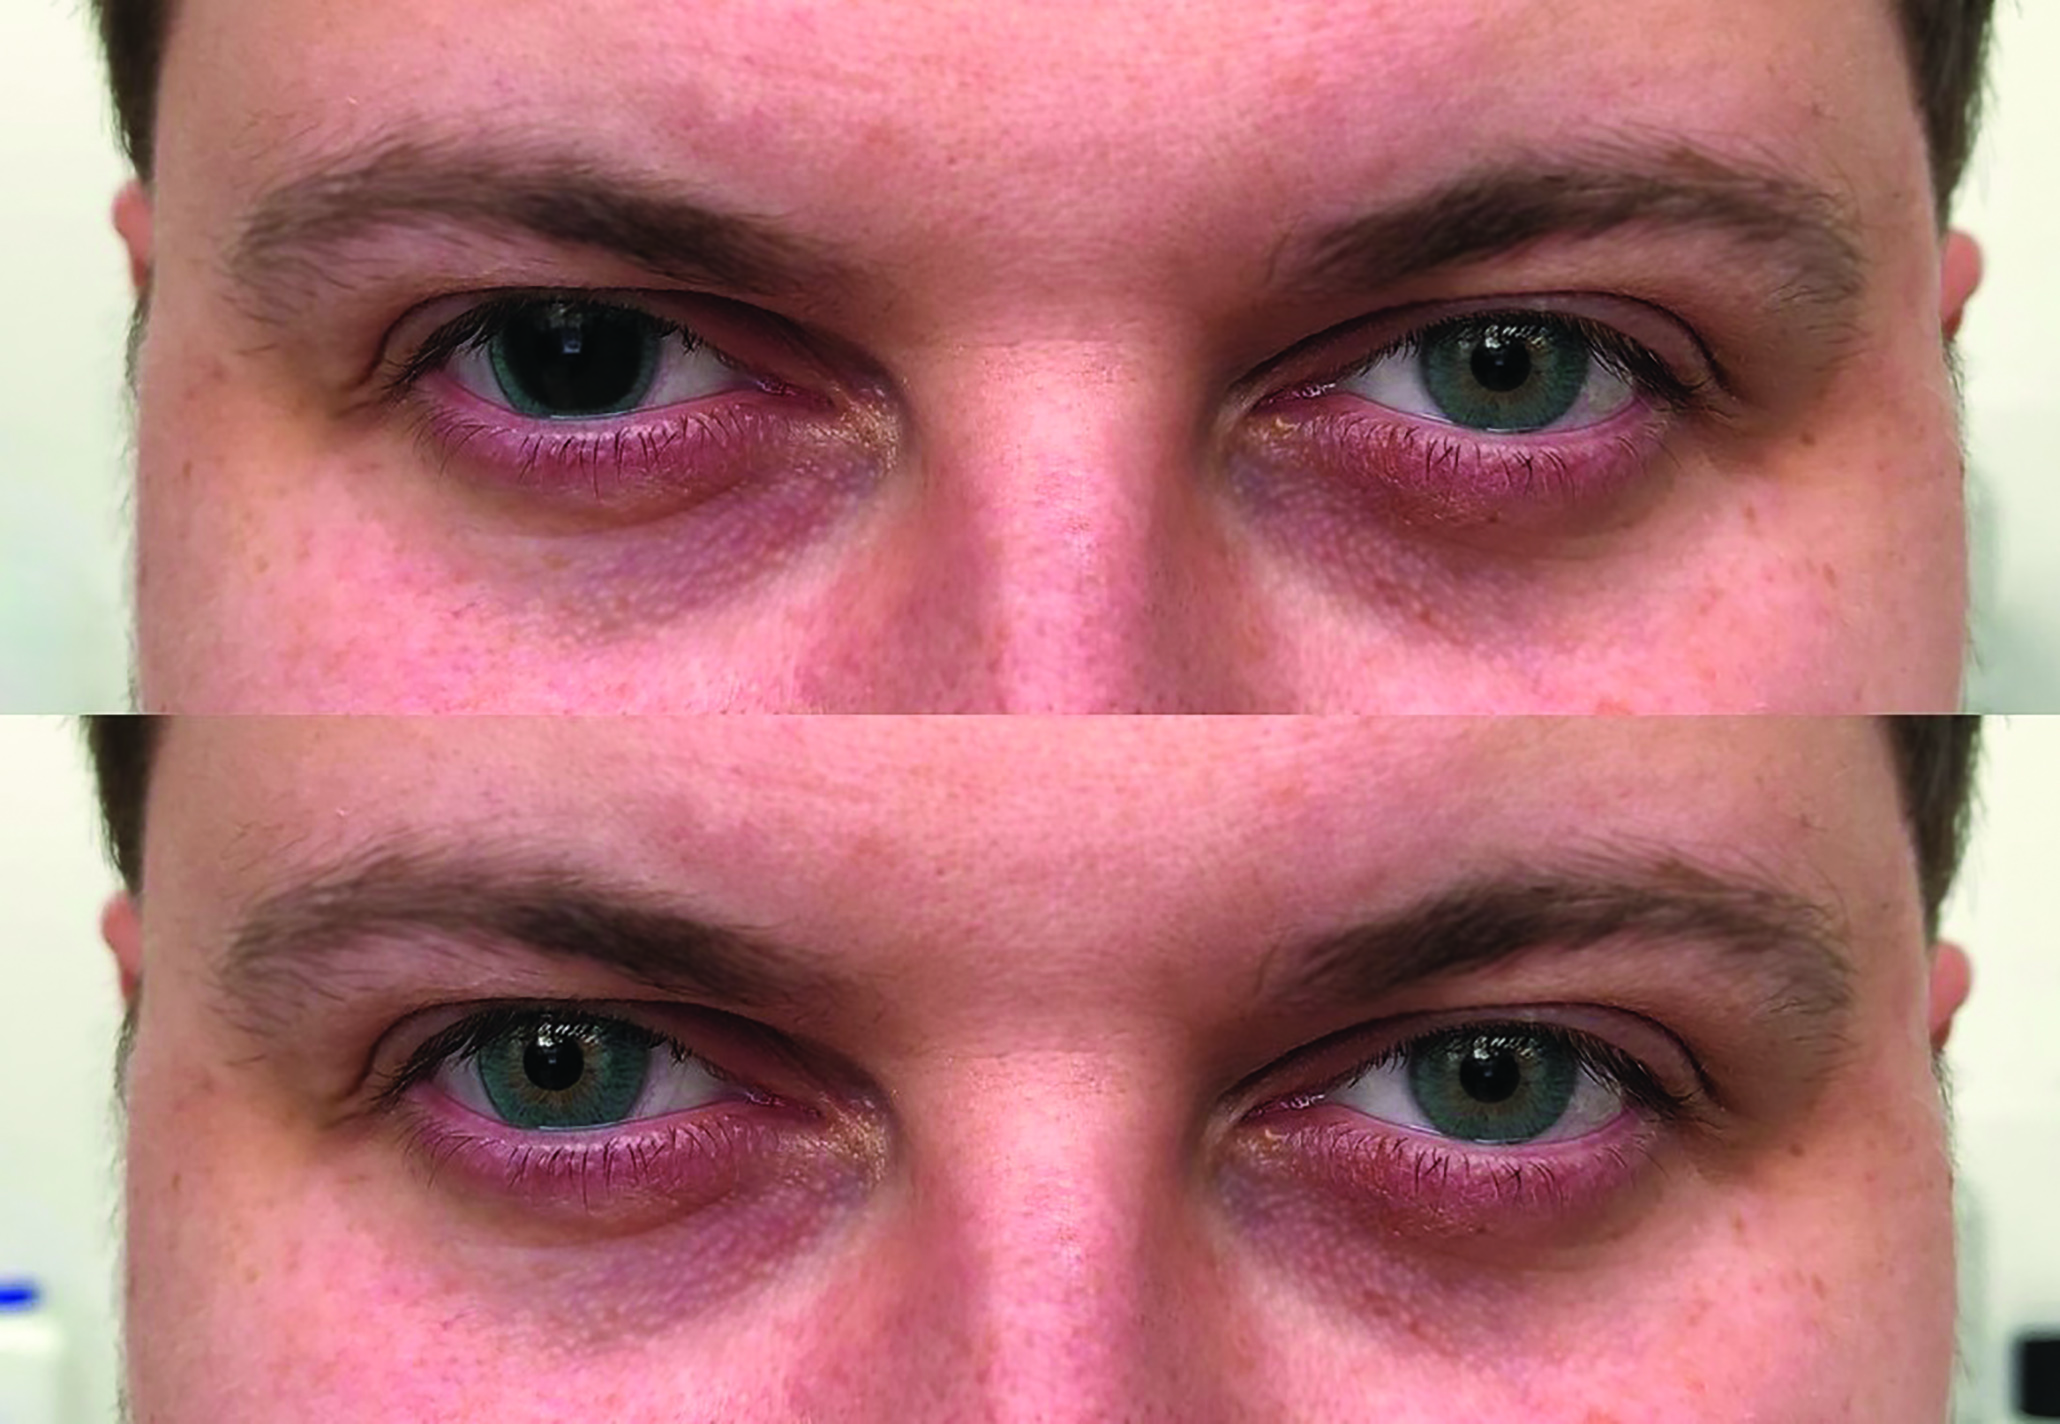 Figure 8: Prosthetic lens to mask a permanently dilated pupil
Packaging
If no tinting is required, the clear lens will be inserted into a glass vial containing saline and sealed with a bung and a special crimp top. The packaged lens is then sterilised by placing the vial in an autoclave at an elevated humidity temperature and pressure for an extended period of time. This is usually around 30 minutes at 121° at a pressure of one atmosphere. However, to adhere to FDA regulations, companies such as Cantor & Nissel Ltd often will increase this to ensure overkill and instead use a cycle of a minimum of 123° for a minimum of 32 minutes. If the autoclave print out shows any dip in temperature throughout the cycle, the lenses may not be sterile and the process will need to be repeated.
The vials are then labelled with all of the required details for CE or FDA approval depending on where the lens is to be shipped to. All of this information is checked once again before the lens is despatched.
Although a more labour-intensive method than the following methods of manufacturing, lathe-cutting provides lenses with an extensive range of parameters which offer great reproducibility. Lathe-cut lenses are becoming a more popular choice for eco-friendly practitioners as the lenses are provided in glass vials which can be recycled and fewer lenses per year means less waste.
Cast Moulding
This method was refined in 1960 by Wichterle along with Drahoslav Lim, and in 1971 Bausch and Lomb obtained FDA approval to sell their hydrogel lenses, which was a big kick start to the popularity of soft lenses.
Cast moulding is still a commonly used method of soft contact lens manufacturing, and is a popular choice for most disposable lenses. The lenses are made with a mould that is in two parts; the anterior (inside) and the posterior (outside). As with the lathe-cut lenses, the mixture used in the mould will depend on the material being used and each material will have a different recipe which, once mixed together, is inserted into the posterior mould. It is then capped with the anterior mould which forms the curved shape of the lens (figure 9). The polymerisation is initiated by ultraviolet light and, as the mould travels along the production line, the material hardens. The lenses will then be removed from the moulds, inspected, hydrated and packaged, usually in blister packs.
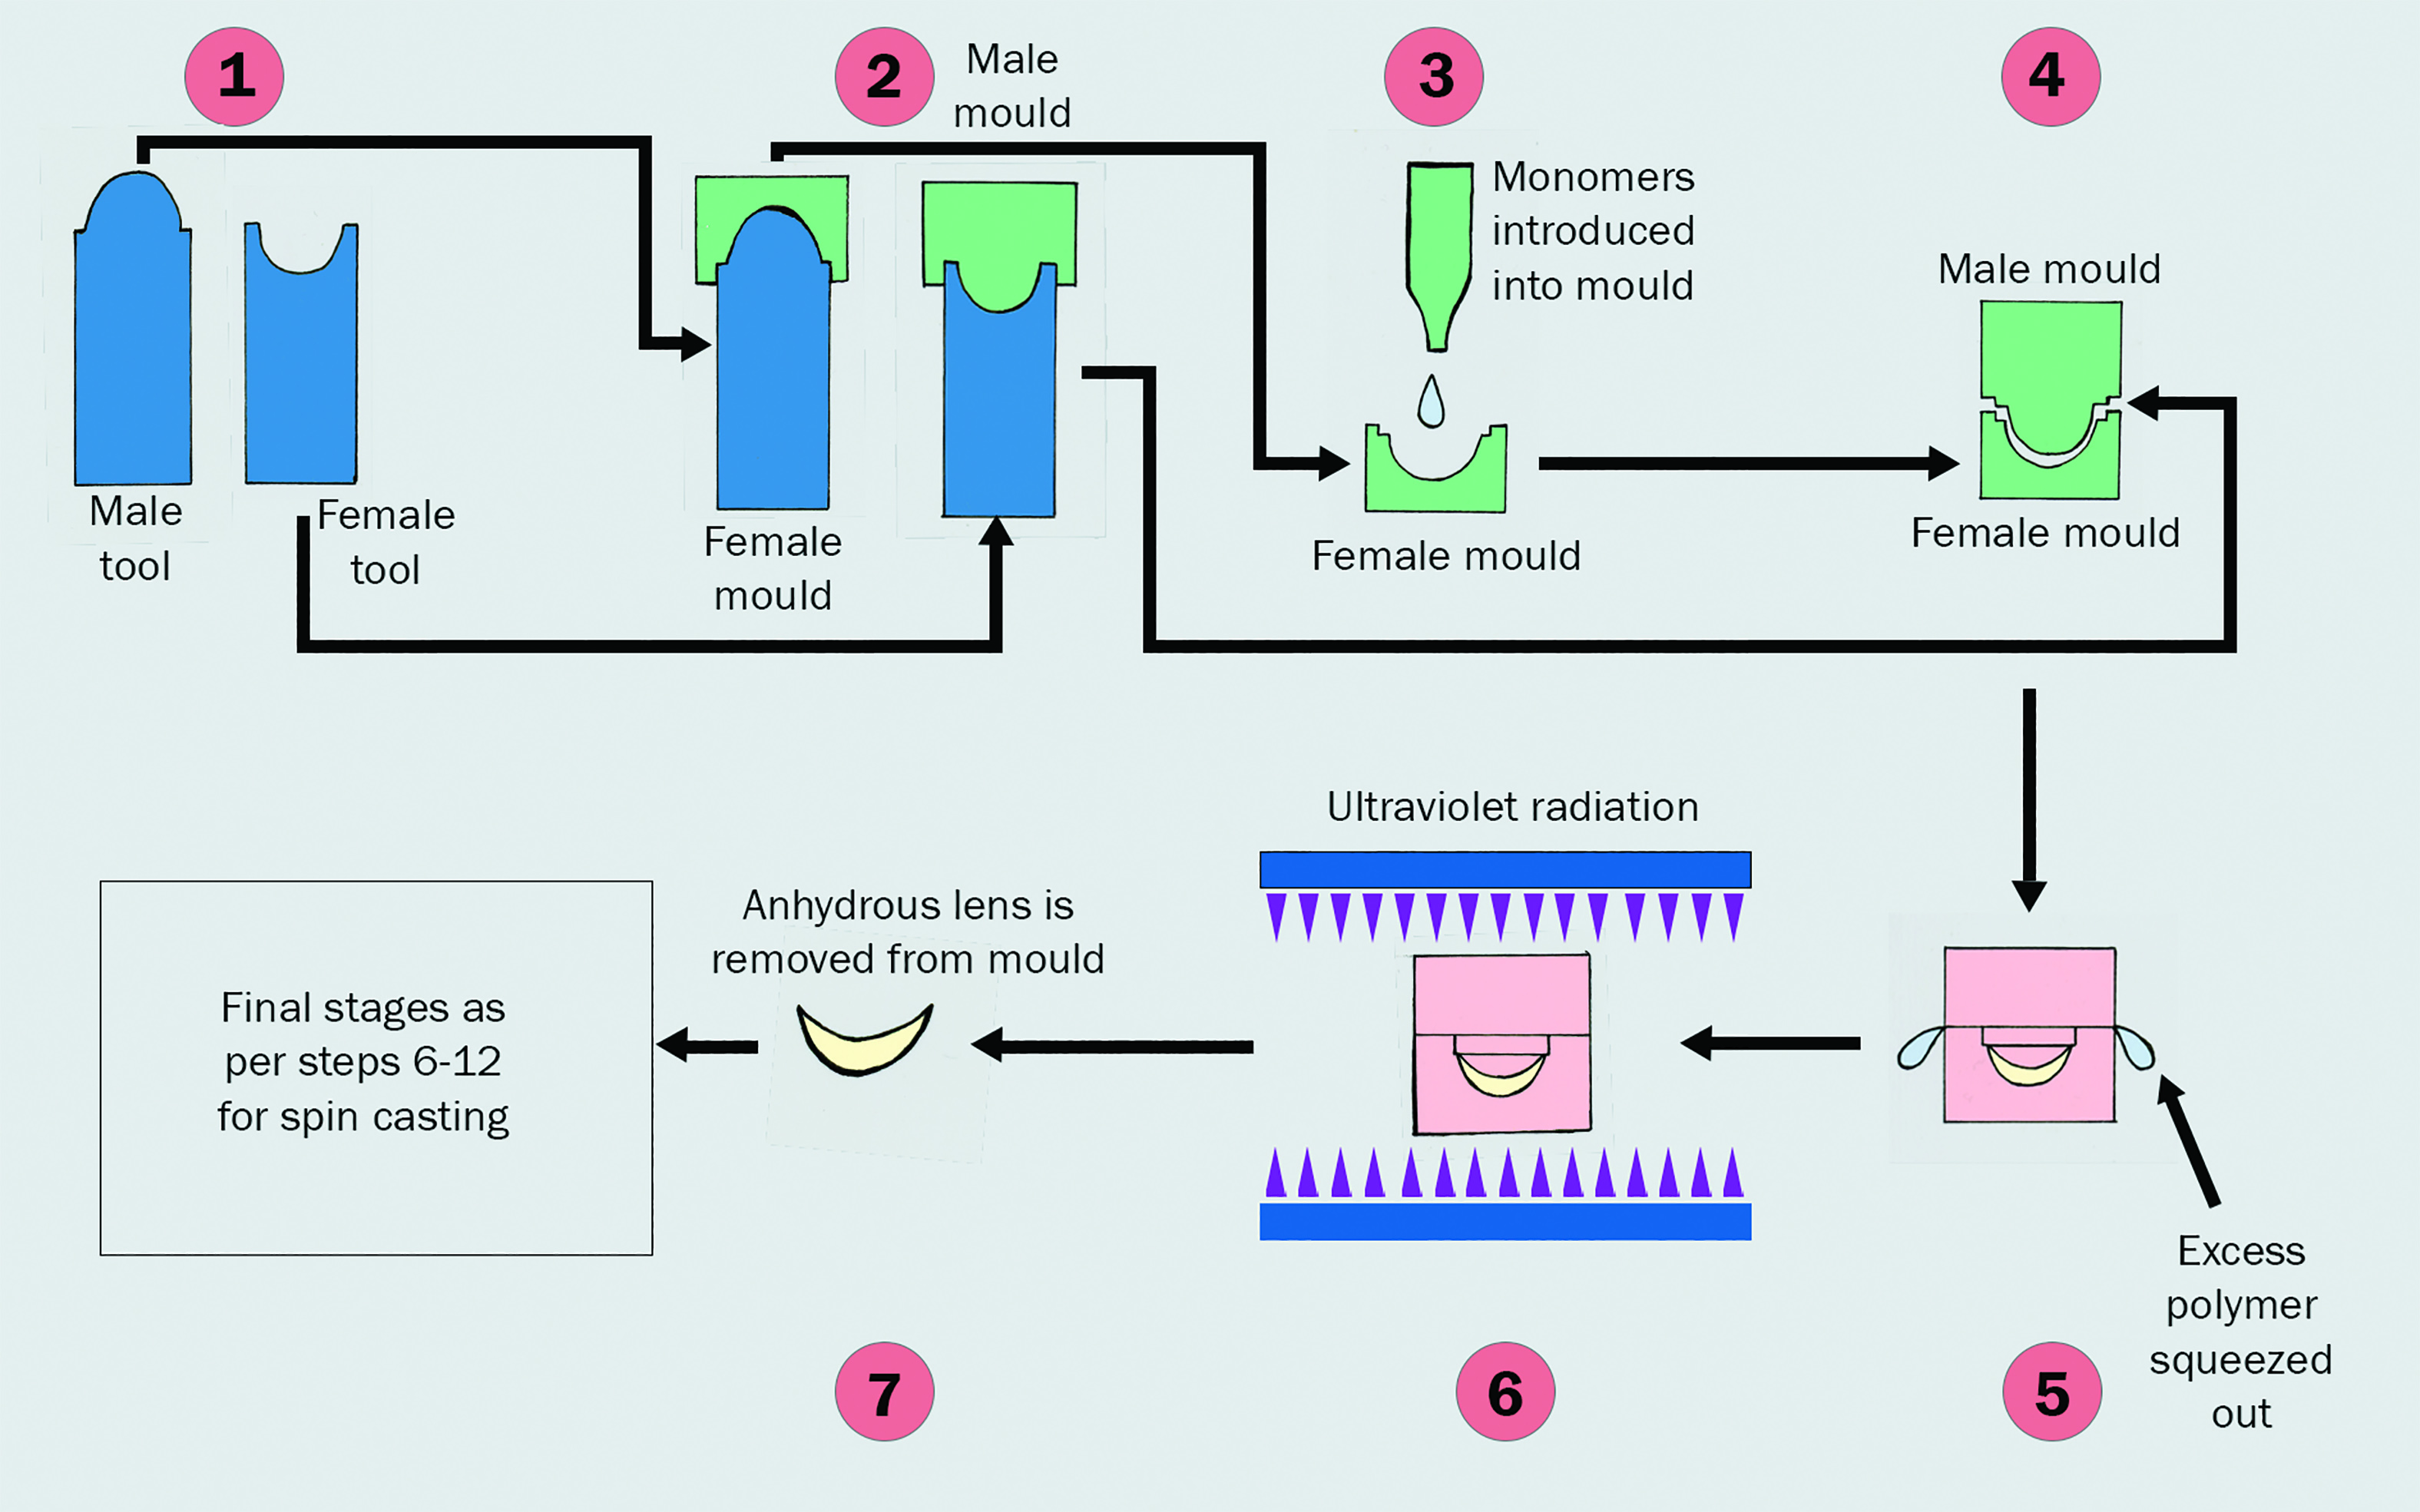 Figure 9: Flow chart showing the key steps in the cast moulding process
Johnson & Johnson has a unique method of manufacturing its disposable lenses, where all Acuvue Contact Lenses are manufactured using ‘soft stabilised moulding’. This is a process of manufacturing where the lenses remain hydrated throughout production. The Acuvue lenses are made in a closed environment and are not touched by human hands at all. They are LED cured and every lens is photographed, with those identified as ‘abnormal’ automatically removed from the production line. The lenses are sterilised at 121 to 125º C, which also goes beyond FDA requirements for microbial kill rate.
Spin Casting
Spin casting is a method used to produce contact lenses by centripetal force and is summarised in figure 10. Liquid polymer is injected into the spinning mould and centripetal force forms the aspheric base curve while the front curve is formed by the curvature of the mould. Ultraviolet light is applied to cure or solidify the lens. The periphery of the lens is buffed and polished to produce a smooth surface and the lens is then hydrated in a sterile water bath. The lens geometry is determined by both the spin speed and volume of material injected. Spin speed also determines the final lens power while the centre thickness of the lens is determined by the volume of polymer injected into the mould.
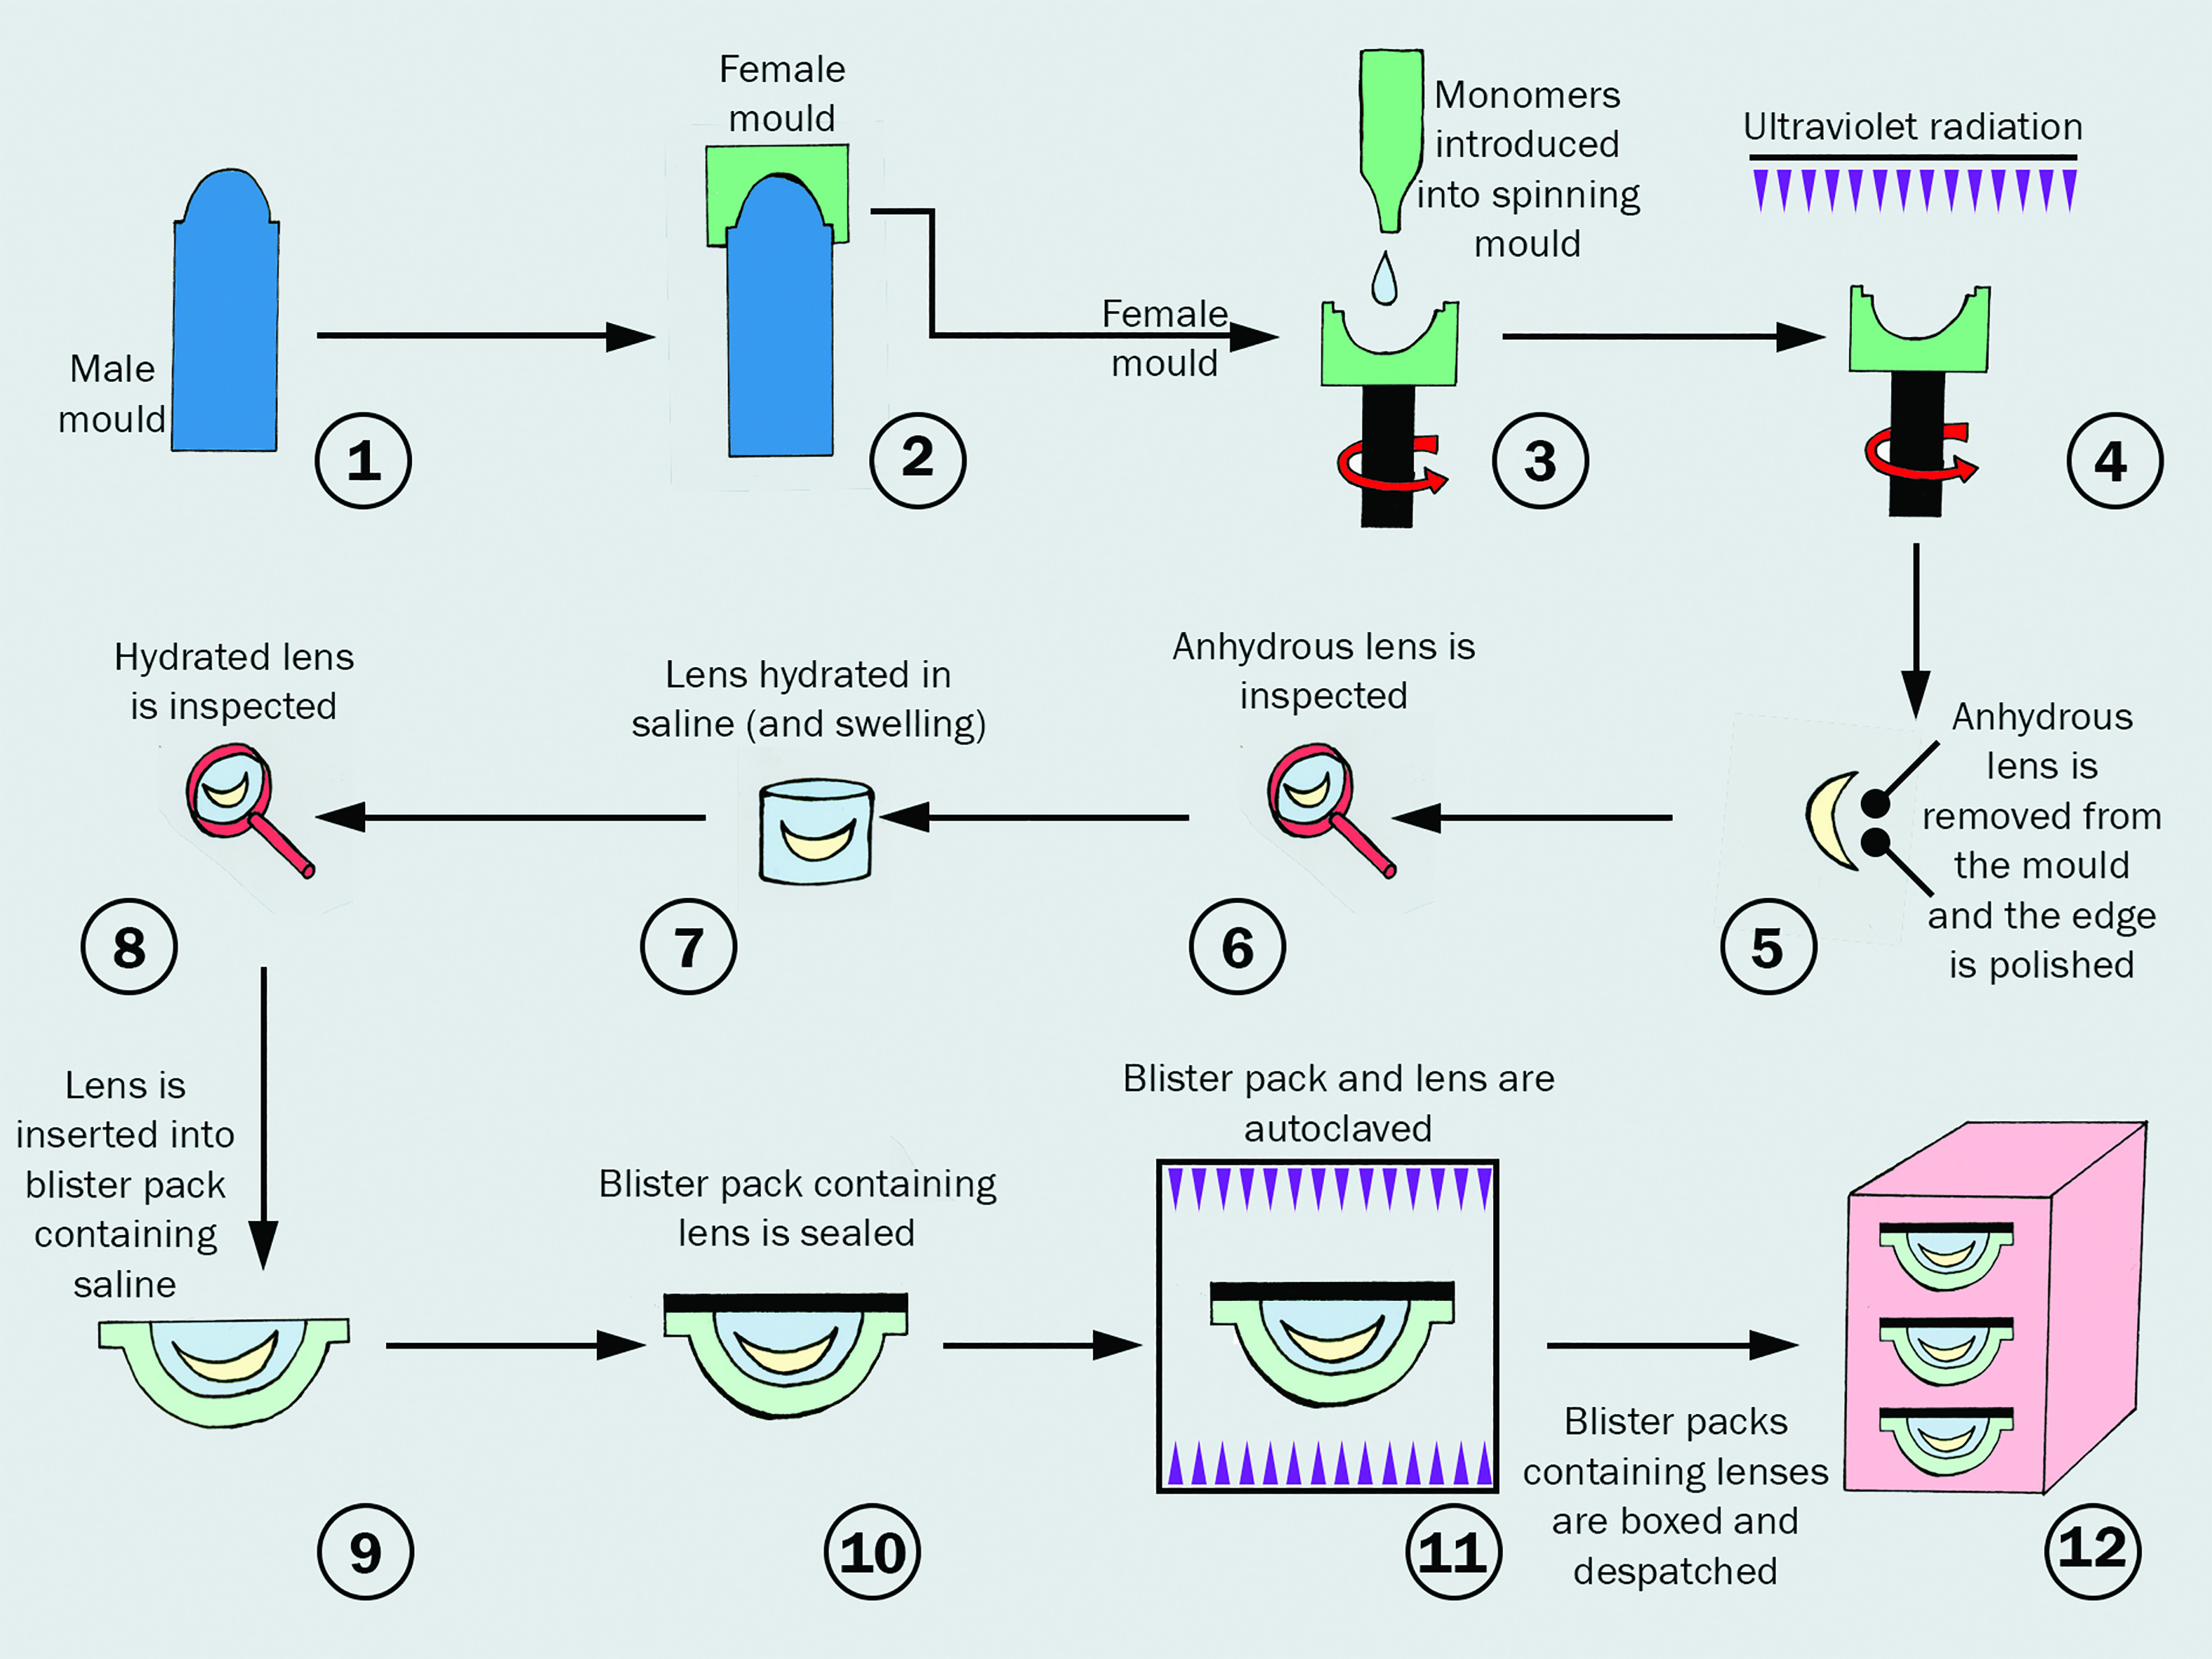 Figure 10: Flow chart showing the key steps in the spin casting process
This has been modernised by Menicon, who use a method called Centraform (figure 11). Spin casting moulds are made for each lens specification required and the monomer liquid is injected into the spinning mould. When the mould rotates at a stable rate, the polymerisation reaction is initiated by either heat or ultraviolet light.3 The shape of the base curve is formed by centrifugal force, while the shape of the front curve is determined by the mould.4 After the lenses are removed from the moulds, they need to be rehydrated before being packaged and labelled.
 Figure 11: Centraform spin casting (image courtesy of Menicon)
Adapted Processes of Manufacture
Combinations of manufacturing processes can be used, such as having buttons with the back surface spun cast and the front surface lathe-cut. For the Reverse Process III, the anterior surface is spun cast and the posterior surface lathe cut.
Another variation in manufacture is the Lightstream process where a mask is used to shield outer areas of polymer within non-touching moulds such that only the centre is cured by the light and the outer material is then washed away. This produces a very smooth, regular and repeatable edge.
How Hybrid Contact Lenses are Made
Hybrid contact lenses have a central optical zone made of rigid gas permeable plastic, surrounded by a peripheral fitting zone made of a soft contact lens material. Hybrid lenses are made with a process very similar to lathe-cut soft contact lenses, with one very significant difference: the plastic disks cut with the lathe have a GP centre, surrounded by non-hydrated soft contact lens material. The two materials are bonded together with proprietary technology to prevent separation of the materials after the lenses are cut and hydrated.
Final Thoughts
As mentioned before, with eye care professionals and patients wanting to become more environmentally friendly, companies such as Terracycle have set up recycling banks for both used contact lenses and contact lens packaging.
Regardless of material and manufacturing methods used, high standards are required by all contact lens manufacturers as lenses are registered as medical devices by the MDA (Medical Devices Association) and there are many ISO standard requirements, not to mention different standards required for Europe and the rest of the world. These standards relate to the whole manufacturing process, from the materials to manufacturing procedures and equipment used, as well as the dyes required for tinting, printing and painting lenses along with cytotoxicity tests that must be carried out on anything being added to the lens. This continues through to the labelling process, where all the necessary information must be clearly stated on the label, including use-by dates. Instructions for use for each lens type must also be provided by the manufacturer, and this is sent out with each order and must be passed on to the patient to ensure that the standards are adhered to throughout.
It is always good to know that, from concept to contact lens, so much science, care and effort goes in to making those little life changing pieces of plastic. Thankfully, with so many different materials and manufacturing methods now available, getting a lens to suit your patient should be a piece of cake.
Karen Hughes is a contact lens optician and Professional Services Manager for Cantor + Nissel Ltd.
Further Reading
Overview
- Jindřich Kopeček. Hydrogels from soft contact lenses and implants to self-assembled nanomaterials. J Polym Sci A Polym Chem. 2009 November 15; 47(22): 5929–5946
- Moreddu, R, Vigolo, D & Yetisen, AK 2019. Contact lens technology: from fundamentals to applications. Advanced Healthcare Materials, vol. 8, no. 15, 1900368
Historical
- NM Farandos, AK Yetisen, MJ Monteiro, CR Lowe, SH Yun. Advances in Healthcare Materials. 2015, 4, 792-810
- Value of the global contact lens market from 2017 to 2024. https://www.statista.com/statistics/485820/global-value-of-the-contact-lens-market (accessed: Nov 2020)
- N Efron, in Contact Lens Practice (Ed: N. Efron), Elsevier 2018, pp. 3-9
- T Young, Phil. Trans. R. Soc. Lon. [Biol. Sci.] 1801, 91, 23-88.
- JFW Herschel, Encyclopedia Metropolitana 1845, 4, 341–586.
- N Efron, RM Pearson, Archives of Ophthalmology. 1988, 106, 1370–1377.
- O Wichterle, D Lim, Nature 1960, 185, 117-118
RGP
- N Efron, in Contact lens practice (Ed: N. Efron), Elsevier 2018, pp. 115-122.
- A Dominguez-Vicent, JJ Esteve-Taboada, T Ferrer-Blasco, S Garcia-Lazaro, R Montes-Mico. Clinical and Experimental Optometry, 2016, 99, 39-46
Soft
- O Wichterle, D Lim, Nature 1960, 185, 117-118
- C Maldonado-Codina, in Contact Lens Practice (Ed: N Efron), Elsevier 2018, pp. 45-60.
- N Efron, in Contact Lens Practice (Ed: N Efron), Elsevier 2018, pp. 61-67.
- G Young, in Contact Lens Practice (Ed: N Efron), Elsevier 2018, pp. 86-94.
- PC Nicolson, J Vogt, Biomaterials 2001, 22, 3273-3283.
- K Ehrmann, in Contact Lens Practice (Ed: N Efron), Elsevier 2018, pp. 73-85.
- N Efron, in Contact lens practice (Ed: N Efron), Elsevier 2018, pp. 95-110.
- Ehrmann, in Contact Lens Practice (Ed: N Efron), Elsevier 2018, pp. 136-142
- A Childs, H Li, DM Lewittes, B Dong, W Liu, X Shu, C Sun, HF Zhang. Science Reprints. 2016, 6, 34905
Hybrid
- B Pilskalns, BA Fink, RM Hill. Optometry and Vision Science, 2007, 84, 334-42