More than two million people in the UK are living with sight loss that is severe enough to have a significant impact on their daily lives, such as not being able to drive.1, 2 By 2030, this number is predicted to increase to 2.7 million and a startling four million by 2050 (figures from fightforsight.org.uk).
Every day 250 people start to lose their sight in the UK, one every six minutes.3 Nearly two-thirds (61%) of people living with sight loss are women.1,2 People from black and minority ethnic communities are at greater risk of some of the leading causes of sight loss. Adults with learning disabilities are 10 times more likely to be blind or partially sighted than the general population.
For the population as a whole, the startling fact is that one in five people will live with sight loss at some time in their life.4
As can be seen from table 1, macular degeneration is the most common cause, accounting for approximately half (48%) of registered cases. Glaucoma represents 16%, cataract 12%, retinitis pigmentosa 10%, and diabetic eye disease 8% of the registered sight impaired and severe sight impaired (SI/SSI) population.
Table 1: Number of people estimated to have each eye condition and the proportion of total sight loss4
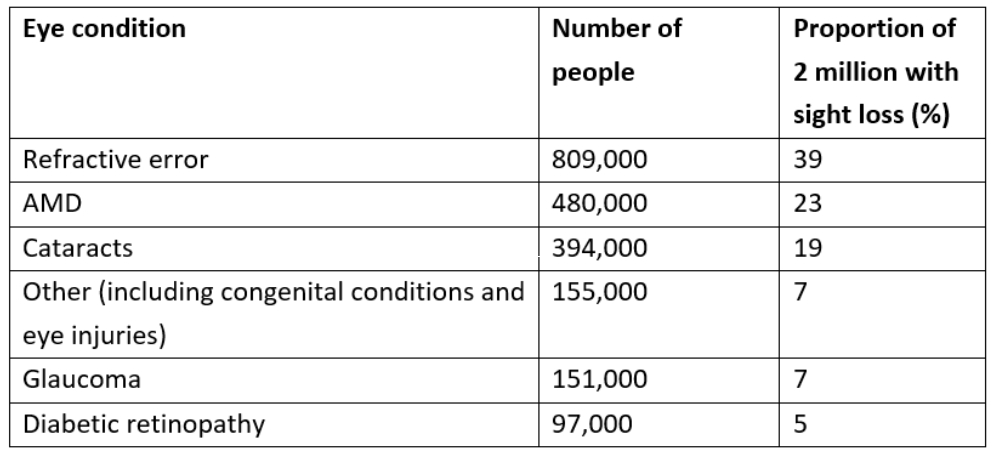
Approximately 79% of people included on the Sight Impaired and Severe Sight Impaired Registers for the United Kingdom are over 64 years of age, while there are around 25,000 children either SI or SSI registered. With the management of systemic disease improving, it is expected the number of elderly within our population will rise even further. This will undoubtedly have the effect of a greater demand for services for visually impaired people, which will include the provision of low vision aids.
Community eye care services, such as community eye care professionals (ECPs), working with others such as eye care (or clinic) liaison officers (ECLOs) are well placed to take on increasing responsibility for helping those with reduced vision.
Who are we dealing with?
From the above statistics, it can be seen that most visually impaired people are elderly and the commonest cause of sight loss among this group would be age-related macular degeneration (AMD). The visual impairment (the impact upon vision) with AMD is loss of central vision. Visual acuity is an indicator of this.
If we now focused on the under-60s, the commonest cause of sight loss would be diabetic eye disease. Diabetes can damage vision in many ways, but the most significant way is through maculopathy, so central vision loss is the most likely impairment.
This is important for a number of reasons. If the impairment (i.e., what is wrong with your vision) is central vision loss, then the most likely disability to be complained about is difficulty reading. Difficulties with television, identifying faces and carrying out fine detail tasks fall some way behind this. Also, the impact on mobility and not bumping into things is minimal. This is why, despite large swathes of the population having a visual impairment, this is not realised by many who expect to see a stereotypical white stick and dark glasses before thinking someone may have vision loss. Sadly, this is also the reason why many elderly people with significant central vision loss might not get the attention they need from those around them as they can still manage to function in ways not requiring central vision.
Among the over-40s, a significant number will have lost vision through progressive glaucoma, which is one condition that may result in loss of peripheral vision; another condition perhaps more associated with this is retinitis pigmentosa, which usually manifests itself much earlier in life. For this impairment, the disability is much more likely to be related to mobility issues, particularly where the main contraction of field is inferior.
As most people with sight loss are elderly, they are more likely to have eye disease, and often more than one. Accurate central fields assessment, rather than impossible for someone SSI registered, is arguably essential and can be done accurately as long as you know how to change the fixation target on your visual fields analyser. Similarly, where contracture of fields is suspected, and may impact on mobility, gross perimetry or a binocular Esterman fields assessment is important.
To summarise, the biggest group of visually impaired are elderly. The commonest impairment is central vision loss. The commonest disability reported is difficulty with reading. The nature of the impairment influences the disability.
Finally, other factors are at play. In general, assuming no significant learning or other secondary impairments, visual impairments acquired early in life (congenital or developmental) tend to be better adapted to. So, someone who has had perfect vision for 70 years, and has lost it suddenly through wet AMD, may have significantly more reported disabilities than someone born with an inherited maculopathy of similar vision, but who has learned to cope with it from day one.
SI and SSI Registration
The older terms partially sighted and blind have been replaced by sight impaired and severely sight impaired. Some people may have enough loss of acuity and/or field of vision to be certified by a consultant ophthalmologist as registerable as one of these two categories. The register is maintained by social services and allows access to a number of benefits, many financial.
Importantly, and this particularly applies to community practice, most people with visual impairment are not registerable and yet can be helped significantly with good advice about lighting, magnification and information about their disease and any available support services. ECPs are key to this.
History and Symptoms
Initial conversation should achieve the following:
- Instill confidence and trust
- Establish a picture of what the person uses their vision for and would like to use their vision for
- Ascertain where problems lie and develop some understanding of the person’s motivation to be helped to overcome these
It may, however, be useful to emphasise some key points when communicating with a low vision patient:
- The practitioner needs to be sensitive to the patient’s emotional response to their disability, especially so in the case of an acquired impairment. Bearing in mind that the commonest cause of registerable blindness in the UK is age-related macular degeneration, it is not uncommon for a patient to have 70 years’ worth of good functional vision that is lost over just a few months or years. In many cases, the first few LVA appointments may well deal primarily with advice and counselling to allow for some acceptance and rationalisation of the situation before any care plan is embarked on.
- The absence of external signs of a visual problem, combined with the general perception that ‘blindness’ means total lack of functional vision, often means relatives and carers of the patient are less supportive than might be expected. The practitioner may play a useful role here.
- By setting realistic and achievable goals, for example, reading for just 10 minutes a day with this magnifier until you can read the whole of the TV listing, is a simple, yet effective, way of increasing patient involvement in their care plan. This can be helped where a disease has shown a period of stability as a patient might find they become better adapted to using their residual vision resulting in a subjective improvement, despite no underlying improvement in ocular health.
- The practitioner needs to remember that patients are not governed by ray diagrams and, while an aid may be issued with the correctly calculated magnification and of the best optical design, this is no guarantee that it will be of any more perceived use to a patient than the old scratched magnifier given to them by a friend.
- When sight is an integral part of the communication process, such as for patients with an associated hearing impairment, there may be a need to develop a very flexible approach in patient management over a period of time.
Depression is far more common in those experiencing sight loss than in the general population.5 A recent meta-analysis has underlined how strong this association is and reinforced the message that ‘visual impairment and depression are prevalent morbidities and should be actively sought when either is identified, especially in older adults.’6
Recent UK figures come from the Depression in Visual Impairment Trial (DEPVIT), conducted at Cardiff University.7 They screened 1,000 participants attending a low vision appointment either in a community practice or hospital clinic, also using the Geriatric Depression Scale-15 (GDS-15), and found that a staggering 43% reported significant depressive symptoms. This is because depression is not only a distressing condition in itself, but can have a negative impact on visual rehabilitation outcomes, it is important that optometrists come to understand and recognise the condition and are able to advise their patients on where to seek help.
Assessing Vision
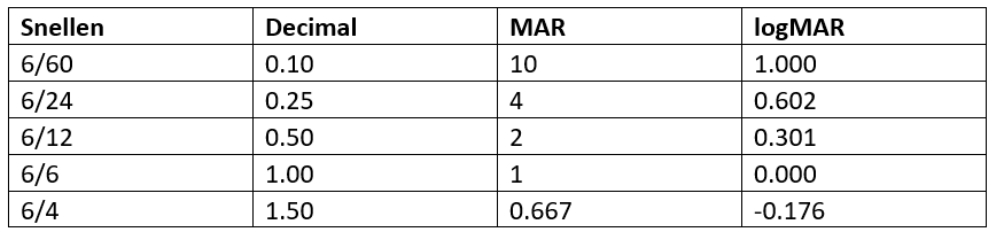
It is useful to record the minimum angle of resolution (MAR). The MAR relates to the resolution required to resolve the elements of a letter. Thus 6/6 equates to a MAR of 1 minute of arc, 6/12 to an MAR of 2 and 6/60 to 10. The logMAR score is the log10 of the MAR so is 0 for 6/6 and 1 for 6/60 (see table 2). This means that targets smaller than the 6/6 letters, which would be expected to be resolved by a young healthy adult, would carry a negative score value.
Table 2: Acuity notation conversion
There are fewer large letters on a Snellen chart, so providing an unequal challenge to those with reduced vision. Also, the letter spacing and the line separation reduces in a non-linear way when reading down the chart, which means that moving charts to different working distances, something often needed when assessing the visually impaired, alters the demand on acuity. Put simply, 6/12 at six metres is harder to read than 6/24 at three metres.
LogMAR charts, such as the Bailey-Lovie chart (figure 1), address some of these shortcomings by having spacing between letters on each line related to the width of the letters and between rows relating to the height of the letters, and an equal number of letters on each line. This provides a constant task as the patient reads down the chart allowing it to be viewed at different working distances and the acuity to be more easily correlated. Such charts have been found to give greater repeatability of measurement and be more sensitive to detect interocular acuity differences.
Figure 1: A logMAR chart
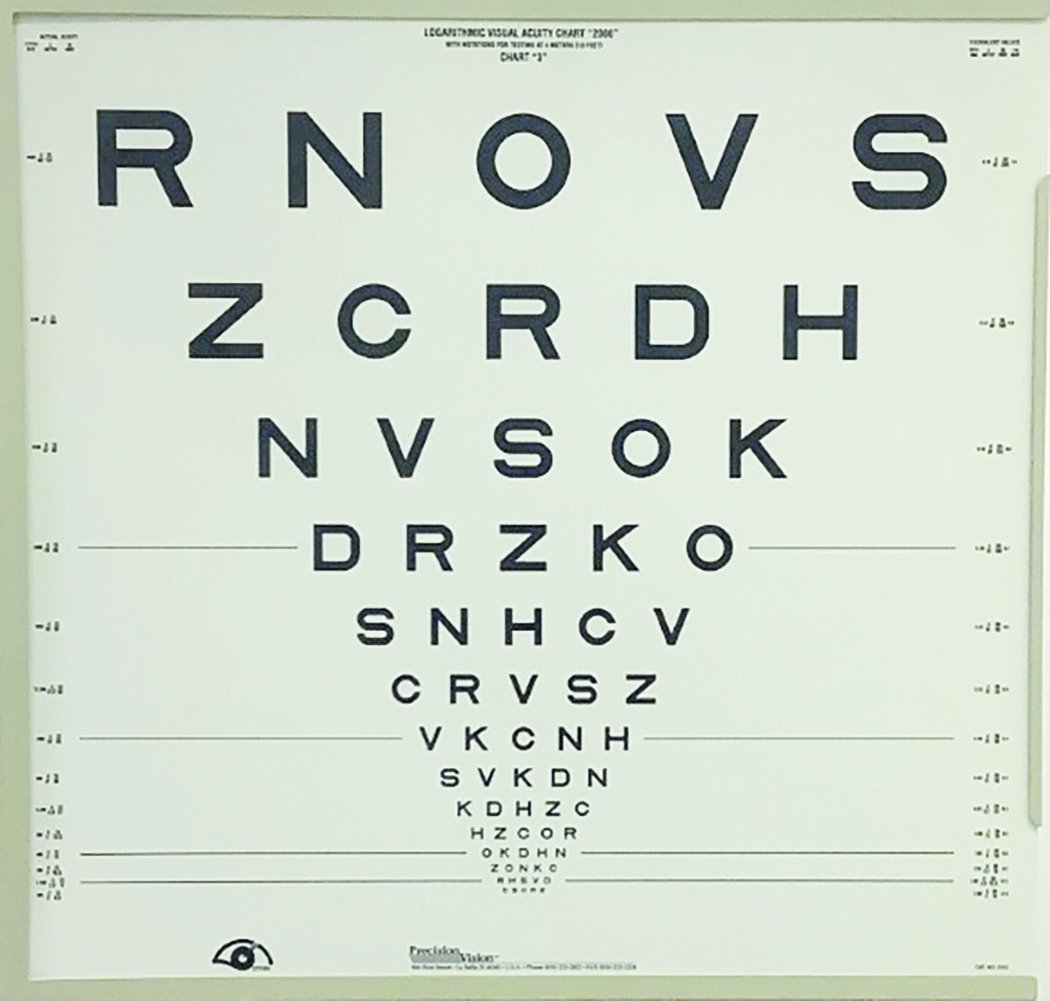
This was simple revision of how to record a logMAR score. We all know that the angle subtended at the retina by a 6/6 letter is one tenth that of a 6/60 letter. Just as if you move something half as close, it will double in size, then if you move something from 60m to 6m it will appear 10 times bigger. Assuming that identification of a 6/6 letter requires the resolution of the minimum angle subtended at the retina, then this might be represented as a logarithmic value. The minimum angle of resolution (MAR) might be defined as 6 divided by 6 (obviously 1) and the log of 1 = 0. At the top of the chart, 60/6 = 10 and the log of 10 = 1.
It is now possible to produce a chart with 10 lines, 0.0 at the bottom and 1.0 at the top, and each increase in size (0.1, 0.2, 0.3 up to 1.0) will have a constant increase in letter size and spacing and gap below and above. This increase is around 1.25 times for each line. And by having the same number of letters on each line, typically five letters then, remembering each line step is represented as 0.1, each letter seen can be ascribed a 0.02 value.
When reducing the viewing distance, the linear design of the logMAR chart means that a single conversion constant can be used to calculate the acuity score. Put simply, for every halving of the viewing distance from that for which a logMAR chart is calibrated, you can add 0.3 to the score for an accurate equivalence. So, for a 4m chart held at 2m, 0.96 becomes 0.96 + 0.3, or 1.26.
Binocular acuities and a gross binocular assessment are also often useful, for example in cases where a previously amblyopic eye now retains the better acuity, such as when a disease process has affected the once better eye. The patient may still prefer to use the eye with the lower acuity particularly if there has been a long-standing strabismus. The low vision aid will best be prescribed to the fixating eye. Occasionally, this requires the fogging or occlusion of the fellow eye to provide better visual comfort with the end appliance. It is useful to assess any benefit of occlusion of either eye during the refraction procedure.
It is not uncommon for patients with severe photophobia, such as seen in oculocutaneous albinism, rod monochromatism or aniridia, to request that the room lights be dimmed or the back illumination of the test chart to be switched off during refraction. The amplitude of any nystagmus may also increase under these circumstances. Again, refract wherever possible in the circumstances most comfortable for the patient; this will likely give you the most accurate end point. However, it is always important to record acuities in both the normal and dim illumination or, better still, take a contrast sensitivity measurement.
Contrast Sensitivity
An easy way to measure contrast sensitivity is with a Pelli-Robson chart (figure 2) which has targets that, at the working distance of one metre, can be seen by nearly all patients as the letters represent a low spatial frequency target (0.5 to 1.0 cycles/degree).
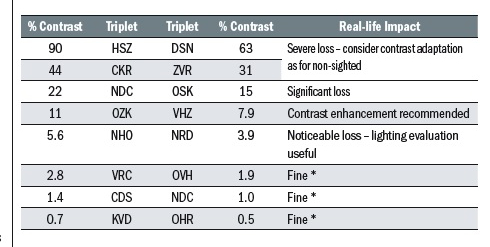
Figure 2: A Pelli-Robson chart. OSK represents contrast recorded as 15% or 0.3.
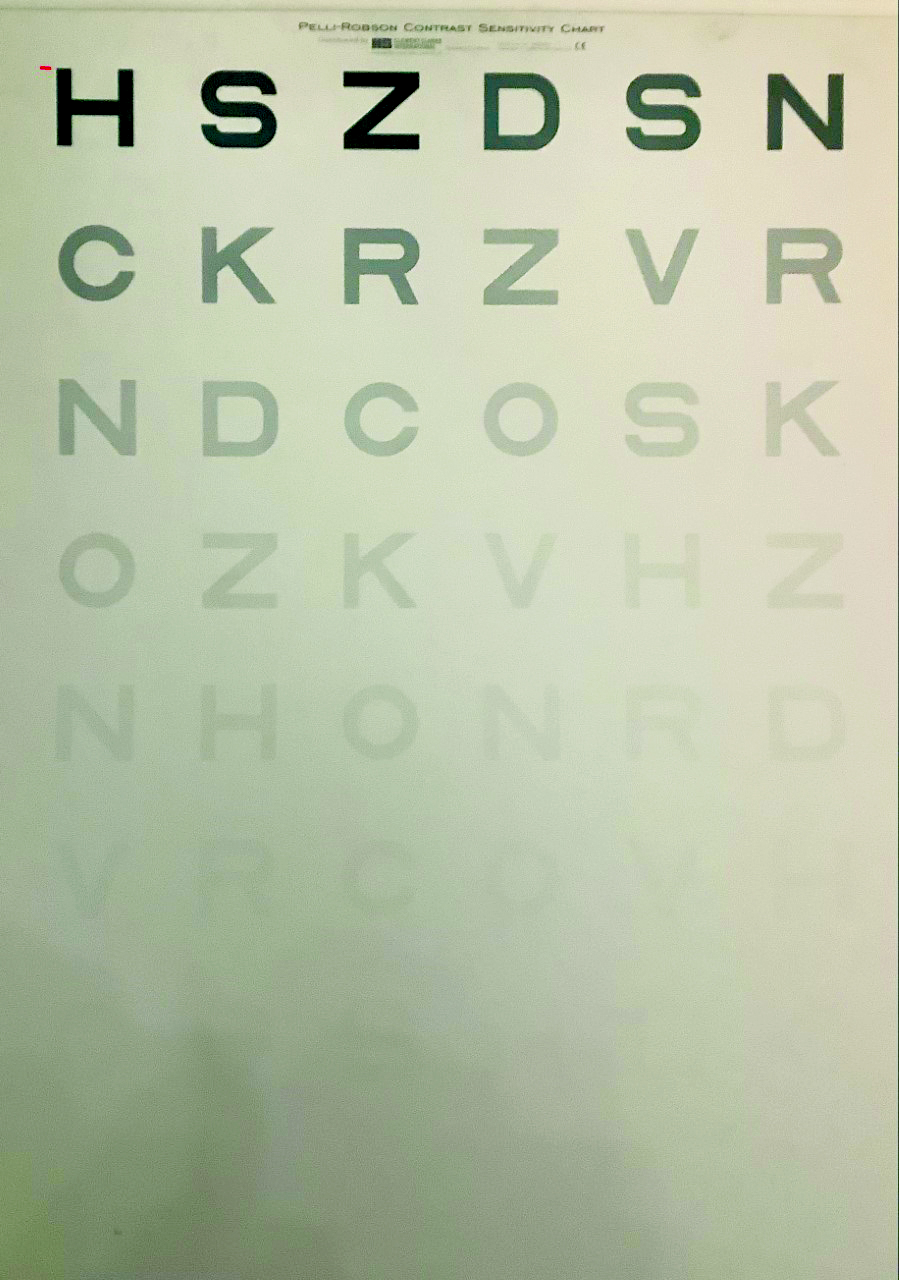
There are two ways of recording the result. The simplest is to record the contrast of the least contrasting triplet of letters seen, such ‘OSK’ which, as can be seen from table 3, represents 15% contrast.
A more accurate way, and one which includes each letter value rather than the above which only looks at the triplets where two or more letters are read, is to ascribe each letter a value of 0.05 log contrast sensitivity. The first triplet ‘HSZ’ has maximum contrast and is assigned a value of 0.0 and then every letter afterwards is scored 0.02 greater; D= 0.02, S = 0.04, N = 0.06, and so on. So, every five letters read is an increase of 0.1. So, in our example, 15% might also be recorded as 0.3.
Where contrast sensitivity is low, significant improvements are often gained by improving the lighting and contrast in the patient’s environment. The use of increased levels of contrast to that required by those without vision loss is described as giving a contrast reserve.
Table 3: Contrast values for the triplets on a Pelli-Robson chart (* ‘fine’ is author BH’s terminology)
Notes on Refraction
It is often useful to record binocular acuity, especially in the case of patients with nystagmus. As the amplitude of the nystagmus increases upon dissociation of the eyes, the acuity recorded monocularly will significantly drop in comparison with the binocular acuity. It is also advisable to allow nystagmus patients who have developed a head tilt to compensate for their null point.
For those patients with a dense central scotoma, it is useful to assess and encourage their ability in eccentric viewing. Where acuity is at its optimum, their refraction will be most accurate.
Refractor heads are inappropriate in the low vision examination, because they make judgements about how the patient is using their eyes difficult as well as reducing light levels.
There are several tips and methods for refracting a patient with low visual acuity; bigger steps, higher power cross cylinders for example. One useful method, where there is little information already established, is to ‘work backwards’.
Case Example
Consider a patient with a lengthy history of corneal dystrophies, failed operations and high myopia and with an unaided acuity of not measurable at various test chart working distances. Starting with little more than this is quite a challenge, especially as there is no useful retinoscopy reflex. However, when presented with reading material, he quickly holds the text up to his useful eye at a distance of 4 or 5cm. At that point, he could begin to discriminate some letters. What is of importance here is the working distance, which implies myopia of -20.00DS. By placing a -20.00DS lens in the trial frame, he could see logMAR 1.4; a much better starting point.
Predicting Magnification
Once the best corrected visual acuity has been achieved, it is time to decide upon a target acuity for whatever tasks have been identified. This might be:
- Distance magnification; if a particular distance task has been discussed, typically watching television or looking at shop signs, then the first step would be to estimate how much further down the letter chart the person would need to be able to read to therefore be able to undertake the specified task more easily. This often involves the use of telescopic devices (see later), but it is worth pointing out that more often than not, insistence on achieving the smallest letter targets is rarely appropriate. Most patients prefer a less magnified image that, though perhaps not completely defined, can be easily identified and is more stable and within a larger field of view than might be the case were the strongest magnification offered.
- Near magnification; with any significant distance correction in place, it is important to find what a person may read with either their existing reading addition or, more typically in a low vision clinic setting, with a +4.00DS addition in place. Knowing this allows a good prediction of the likely required magnification.
At this point it is worth noting the term acuity reserve. There are some benefits from prescribing the minimum required magnification, such as minimising magnifying lens power and therefore thickness, distortion, field of view, working distance issues and so on. For these reasons, such an approach might be considered for spot tasks, like checking a price in a shop. However, it is not useful when prescribing any magnification for prolonged use, such as fluent reading. By offering greater magnification than that predicted as needed to reach a target acuity, and therefore providing an acuity reserve, the higher magnification value should make prolonged viewing of the target acuity easier and less of a strain.
An acuity reserve is usually offered when magnifiers are used for reading for any length of time. Most practitioners choose N8 as representative of typical news and book print of reasonable contrast. Using an acuity reserve of 2:1, a sensible option in this author’s view, sufficient magnification should be offered to allow the person to achieve N4 such that N8 might be easily achieved and allow them to read a newspaper more comfortably. Despite textbooks highlighting specific reserve values, each patient’s performance should be judged on an individual basis and there is no single right solution for every patient with the same level of vision. For example, for maculopathy, N6 might be a more appropriate target to achieve a degree of fluency for N8.
Case Example
A patient can manage N24 at 25cm with a +4.00DS addition over their distance correction. They really want to start reading their newspaper again. What might be the expected level of magnification required to support this wish?
- Estimated task acuity is N8
- An acuity reserve of 2:1 is sensible
- Target acuity with magnification is therefore N4
- N4 is six times smaller than N24
- Predicted required magnification is six times
So how might magnification be achieved?
Optical Low Vision Aids
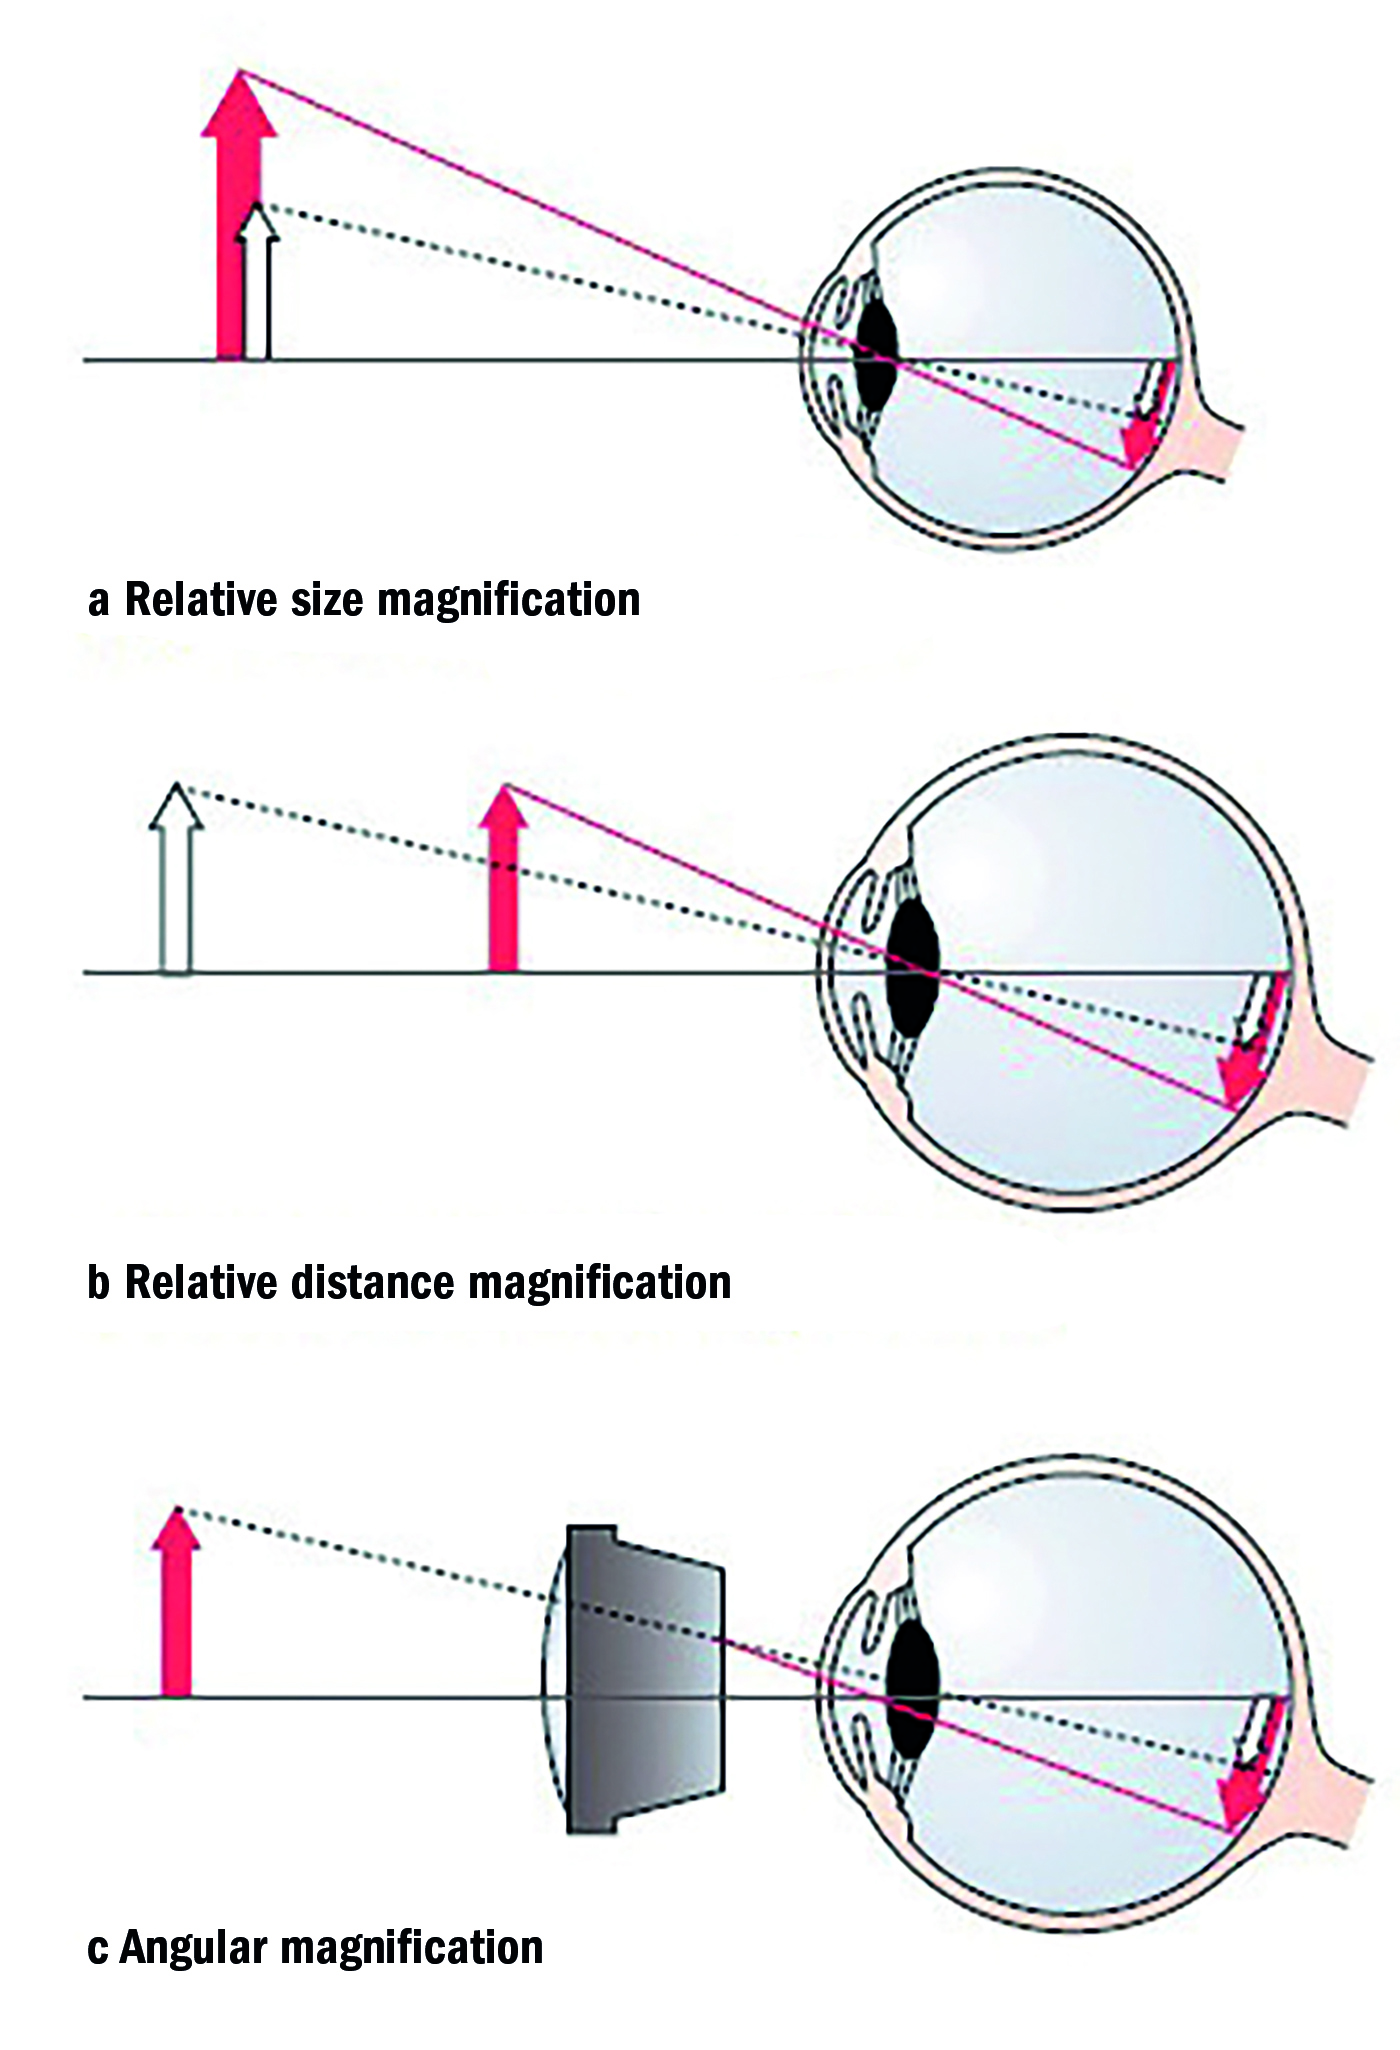
Low vision aids take many forms. Some, for example large print books, exploit relative size magnification (figure 3). Some allow things to be held closer than they would normally be held, so making them bigger (relative distance magnification). Strong glasses, or spectacle magnifiers in this context are an example. Others actually bend light to achieve a bigger image, angular magnification. Telescopes do this and this allows distant objects to be enlarged.
Figure 3: Different types of magnification
Most single lens magnifiers are designated by their lens powers, such as 8DS or 24DS. In most clinics, to ensure consistency, any low vision aid is usually recorded in terms of its dioptric power. Where magnification is written on a device, this is usually the magnification derived by the trade magnification formula:
M = F/4+1.
Case Example
A patient wants to know if the hand magnifier they have previously been given is ‘strong enough’. There is 6x written on the handle.
So, the equivalent power of the lens will be (6-1) x 4 = 20DS
This is what is recorded in the notes.
Usually, there are considered to be four categories of optical low vision aid:
- Spectacle magnifiers: a single lens thickness in front of the eye, either consisting of a single lens or a compound lens without separation.
- Hand magnifiers: allowing flexible distance from the object and the viewer’s eye. Many include an LED light source.
- Stand magnifiers: a lens in a mounting held at a set distance from the object. Most include an LED light source.
- Telescopes: two or more separated lenses, that nearest the eye acting as eyepiece and that furthest as the objective lens.
Spectacle or head borne magnifiers
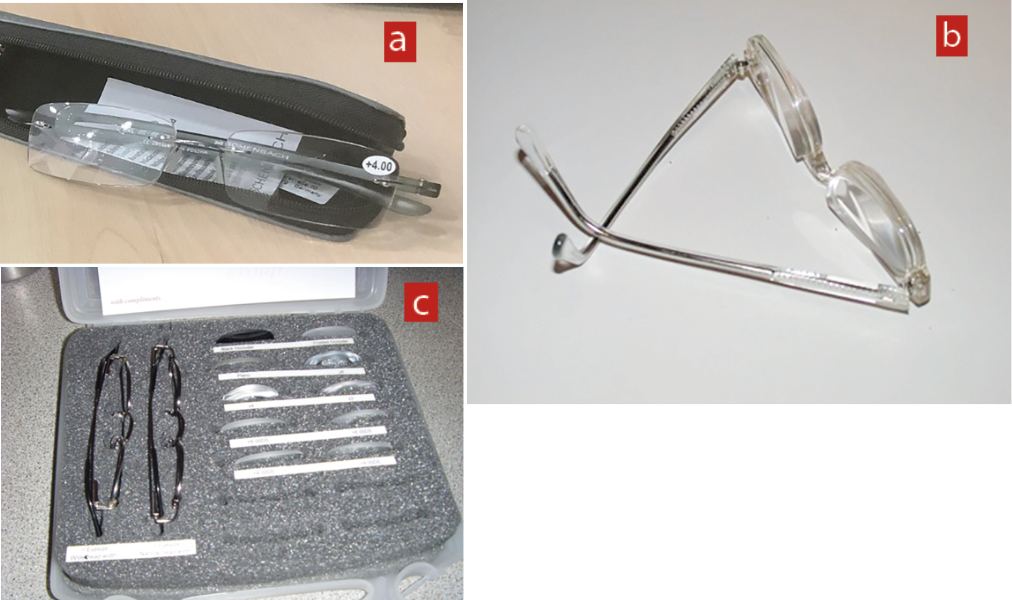
These are single or compound lens aids held in front of the eye for near magnification purposes (figure 4).
There are a number of advantages to a spectacle solution, so do not be put off by concerns about lens thickness or short working distance. These include:
- Maximum field of view. This is provided by having the lens as close to the eye as practicable. This is very useful in scanning tasks such as reading, particularly when trying to locate the start of the next line in a paragraph.
- Hands free. Remember that the higher the power, the more critical working distance becomes and so the hands are often needed for accurate positioning of the object.
- Cosmetic and psychological acceptance. Particularly with lower magnifications, there may be considerably less stigma attached to the wearing of spectacles. Elderly patients who have recently lost vision may find spectacles far more acceptable, though might also be more resistant to adopting a different viewing distance.
- Tints and coatings. Spectacles may be readily adapted to suit patient needs where needed. Tints may be useful with light sensitivity. Aphakes may benefit from UV protection. Patients with corneal hyperaesthesia may benefit from side shield attachment. Selective tints may be subjectively preferred, such as the orange/red tints often preferred with retinitis pigmentosa or Stargardt’s disease, or the yellow tint often liked by those with AMD.
- Wide range. There are many variations, including high power prescription lenses, ready-mades, trephined or advanced mounted adds, bifocals, hyperoculars and so on. The greater the range, the more likely an aid may meet a patient’s requirements. Most of these options allow for the correction of ametropia as well as magnification, essential for those with significant astigmatism.
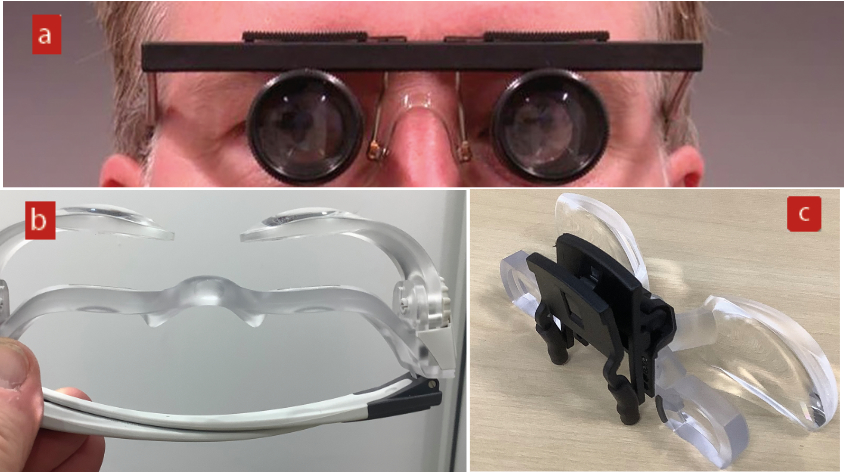
- Binocularity may be maintained. This may enhance acuity and total field of view. Because of convergence problems at closer working distances, base-in prism or decentration may be necessary for additions over +4.00DS and as the near add approaches +12.00D (three times magnification), binocularity becomes impractical to maintained as prolonged convergence at 8cm or less is an effort. The problem is not a major one as, more often than not, sight loss is asymmetric and the main challenge is establishing which of the eyes to offer the magnification to, as discussed earlier. As a rule of thumb, binocular comfort is possible by adding 1Δ base in prism in each eye for every dioptre of addition over +4.00DS.
Figure 4: Spectacle magnifiers. (a) +4.00Eschenbach ready-mades. (b) High addition ready-mades with base-in prism. (c) Norville high addition spectacle magnifier fitting set
Case Example
An AMD patient with negligible distance refraction can read N24 with a +4.00DS addition and, unusually, can achieve this with each eye. To achieve N8 fluently, a +16.00DS addition allows him to read N6 as predicted because N6 is four times smaller than N24, so +16.00DS would offer this four times magnification and an acuity reserve of 4/3:1, less than the often cited 2:1 but helping keep lens power down.
To maintain binocularity at the reduced working distance of 100/16 = 6.25cm, the following was prescribed for reading:
- R: +16.00 12Δ base in
- L: +16.00 12Δ base in
Remember, it is very unusual to find equal acuities in both eyes at low vision of this level.
A short working distance is the main disadvantage of spectacle magnifiers. This often reduces illumination, may be physically difficulty to maintain and is often associated with adaptation problems with patients more attuned to greater working distances. There is often some stigma attached to holding objects very close.
Case Example
A patient wants to be able to read their newspaper from cover to cover. Their current spectacles are only recently prescribed by a colleague and the patient is able to just achieve N12 with their +2.50D addition. What magnification is predicted as required and how might this be achieved with spectacle magnification? What might hinder success with this option?
- Estimated task acuity is N8
- An acuity reserve of 2:1 is sensible
- Target acuity with magnification is therefore N4
- N12 is three times bigger than N4, so three times the magnification of the image with their spectacles is required, or in other words, a +7.50D addition (note that in this case we have adopted a starting point using their existing spectacles rather than a +4.00D addition. This is why the end point is not +12.00D which is what most would first assume is an addition offering three times magnification.
- A +7.50D addition requires a working distance of 100/7.5cm or approximately 13cm. The working distance is significantly reduced even at what might be considered modest magnification levels. Without good advice on local lighting and training to be able to comfortably assume the new close distance, this option may prove unsuccessful.
Hand-held magnifiers
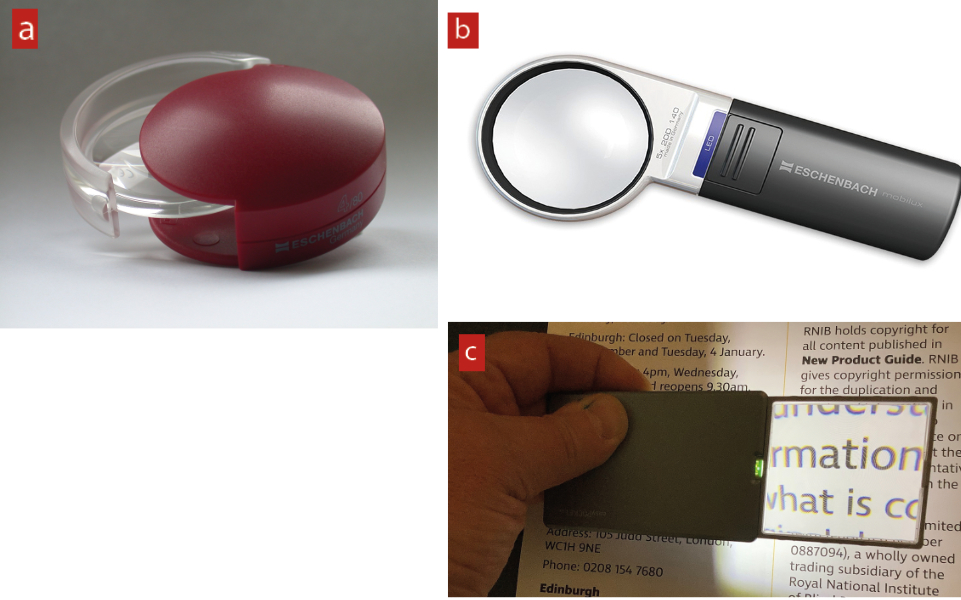
Hand-held magnifiers, as popularised by Victorian sleuths, are both convenient and portable, making them the most likely first choice for helping with spot tasks when on the move, such as reading a medicine bottle or telephone directory. Uneven surfaces, such as food tins, are easy to view. Though less easy to use for prolonged reading tasks, this is very much patient dependent so should not be ruled out. There are a wide range available, many with in-built illumination, which again increases the likelihood of success (figure 5). If the aid has a right or left-handed design, the flat surface of the lens needs to be towards the object.
Figure 5: Examples of different hand magnifiers. (a) portable loupe, (b) illuminated credit card style, (c) illuminated hand magnifier
It is important to remember that, where a patient has little success with a prescribed hand magnifier, it is always important to check how they use them. Incorrect use is common. When dispensing, it is important to go through the following instructions:
- Ask the patient to hold the object (book, newspaper) at a comfortable working distance
- Ask them to place the magnifier close to the page and then move it away and notice how things get bigger.
- Ask them to keep moving the lens away from the object until it starts to go out of focus
- Ask them to reposition as close to this point as possible while maintaining a clear image
The magnification from a hand magnifier will depend on where the lens is placed relative to the object and also on the correction worn by the patient. If the magnifier is held at exactly its focal length from the object (for example a 12DS hand magnifier held at 8cm from a page of print), then the light from the aid reaching the eye will be parallel and offer a clear image to an emmetrope or someone with their distance correction in place (figure 6). This will be a constant magnification irrespective of the lens to eye distance. The closer the patient moves their eye to the lens, the bigger the field of view, but magnification is unaffected (figure 7).
Figure 6: When a hand magnifier is held at its working distance from the object, the emergent light is parallel
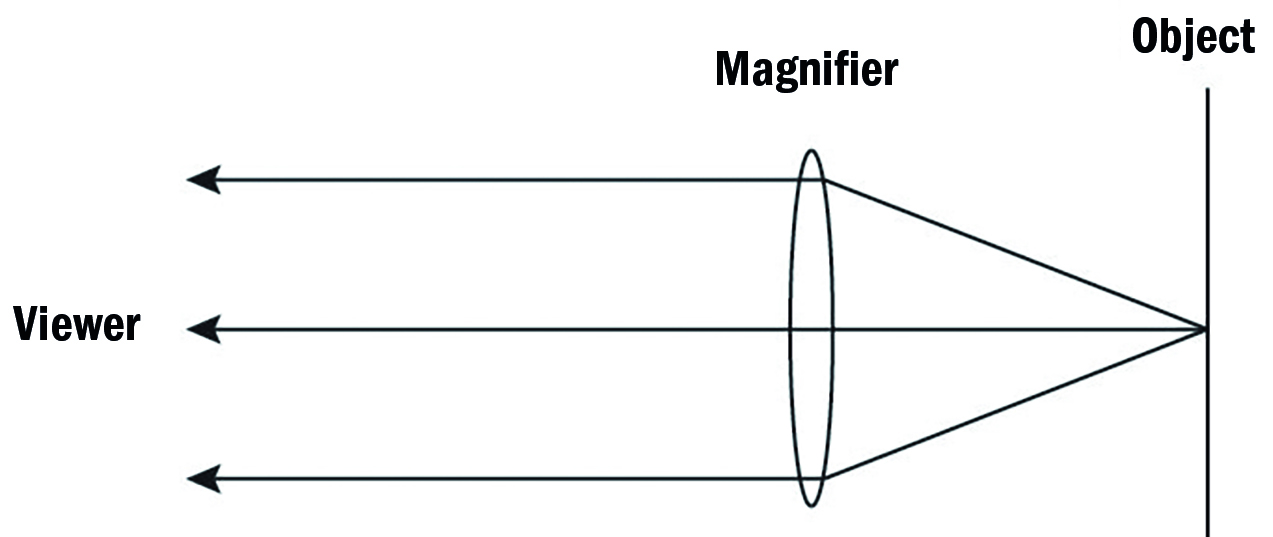
Figure 7: When a hand magnifier is held at its working distance from the object, magnification is constant as the lens to eye distance is reduced while the field of view increases
As the image formed when a lens is held at its focal length from the page tends to be aberrated and the image not as sharp as most would like, most patients tend to hold their hand magnifier closer to the page to improve the image quality, but by doing so achieve less magnification. For the emmetrope or pre-presbyope, therefore, a good rule of thumb is to issue a stronger hand magnifier than one might otherwise have predicted.
Where a patient uses their hand magnifier with a reading correction in place, this is not necessary as the magnifier lens, reading addition and variable separation distance may now act as a zoom system.
This is important as the magnification that they may achieve with the magnifier is related to how much bigger the equivalent power of the addition/hand magnifier lens combination is compared to that of their spectacles alone.
So, if a patient asks for a stronger hand magnifier, ask them to demonstrate correct use of their aid as described. If they are using correctly and still struggling with the magnification, ascertain if they are using their reading correction. If they are wearing multifocals, then have them decrease the lens to spectacle distance and this acts like a ‘zoom’ function.
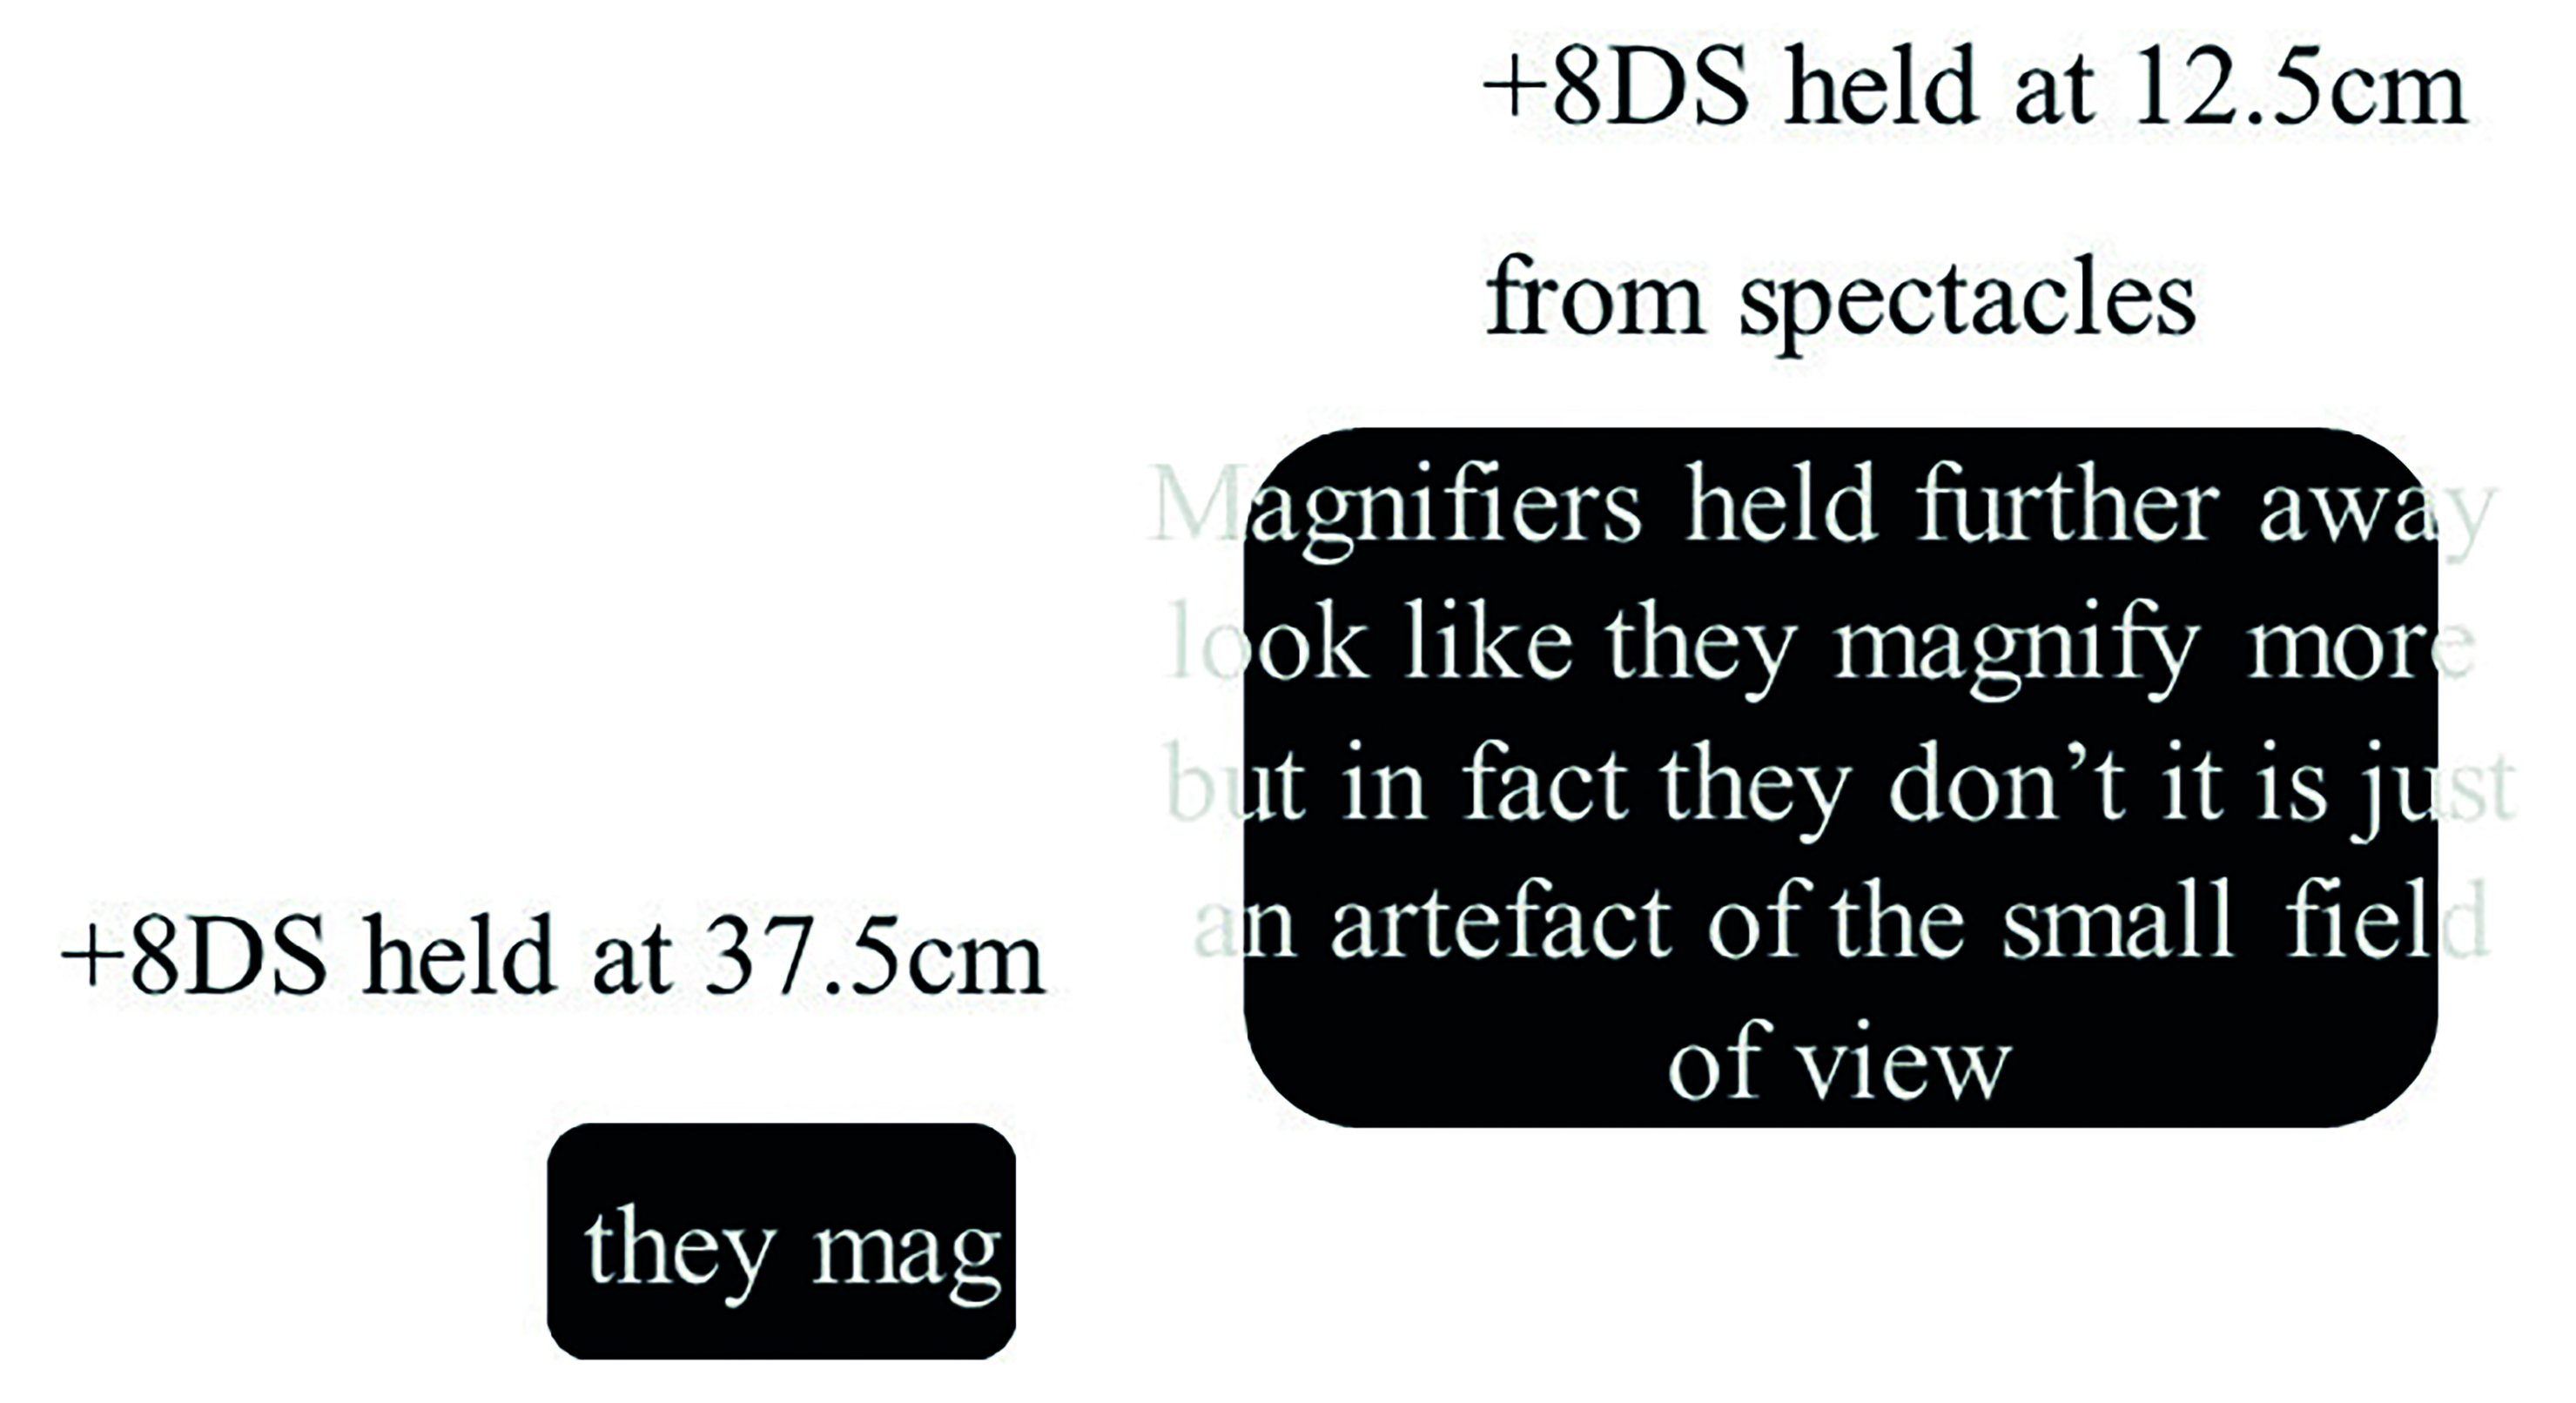
In this situation, the magnification achieved by the patient may be completely different to that suggested by the markings on the aid. In many cases where a patient says their hand magnifier is not strong enough, the best option is to tell them to move the lens and object closer to their glasses (a distance often described by the lower-case letter z), because the smaller the z value, the bigger the magnification.
Figure 8: The equivalent power of the magnifier in conjunction with the reading addition may be calculated by the formula: Fe = Fm + Fa - z.FmFa (where, Fe = equivalent power of the system: Fm = the power of the magnifier: Fa = the power of the near addition: z = the distance in metres separating the magnifier and spectacles)
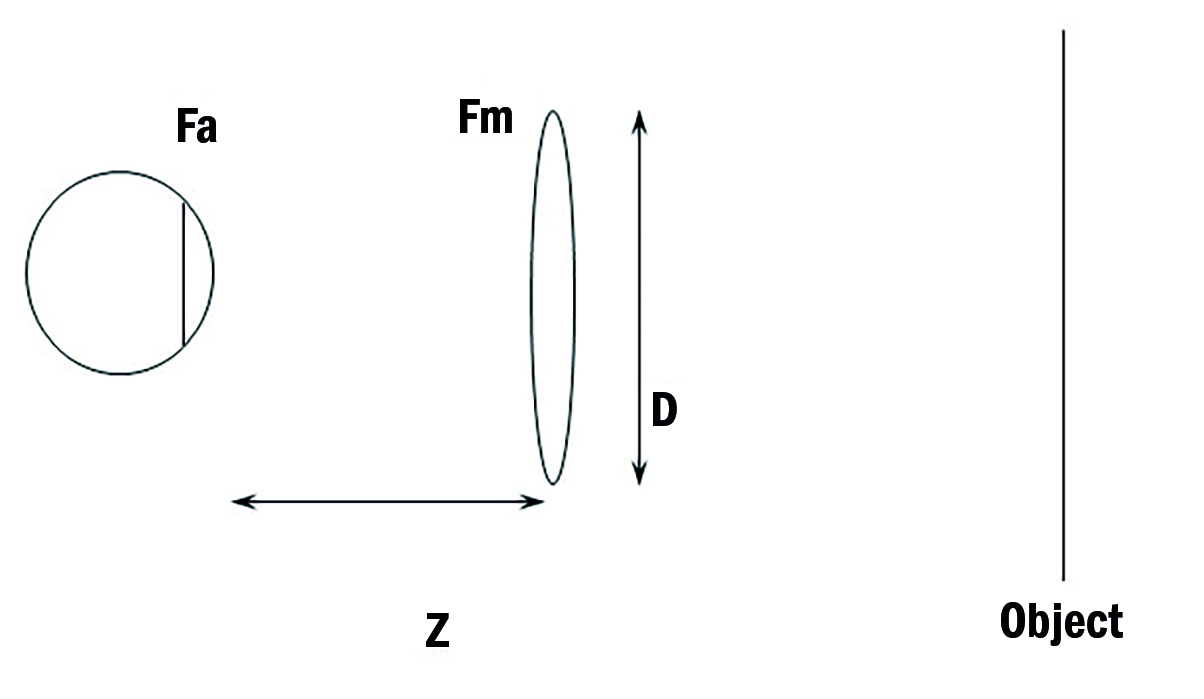
Figure 8 is a schematic representation of the hand magnifier used in conjunction with a reading addition. The magnification for the use of a hand magnifier is simply the ratio between the original dioptric correction value (that of the reading addition, Fa) and that of the new lens system Fe (reading addition Fa and spectacle add Fm separated by z). The latter may be calculated by the formula:
Fe = Fm + Fa - z.FmFa
Case Example
A patient wearing a +2.50D addition finds their +20D hand magnifier to be inadequate and wants a stronger one. The hand magnifier has 6x on the handle (so is a 20DS as calibrated by F/4 + 1). It is always useful to remember that simply reducing the ‘z’ distance serves to increase the magnification and is usually all that is required.
When the magnifier is held up right to the spectacles, such that z = 0, then the equivalent power Fe is +22.5D (Fa + Fm). As the power of addition is +2.50D, then:
Magnification = Fe/Fa = 22.50/2.50 = 9 times
If z is the same as the focal length of the lens (in this case 100/20 = 5cm) then:
Fe = 20 + 2.5 – (0.05 x 20 x 2.5) = 20D
Magnification = Fe/Fa = 20.00/2.50 = 8 times
Note that where z is the focal length of the magnifier lens, then Fe = Fm.
As z increases, the Fe reduces accordingly. For example, for the z value of 20cm;
Fe = 20 + 2.5 – (0.2 x 20 x 2.5) = 12.50D
Magnification = Fe/Fa = 12.50/2.50 = 5 times
Notice how in none of these cases can we say the magnification achieved is the same as written on the magnifier.
Stand magnifiers
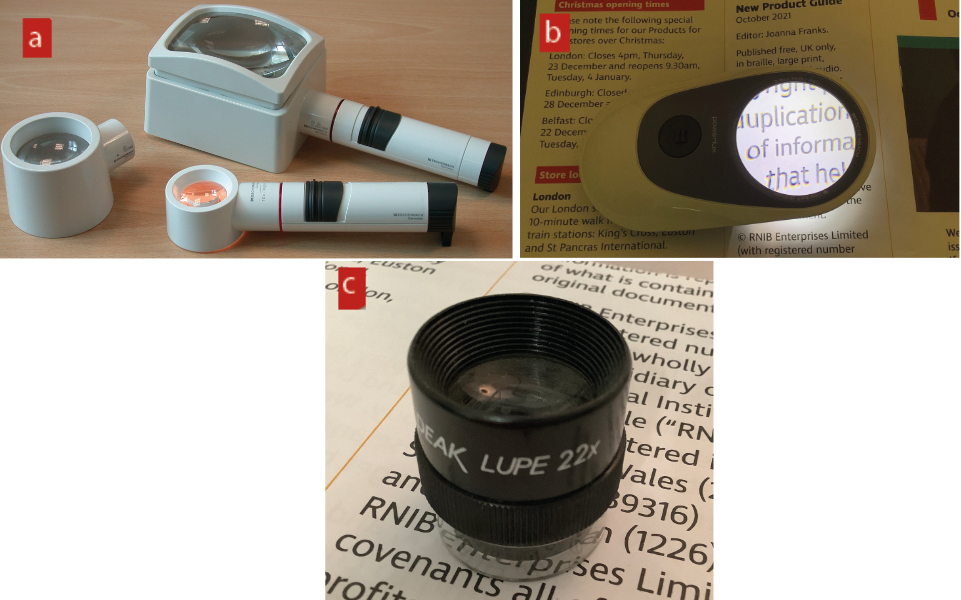
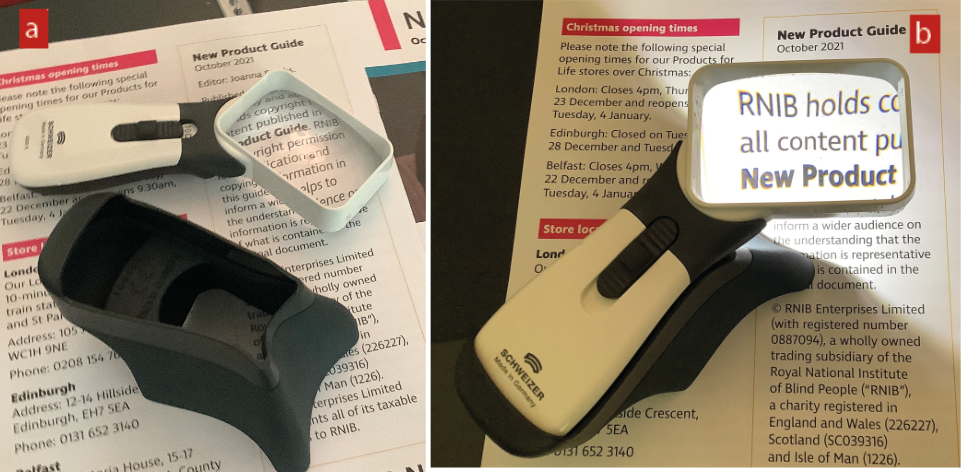
A significant advantage of stand magnifiers is that they are supported on the object to be viewed so offer a more stable and less physically demanding option, especially useful for those with handling challenges or with a tremor (figure 9). Most include an LED light source, which tends to give a more even illumination than that offered by the source in a hand magnifier. For uneven and flexible surfaces, such as newspapers, the stand may act like an iron and flatten the surface. This helps maintain constant contrast across the viewing field, especially noticed when there is an illumination source included.
Figure 9: Stand magnifiers. (a) Various illuminated stand magnifiers with detachable battery handle, (b) Powerlux stand magnifier with double LED source, (c) 22x Peak magnifier
Hands-free tasks, where a tool or pen are required, are often easier with a stand magnifier. As stand magnifiers can be bulky to carry around, many modern hand magnifier ranges offer the option of a stand into which the aid may be fitted as required (figure 10). Some lower power aids have an in-built tilt facility to enhance this and to reduce reflections from overhead lighting.
Figure 10: (a) Hand magnifier with an optional stand and (b) mounted. Note, this magnifier is for left-handed use
The most important point to remember about most modern stand magnifiers, especially those of lower powers, is that the emergent light is divergent. This is because the stand positions the magnifier lens from the object at a distance less than the focal length of the lens, so minimising aberrations as mentioned earlier. Also, in the unlikely situation of the aid being used under direct sunlight, there is less risk of starting a fire when reading a newspaper.
So, to see the image clearly, the patient requires either accommodation or, if presbyopic, a reading addition, typically +2.50DS.
It is often of importance, therefore, for the patient to keep any old spectacles as it may mean that they will be able to get optimum efficiency from the aid prescribed. Most modern lower powered stand magnifiers are designed this way to minimise aberrations affecting the image. To satisfy yourself, look through a stand magnifier and gently lift it off the page. The image will initially increase in size but also become less sharp (spherical aberrations) and develop purple and orange fringes (chromatic aberrations).
Case Example
A 48-year-old diabetic has to lift his stand magnifier from the page to see print clearly and wants a stronger one now. His measurable acuity is the same as when you first prescribed the aid five years ago and, when he lifts the aid from the page, he is able to read the same sized print as when it was first issued some eight years ago.
As he is presbyopic now and unable to focus the divergent emergent light, he is moving the lens away from the page to its focal length so that the emergent light is now parallel and able to be seen without any accommodation.
Prescribe him readers appropriate for the working distance.
Patients benefit from an explanation that stronger usually means smaller size and, therefore, narrower field of view. Many ask for a larger lens because they are struggling with reading just a few words at any viewing position. Typically, the main complaint is of difficulty locating the start of the next line when reading a paragraph of text. A typoscope may also help here.
The obvious answer to this problem, therefore, is to encourage the patient to move a little closer to the aid to improve the field of view. However, the shorter the working distance, the greater the divergence of the light hitting the eye and therefore, to maintain a clearer image, it is often necessary to prescribe a stronger reading addition in their glasses.
Case Example
A patient moves their eye right up to their +6.00D stand magnifier in order to maximise the field of view. However, doing so makes the image blurry.
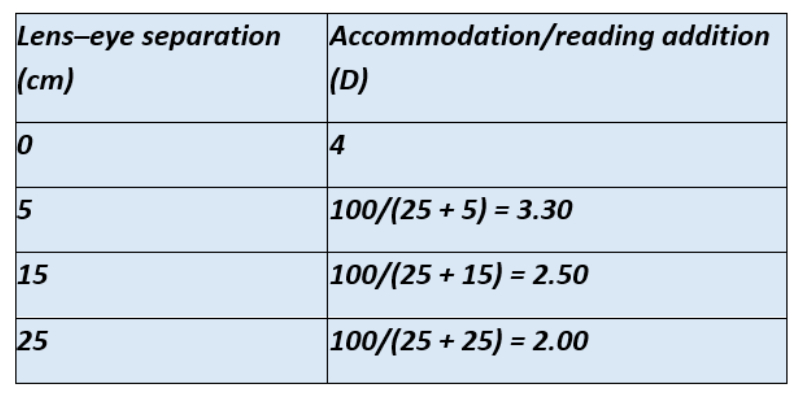
The lens to object distance, or in other words the height of the lens in the stand magnifier from the page when the stand is held flat on it) is measured to be 10cm. Light from the object will hit the lens with a -10.00DS vergence of which +6.00 will be neutralised by the lens. This leaves -4.00DS emergent vergence and hence the required amount of accommodation or addition for this patient is +4.00DS. Ready-mades of this power were given and the wider field image was now clear for the patient. Table 4 shows the required reading addition for increasing eye to magnifier distances.
Table 4: Calculating the required reading addition for the stand magnifier in case example of a +6.00DS lens in a 10cm height stand
Telescopes
A telescope allows magnification of an object without having to change the working space. This is achieved by a combination of lenses separated by a finite distance, plus lenses in an astronomical system, or a negative eyepiece and positive objective in a Galilean system. Magnification is achieved by changing the angle of incident light, so-called angular magnification, and so is able to offer a means of magnifying a distant object, such as television subtitles or a sign above a supermarket aisle.
Telescopes set to magnify a near object, often described as tele-microscopes, offer the advantage over spectacle magnifiers of an increased working distance. They are useful for hobbies or tasks where a tool or implement needs to be between the viewer and the task. Most telescopic systems allow the user to change the lens separation and therefore the point of focus, allowing them to change from a distant target to an intermediate or near one. A few telescopes achieve this by the addition of lens caps placed over the objective lens.
Spectacle-mounted telescopes (figure 11) are preferable for prolonged viewing tasks, such as television viewing, to minimise the impact of tremor and fatigue. Spectacles can easily be adapted to a telescopic form with a clip-on option, either monocular or binocular.
Figure 11: Spectacle-mounted telescopes: (a) Eschenbach 4 x Galilean; (b) MaxTV; (c) Clip-on MaxTV
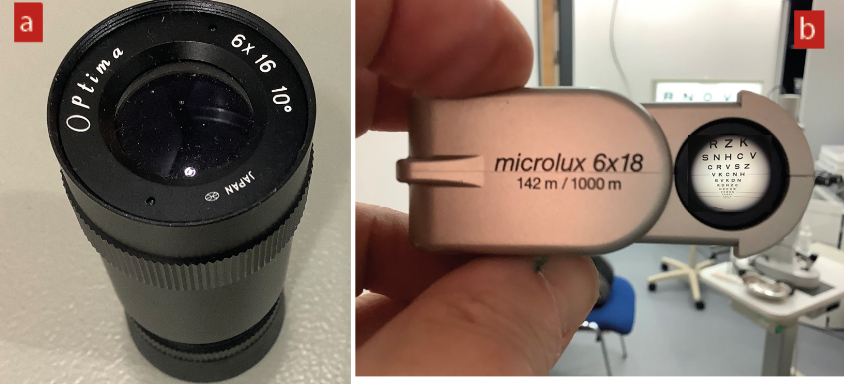
For portability, a hand-held monocular telescope may be preferred (figure 12). Where binocularity needs to be maintained and for patients with small hands (children), a binocular option is usually preferred.
Figure 12: Hand-held telescopes. (a) Optima, (b) Eschenbach Microlux
The main disadvantage of a telescope is that, because the objective lens, which limits the light entering the system by acting as the entrance pupil, is a distance away from the eyepiece, the field of view is restricted. Also, hand tremor or, with spec-mounted designs, head movement is magnified, which is off-putting for many. The restricted field of view also means that object location may be tricky, and is near impossible for moving objects. The old assumption that telescopes are good for bus numbers is a myth.
For a lens system to offer an apparent increase in the size of an object purely through angular magnification, then both the object and the image have to be at infinity. In this situation, the system is said to be afocal (or in normal adjustment). As soon as an image is formed closer than infinity in such a way that it appears larger than the object, then this system is said to be focal (in so much as it now has a finite focal length) and magnification is now achieved primarily by relative distance magnification; the image appears to be at a distance that makes the object appear to be closer.
Telescopes used in low vision world tend to exploit refraction. Reflection telescopes exist, as budding astronomers will know, but they are not easily miniaturised. Refracting telescopes are made up of two lenses, the objective and the eyepiece, with more lenses added as required by design.
The objective lens is a positive lens that acts to converge incident light towards the other lens, the eyepiece. The nature of the eyepiece dictates which of the two designs of telescope the system is; a negative eyepiece is found in a Galilean telescope, while a positive eyepiece is found in a Keplerian (or astronomical) telescope.
For afocal systems, the magnification is found to be the ratio of the power of the two lenses:
M = - F1/F2
Otherwise written as
M = - Feyepiece/Fobjective
For an afocal system, the equivalent power is zero. When it is focused on an intermediate or near object then it will have an equivalent power related to the viewing distance at which the object is viewed.
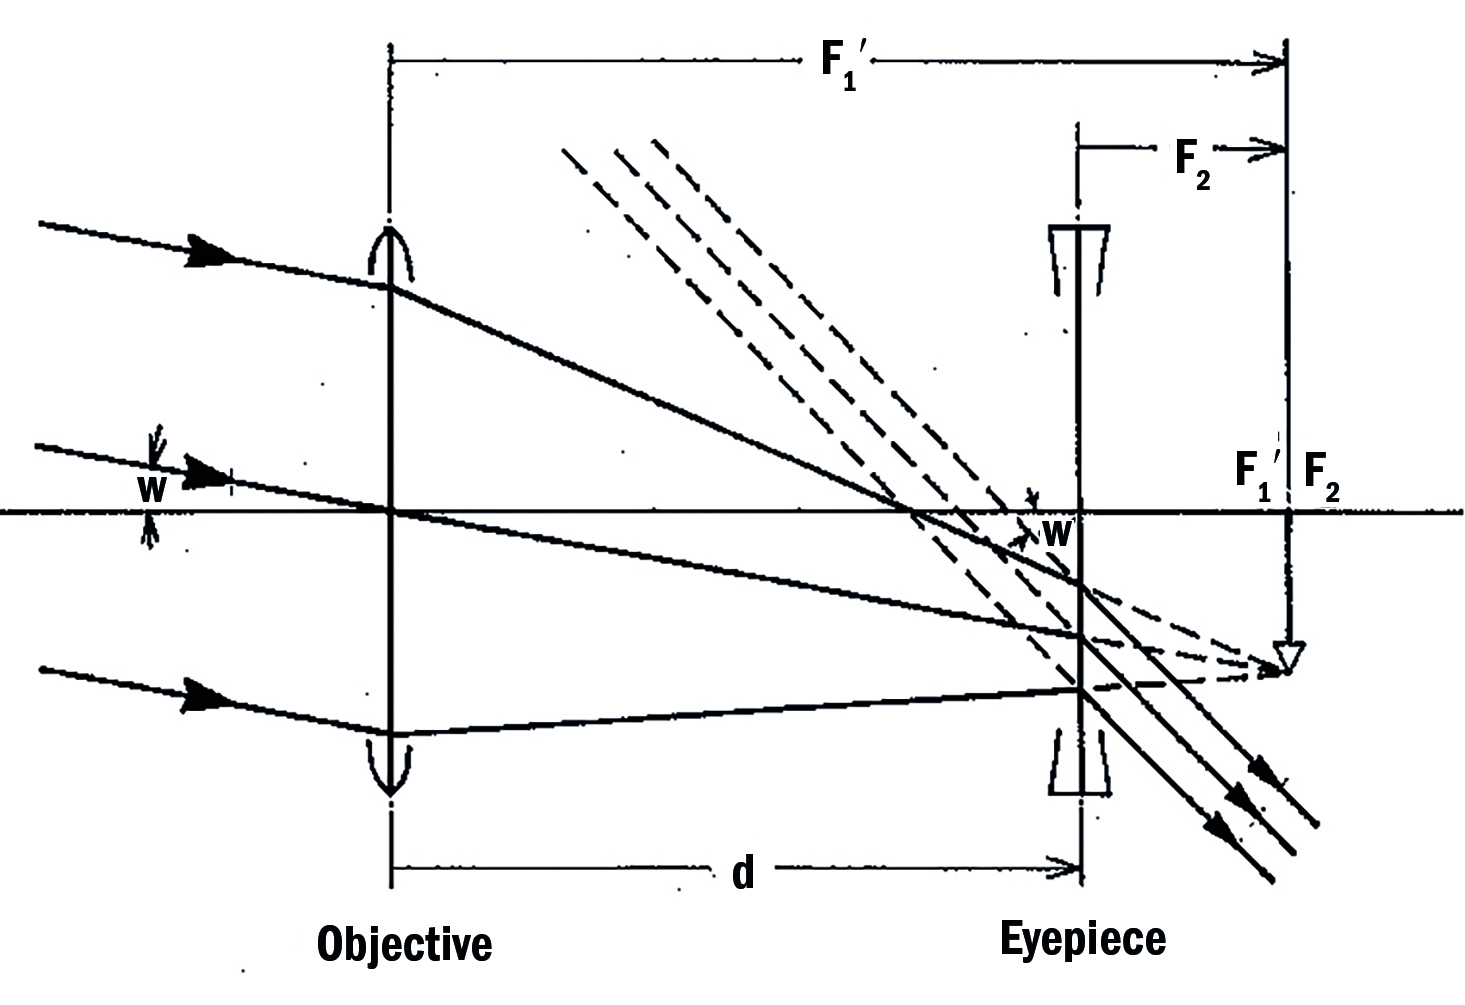
For a Galilean system (figure 13), the objective lens focuses light from infinity upon a point (F1’) which is coincident with the primary focal point of the eyepiece (F2). Magnification is achieved by the incident angle of subtense at the retina (w) increasing (w’).
Note the following:
- The eyepiece is numerically stronger than the objective
- The length of the system is the sum of focal lengths of the objective lens (f’1) and that of the eyepiece (f2) and, as the eyepiece is negative this represents a lower numerical value than if the two lenses were positive
- The image formed is erect
- The exit pupil, which is the image of the objective as seen through the eyepiece, is located within the tube
Figure 13: Optics of a Galilean telescope
Case Example
A Galilean telescope is formed of a +20.00DS objective lens and a -50.00DS eyepiece. What is the magnification?
M = Feyepiece/Fobjective = - (-50)/20 = 2.5 x
The answer is a positive number, so implying an erect image and therefore confirming a Galilean system.
With a Keplerian system, the objective and the eyepiece are both positive powers (figure 14). Again, the secondary focal point of the objective (F1’) coincides with the primary focal point of the eyepiece (F2) and magnification is achieved by increasing the angle of subtense (w to w’).
Note the following:
- The positive eyepiece is numerically stronger than the objective
- The length of the tube is the sum of the two focal lengths. Both lenses are positive and so the length is greater than that of a Galilean system.
- As both of the lens powers are positive, then the magnification value will be a negative number. This implies an inverted image. Were the image to remain inverted, then the system is said to be astronomical. Stargazers will know that image inversion when staring into space is the norm. However, for use as an aid in everyday life, a telescope with an inverted image would prove pretty well impossible. For this reason, astronomical systems include prisms to erect the image at which point the Keplerian system is no longer astronomical but instead might be described as terrestrial.
- The exit pupil is just outside the eyepiece. This is important as it means that the limiting factor for light leaving the system is pretty well coincident with the entrance pupil for the viewer, that is their iris. Most light leaving the telescope will enter the viewer’s eye. This is one reason why image quality with a Keplerian system is better than that of a Galilean system.
Figure 14: A Keplerian (or astronomical telescope if the inverted image is that viewed)
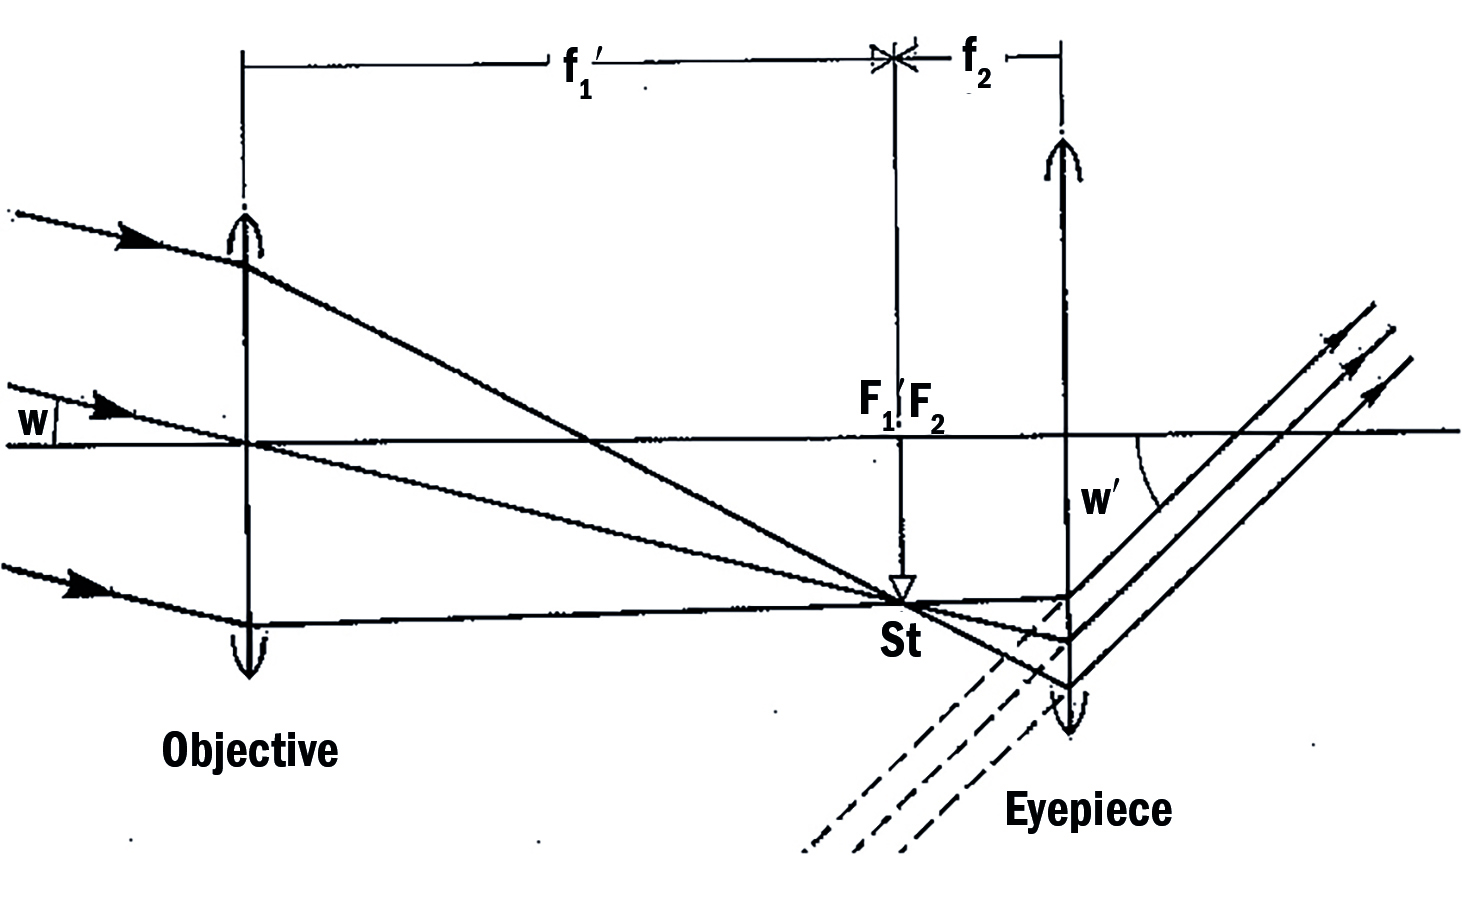
Figure 14 shows the point where the rays cross over within the tube (arbitrarily labelled as St). Placement of a stop at that point can reduce spherical aberration and, again, lead to an improved image quality.
Case Example
A Keplerian telescope is formed of a +20.00DS objective lens and a +50.00DS eyepiece. What is the magnification?
M = Feyepiece/Fobjective = - 50/20 = - 2.5x
The answer is a negative number and therefore inverted.
For both types of telescope, uncorrected ametropia will have an impact on the expected magnification. The best way of thinking about this is that the uncorrected ametropia modifies the power of the eyepiece.
Case Example
Which type of telescope will give greater magnification for an uncorrected -10.00DS myope? If we use the same telescopes as in the previous two cases then:
For the Galilean system with the -50.00DS eyepiece, the eyepiece value used with the uncorrected myope now becomes -40.00DS. Therefore, magnification is:
M = - (-40)/20 = -2x
This is less than the magnification found in the previous example.
For the Keplerian system, the eyepiece value for the uncorrected myope is now +60 and so:
M = 60/20 = 3x
So, the uncorrected myope achieves better magnification with the Keplerian system, less with the Galilean. For the uncorrected hyperope, the opposite of this will be true.
One unusual variation of a Galilean telescope is the combination of a negative powered contact lens representing the eyepiece and a positive spectacle lens representing the objective. This has the advantage of a wider field of view and somewhat better cosmesis than the standalone telescope, but at the expense of limited magnification range and problems of vision stability as the contact lens moves on the eye. Galilean telescopic intraocular implants have also been used with varying success.
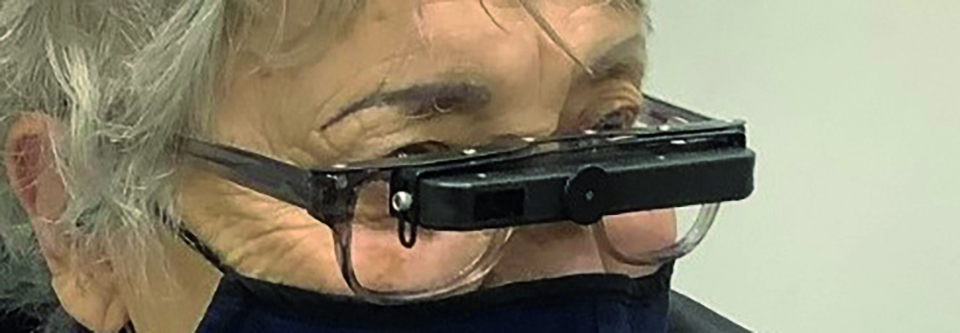
Another interesting variation is the bioptic telescope (figure 15). Telescopes are not designed for walking around with while using. A bioptic telescope is one mounted across the brow of a spectacle frame and allows the user to look through the telescope eyepiece simply by tilting their head forward when extra magnification is required.
Figure 15: A bioptic telescope
Case Example
A patient has been issued a telescope with which he is not pleased. While the magnification was enough to see what he needed, he found location of targets, such as shop and transport signs, difficult and time-consuming. This meant he felt self-conscious using the telescope in busy places.
The markings seen on the device are as follows:
8 x 24
The number before the x is the magnification (8 times), while the number after the x represents the diameter of the objective lens in millimetres (24mm). The diameter of the objective lens represents the entrance pupil of the system and, as such, limits the light entering the system. Knowing this, therefore, has some bearing on the way the telescope will be used.
A larger value should offer a wider field of view, but also make the telescope weightier and bulkier. This might be remembered when deciding which of the two is most important for a patient and in this case would seem a good idea.
Secondly, knowledge of these values plus and an awareness of the size of the patient’s pupil gives some indication of the brightness of the image seen by the patient.
This patient had a 4mm pupil diameter in photopic conditions. Light leaving the system, as we have previously stated, is determined by the exit pupil (or the image of the entrance pupil). Dividing the magnification into the objective diameter gives us the exit pupil diameter, so in our example:
24/8 = 3mm
This means that light exiting the system will not fill the entrance pupil of the patient’s own eye. It was decided to replace his telescope with one designated as follows:
8 x 32
Now, he will have a wider field of view, so making location of targets easier, and also the new system will have an exit pupil that matches his own eye’s pupil:
32/8 = 4mm
This will maximise the brightness of the image and should improve contrast resolution.
When prescribing a distance telescope, the predicted magnification is not always the best. For example, to allow someone with distance acuity of logMAR 1.0 (or Snellen 6/60), 10 times magnification should allow them to attempt 0.0 (or 6/6). However, telescopic magnification is often best prescribed by erring on the conservative side. A slightly reduced magnification, in this case say eight times, may still allow resolution of most of the required target but will also give a more stable view; the higher the magnification, the more the image will jump about. There is no need to offer a reserve, as with close work.
For prescribing telescopes for near, the predicted magnification may be set in a trial frame during the assessment and the patient asked to read their required target acuity. If accepted, the telescope may then be prescribed. Again, err on the cautious.
Conclusion
This aim of this article has been to cover the main areas of low vision practice as might be relevant to everyday community practice. Increasingly, electronic aids are superseding the more traditional optical aids. For a review of these, see a previously published series in Optician.8-12
- Peter Black MBA FBDO FEAOO AFHEA is Course Lead for BSc (Hons) Ophthalmic Dispensing at the University of Central Lancashire, Preston, and is a practical examiner, practice assessor, exam script marker, board member and past president of the Association of British Dispensing Opticians. Tina Arbon Black BSc (Hons) FBDO CL is director of accredited CPD provider Orbita Black Limited, an ABDO practical examiner, practice assessor and exam script marker, and a distance learning tutor for ABDO College.
- Bill Harvey is a specialist optometrist at the RNIB Low Vision Centre, London.
References
- Pezzullo L et al. (2018) The economic impact of sight loss and blindness in the UK adult population. BMC Health Services Research, 18:63
- Office for National Statistics. (2015) 2014-based National Population Projections: Principle projections
- Deloitte Access Economics (2017). Incidence and risk of sight loss and blindness in the UK. RNIB
- RNIB. Key statistics about sight loss. Available at: https://www.rnib.org.uk/sites/default/files/Key%20stats%20about%20sight%20loss%202021.pdf (Accessed 30/08/22)
- Marc LG et al. (2008) Screening performance of the 15-item geriatric depression scale in a diverse elderly home care population. American Journal of Geriatric Psychiatry. Nov;16(11):914-21
- Virgili G et al. (2022). The association between vision impairment and depression: A systematic review of population-based studies. Journal of Clinical Medicine, 11, 2412
- Nollett, C et al. (2016). Depression in Visual Impairment Trial (DEPVIT): a randomized clinical trial of depression treatments in people with low vision. Investigative Ophthalmology & Visual Science 57 (10), pp. 4247-4254
- Harvey B. Developments in electronic low vision aids: Assistive technology. Optician, 19.02.2021, pp19-22
- Harvey B. Developments in electronic low vision aids: Assistive technology part 2. Optician, 12.03.2021, pp18-22
- Harrvey B. Developments in electronic low vision aids: Assistive technology part 3. Optician, 14.05.2021, pp20-23
- Harvey B. Developments in electronic low vision aids: Assistive technology part 4. Optician, 25.06.2021, pp24-32
- Harvey B. Developments in electronic low vision aids: Adaptive technology part 5. Optician, 23.07.2021, pp18-22