My time as an optometrist perfectly reflects the gradual transition from direct to indirect ophthalmoscopy as the first-choice technique for optical, non-automated fundoscopy in the UK. At university, I found direct ophthalmoscopy easy and took to the technique well. The fundus view was easily attained, with a reasonable field of view and the right way up; just as you might expect when practising on young, emmetropic patients with clear media (figure 1).
Figure 1: Direct ophthalmoscopy. (a) Trusty old direct ophthalmoscope bought by author in 1985. (b) Proximity to patient is essential to maximise view
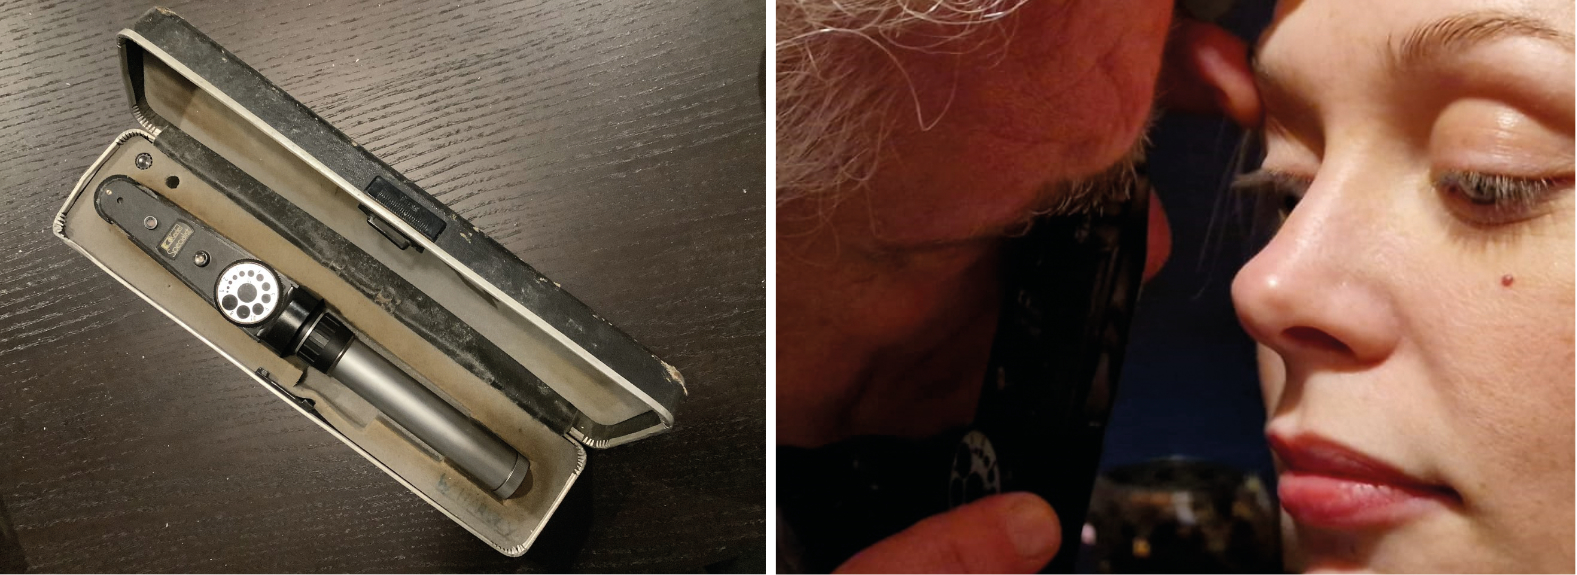
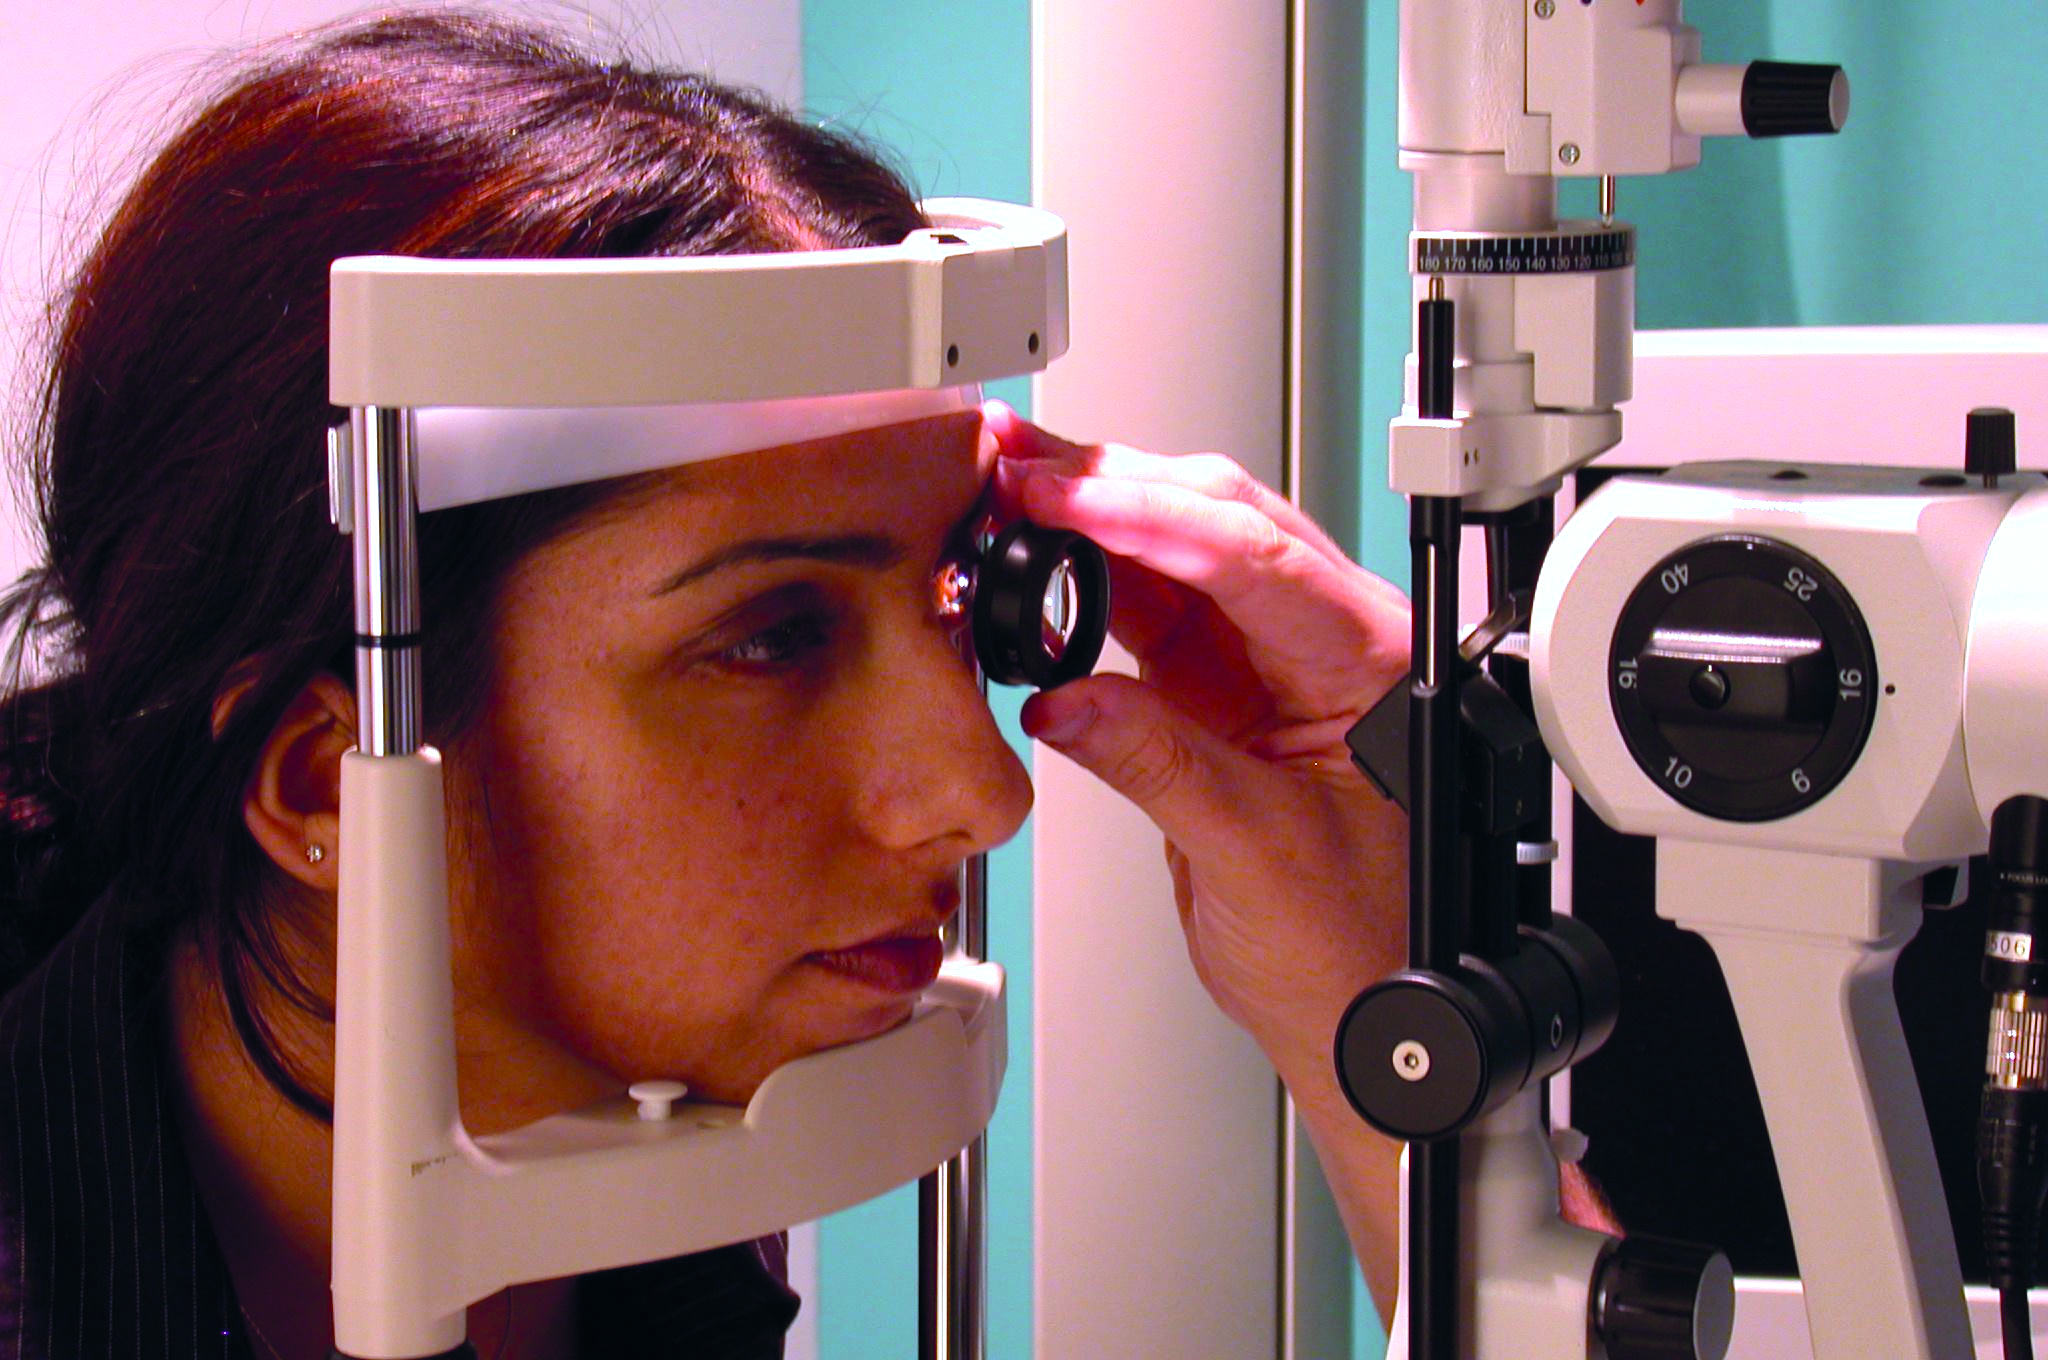
Binocular indirect ophthalmoscopy (BIO) took more practice, was obviously easier if the patient was dilated, and the image was inverted and reversed so required a new way of interpretation. Over time, and after exposure to older patients with media changes and for accurate assessment of the disc and macula, slit-lamp BIO (figure 2) soon replaced direct as my first-choice technique for fundus viewing, direct remaining the method of choice for domiciliary visits, the very young, people with severe learning disability, and for alternative viewing of some specific lesions, such as cortical cataract and certain floaters.
Figure 2: Slit-lamp binocular indirect ophthalmoscopy
My first exposure to headset binocular indirect ophthalmoscopy (HBIO) was less than auspicious. The original headsets I learned with were powered via a wall electrical socket, were heavy, and were quite cumbersome as a result. I also found that patients required dilation and tended to be less than enthusiastic about the brightness of the light source. This prevented me from developing the skill with any confidence and, I confess, my confidence with HBIO failed to grow.
A few years ago, I started working in a low vision clinic where I regularly undertook domiciliary visits, saw many people with often severe learning disability, and regularly examined both very elderly and very young patients where slit lamp BIO proved difficult. So, I took a second look at headset BIO. Not only have I found that the technique is nowhere near as difficult as I had always thought it to be, but found it to have many advantages over direct ophthalmoscopy and capable of offering excellent retinal views for patients who had been quite resistance to other methods. Importantly, newer designs of headset units have many improvements over those from my student days making the technique much easier, more comfortable for the patients, and even possible without dilation in many cases.
So, the aim of this article is to encourage you to have another look at headset BIO.
History
The invention of the HBIO is generally attributed to the eminent ophthalmoscopy and war hero Charles Schepens (1912 to 2006) who first described it in 1945.1 Although a range of binocular indirect ophthalmoscopes had been in existence since the 19th century, these were limited in terms of extent of field of view when assessing the peripheral retina. To address this, and therefore improve the detection and management of retinal detachment, Schepens introduced the head-mounted, internally illuminated instrument with which we are familiar today. In 1999, Schepens was chosen by the American Society of Cataract and Refractive Surgery as one of the 10 most influential ophthalmologists of the century.
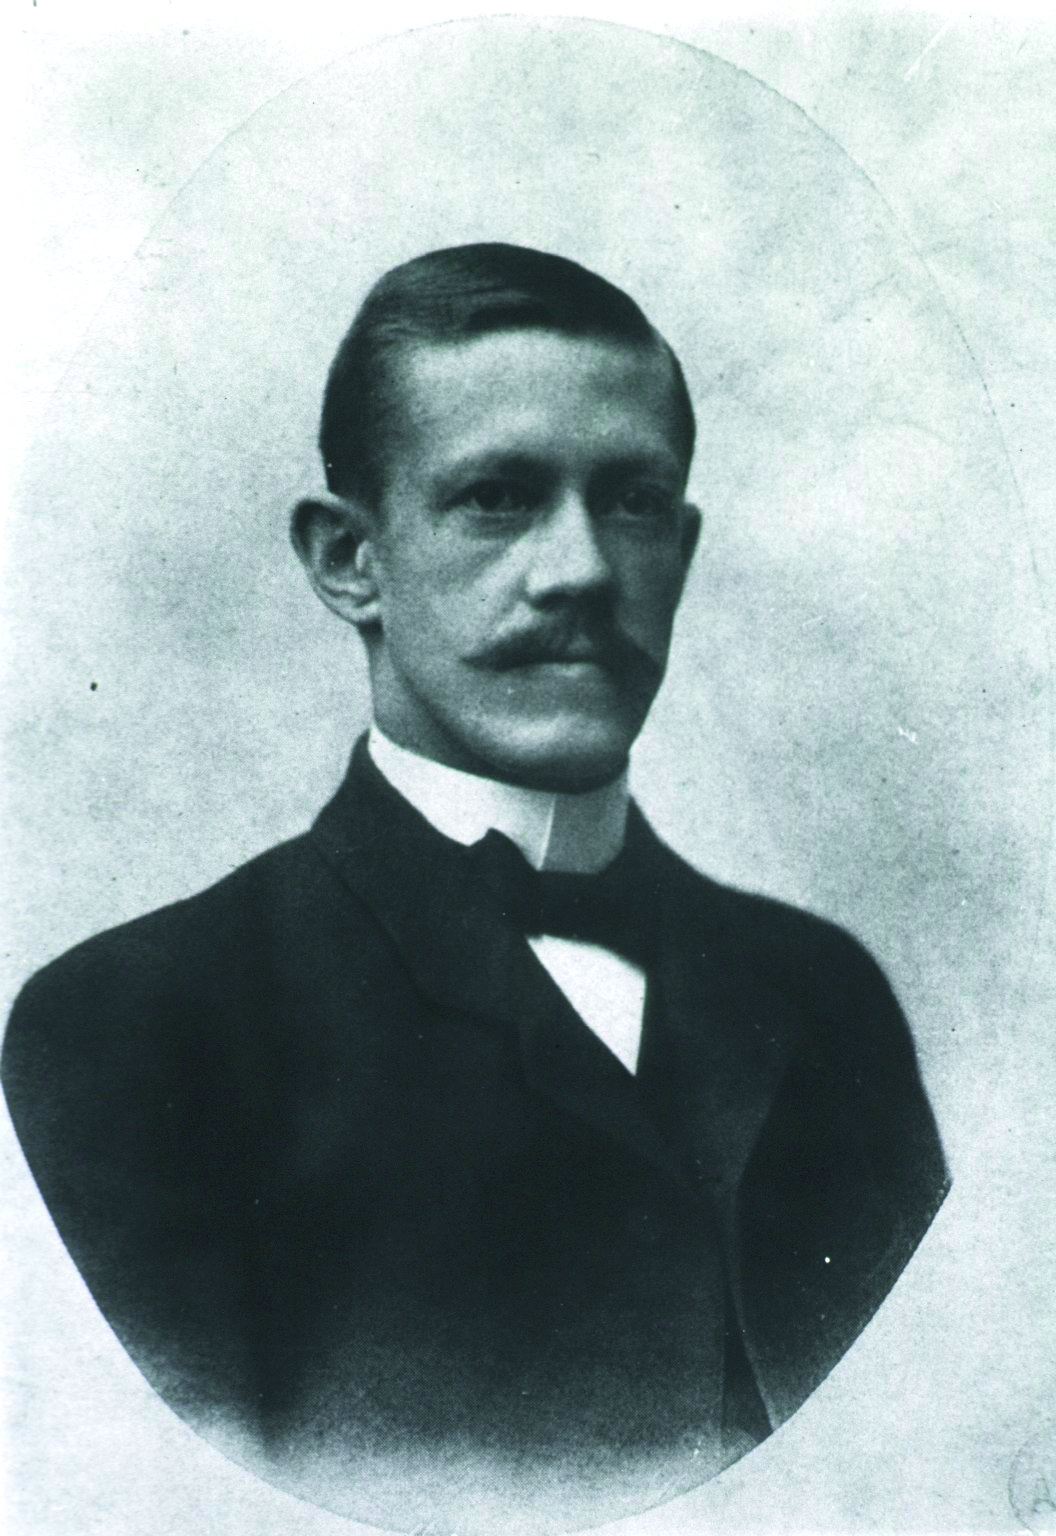
A key characteristic of the Schepens system was the use of a binocular viewing system incorporating a pair of low powered convex lenses. This not only allows a stereoscopic view of the image, but also exploits a ‘reflex-free’ system first proposed by Swedish ophthalmologist and optician Allvar Gullstrand towards the end of the 19th century (figure 3). So doing, the Schepens instrument was able to minimise unwanted back-scatter and reflections during ophthalmoscopy, a considerable problem with earlier designs.
Figure 3: Allvar Gullstrand (1862-1930)
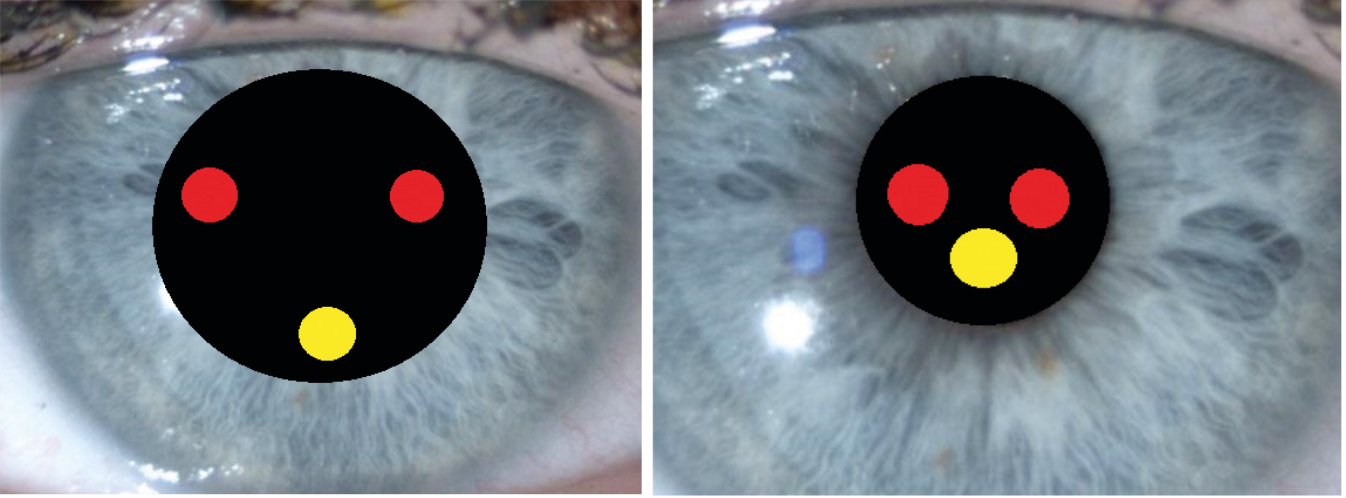
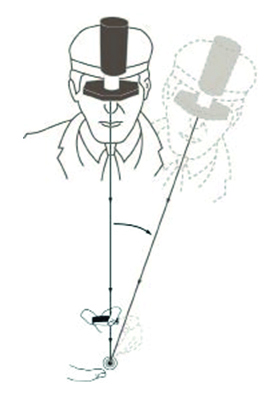
The principle of the Gullstrand reflex-free system depends on the incident light entering the eye to be viewed along a separate path to that of the emergent light viewed by the observer. By keeping the two pathways separate in the pupillary plane (figure 4), reflections and back-scattered light are minimised.
It also means that light passes through any media opacification (whether corneal, lenticular or vitreous) only once as it passes to and from the retina, resulting in much less image degradation than happens with direct ophthalmoscopy, where the incident and emergent light beams are coincident. Many instruments allow the separation between the pathways to be reduced to facilitate a binocular view through small pupils.
Figure 4 (left-right): Representation of the Gullstrand reflex-free system. Incident light (yellow) enters the eye along a separate path to the emergent light (red) observed by the viewer. (a) Standard reflex-free system in a larger pupil. (b) Reduced beam separation allows viewing through smaller pupils
Principles of Binocular Indirect Ophthalmoscopy
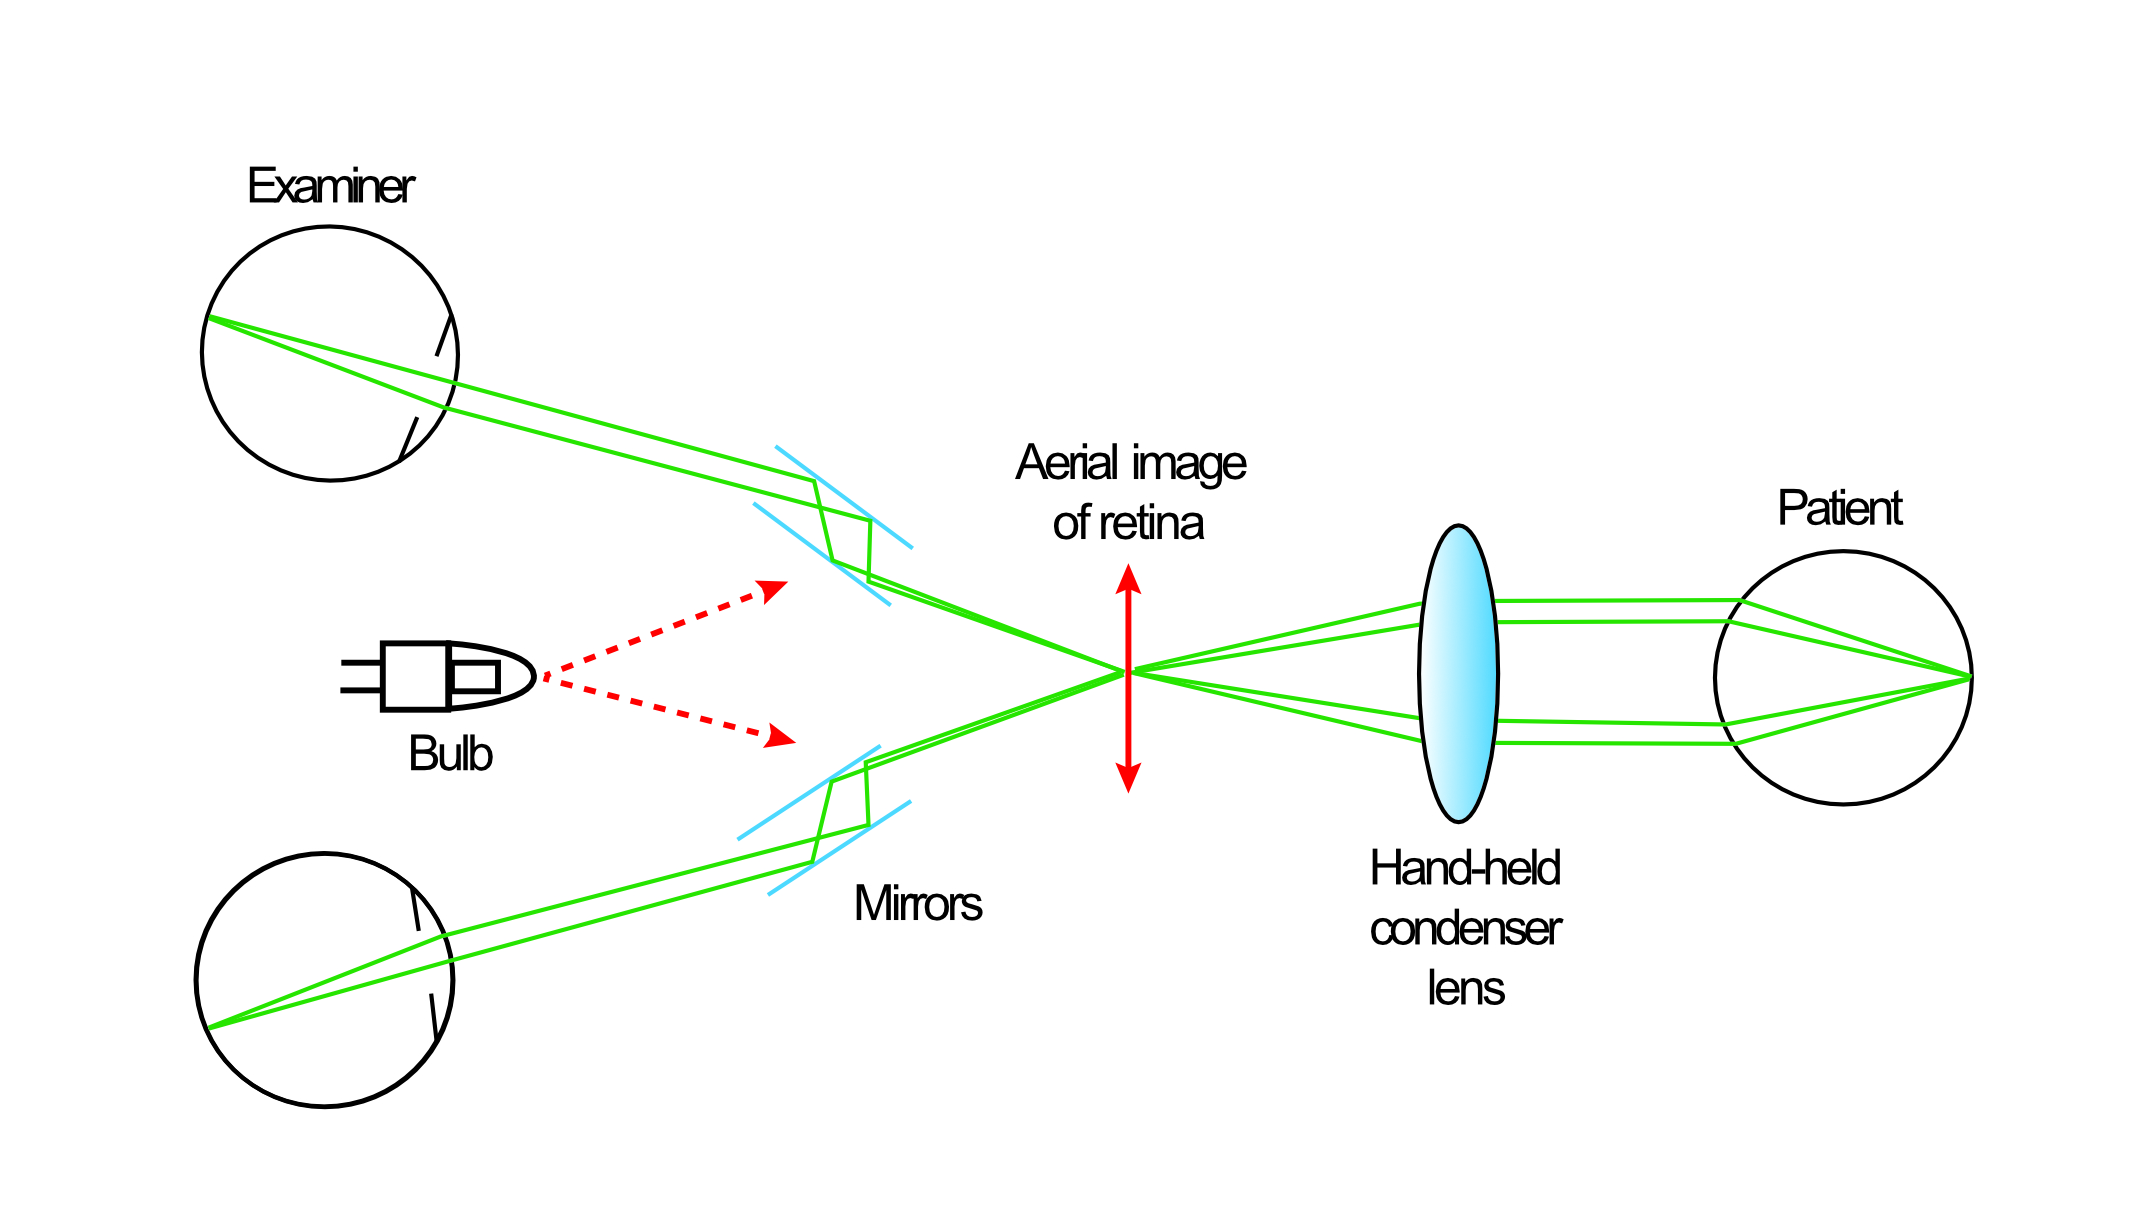
Essentially, binocular indirect ophthalmoscopy relies upon an external light source passing through a positively powered condensing lens held before the patient, which focuses the light upon their retina. Reflected light then emerges from the patient and passes back through the condensing lens to form a virtual, inverted image at a position in front of the condensing lens (figure 5).
Figure 5: Basic design of a binocular indirect ophthalmoscope
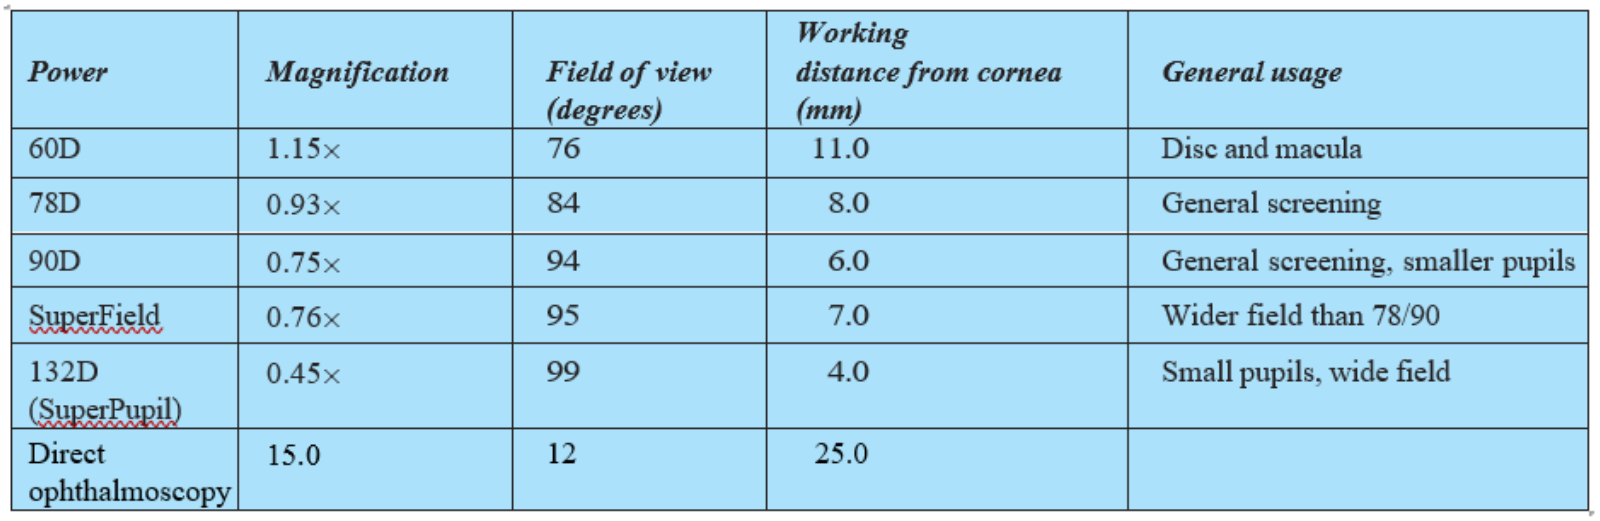
The magnification, field of view and position of the inverted image is very much dependent upon the power of the condensing lens used. For slit-lamp BIO, higher powered condensing lenses are used as is necessary for the restricted and set distance between the viewer and the patient. These offer excellent field of view, but are limited in their magnification, though this is easily supplemented by the magnification of the slit-lamp itself. Table 1 summarises the properties of some commonly used condensing lenses for slit-lamp BIO and compares them with direct ophthalmoscopy.
Table 1: Properties of some commonly used condensing lenses for slit-lamp BIO (direct ophthalmoscopy is included for comparison)
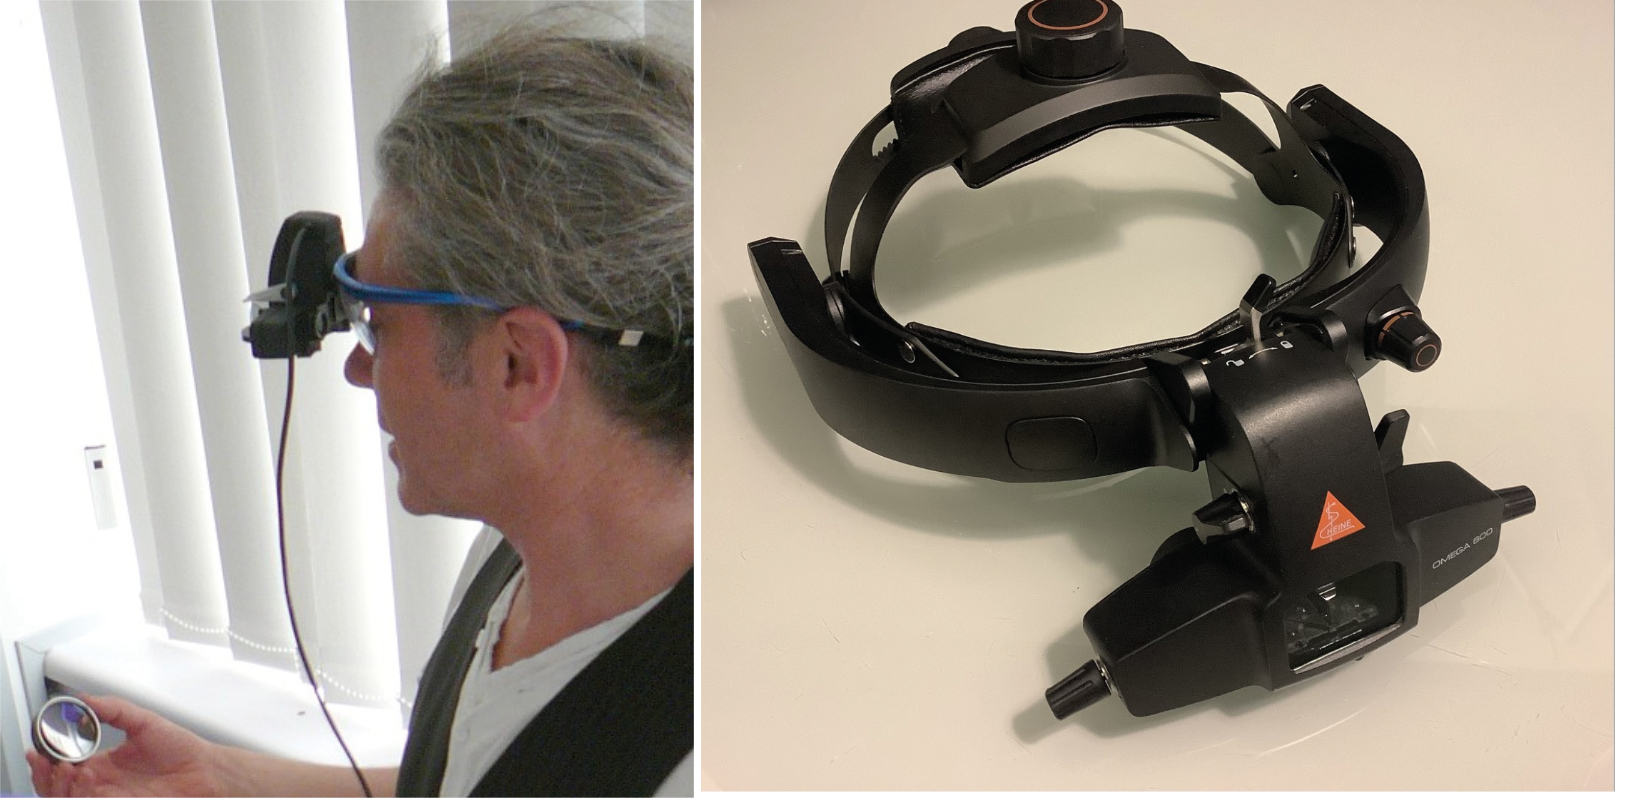
Headset BIO is a much more dynamic technique allowing a much greater distance between viewer and patient (figure 6). This means that lower powered condensing lenses may be used, offering greater magnification as well as an excellent dynamic field of view. Table 2 shows the properties of some commonly used condensing lenses for HBIO.
Table 2: Properties of some commonly used condensing lenses for HBIO
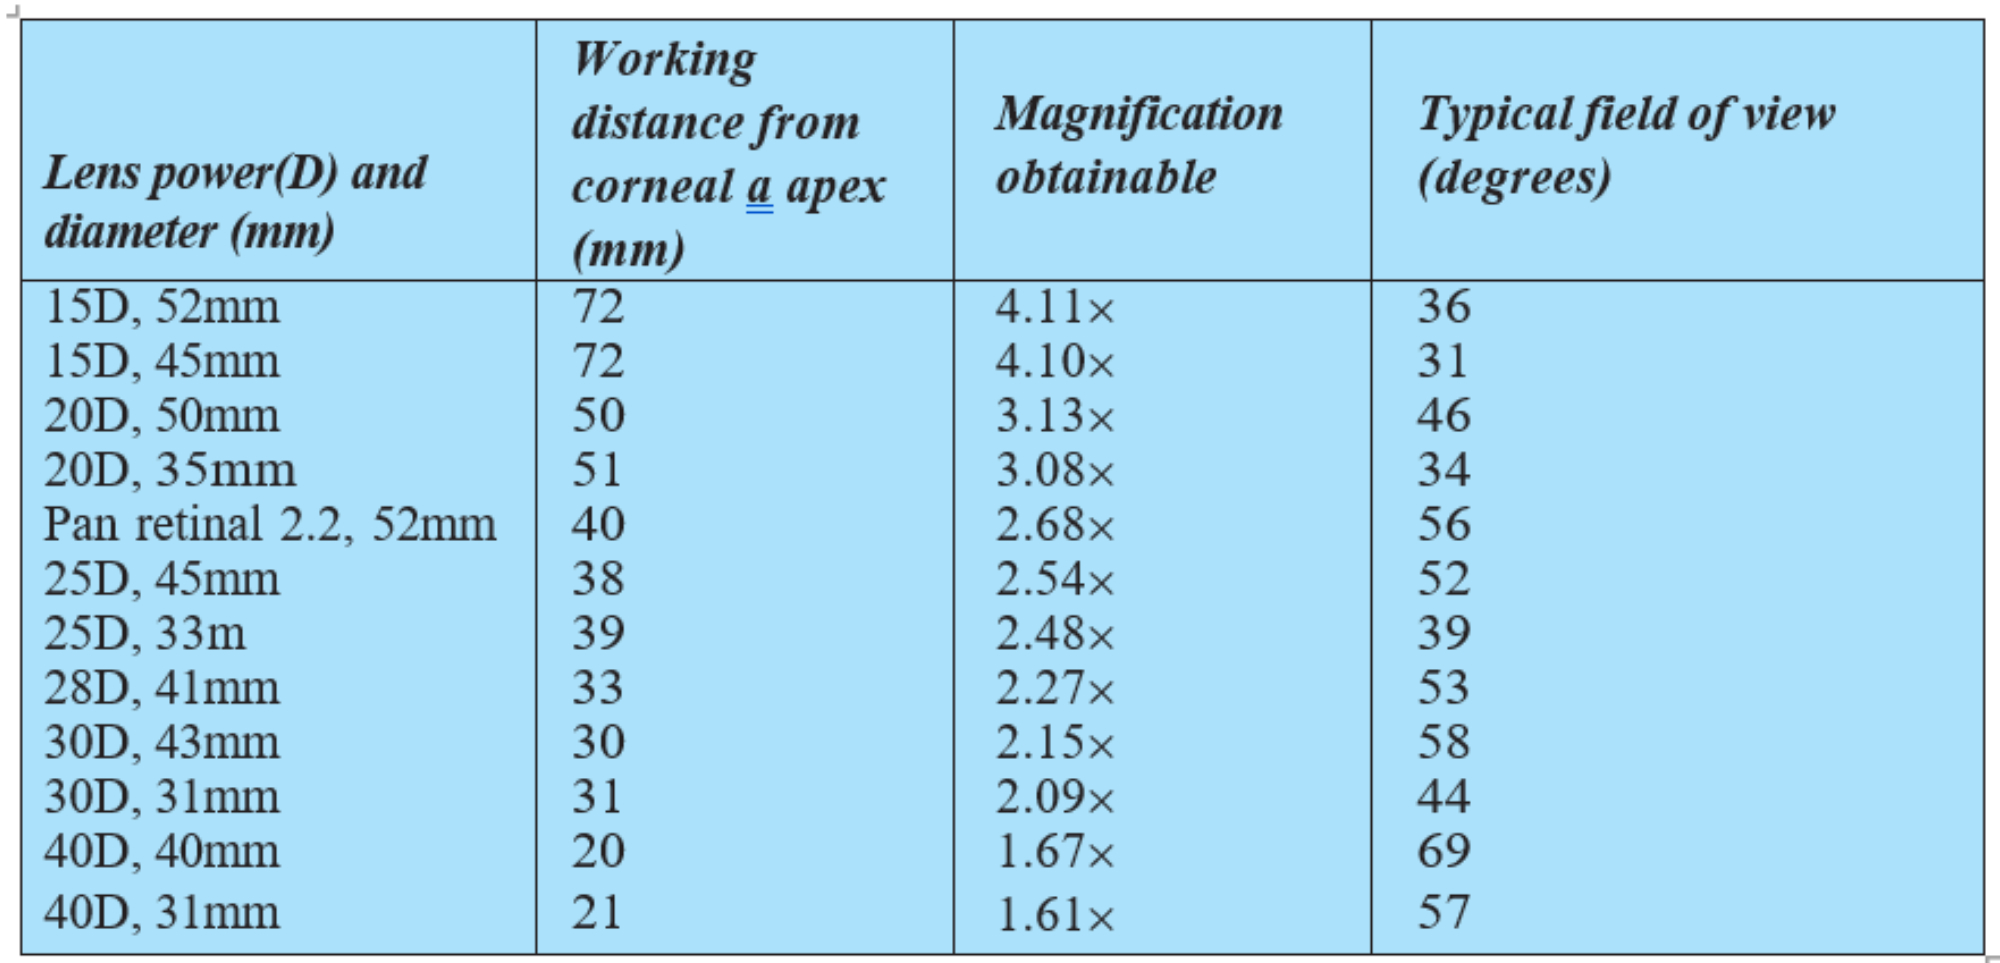
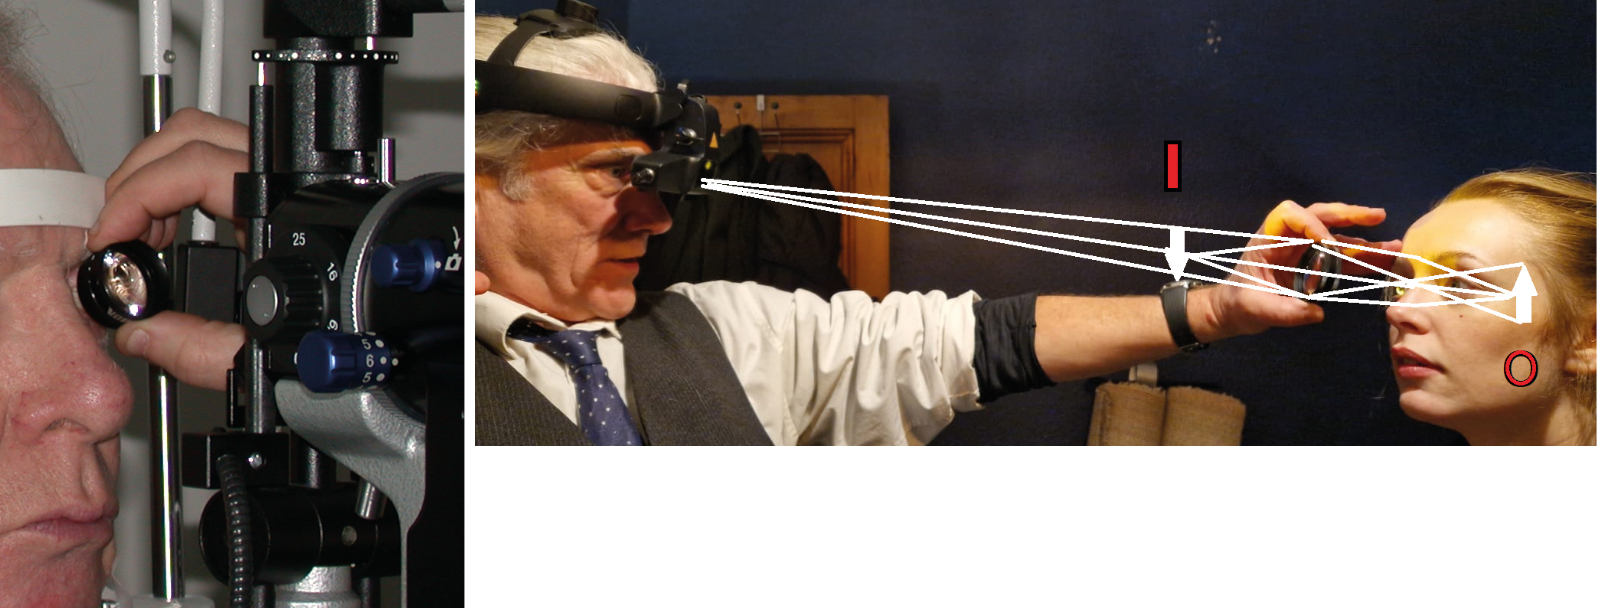
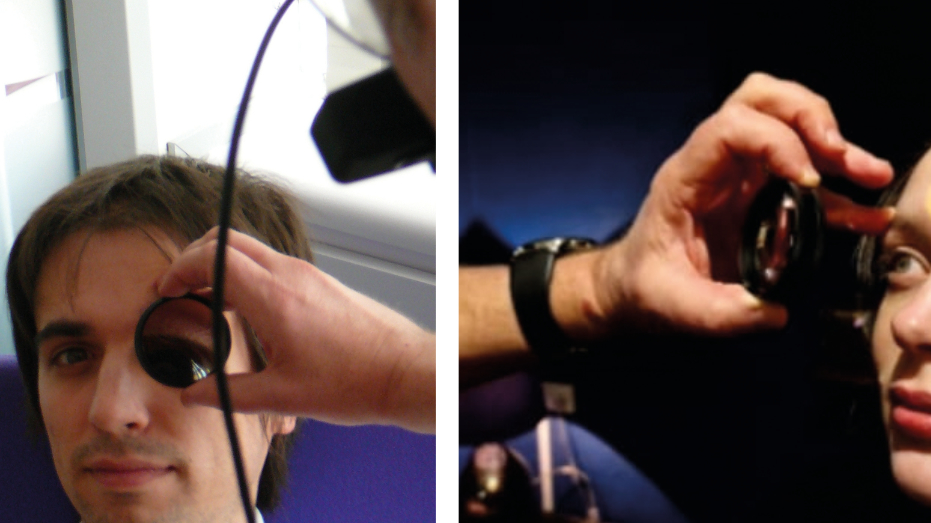
Figure 6: (a) Higher powered condensing lenses are used for slit-lamp BIO. (b) The dynamic nature of HBIO allows use of lower powered condensing lenses offering good magnification and excellent dynamic field of view. Note: the image shows the formation and position of the inverted virtual image (I) of the patient retina (O)
The 20DS lens is the standard lens for general examination, offering X3 magnification and a field of view of approximately 45°, and is my own preferred choice for general purpose use (figure 7). Common with most condensing lenses, the 20DS lens is a biconvex, aspheric lens with the majority of its power on the front surface; the side facing the examiner. To help ensure correct orientation, one lens casing edge is silvered and this should be held towards the patient (figure 8).
A +30DS lens will offer 2x magnification, along with a field of approximately 65°. These higher powered lenses are commonly used to examine small children and those with small pupils. They are thought of as more forgiving than the lower powered lenses, and as such are often advocated as a good choice of lens for those new to HBIO.2
Figure 7: A 20DS condensing lens;
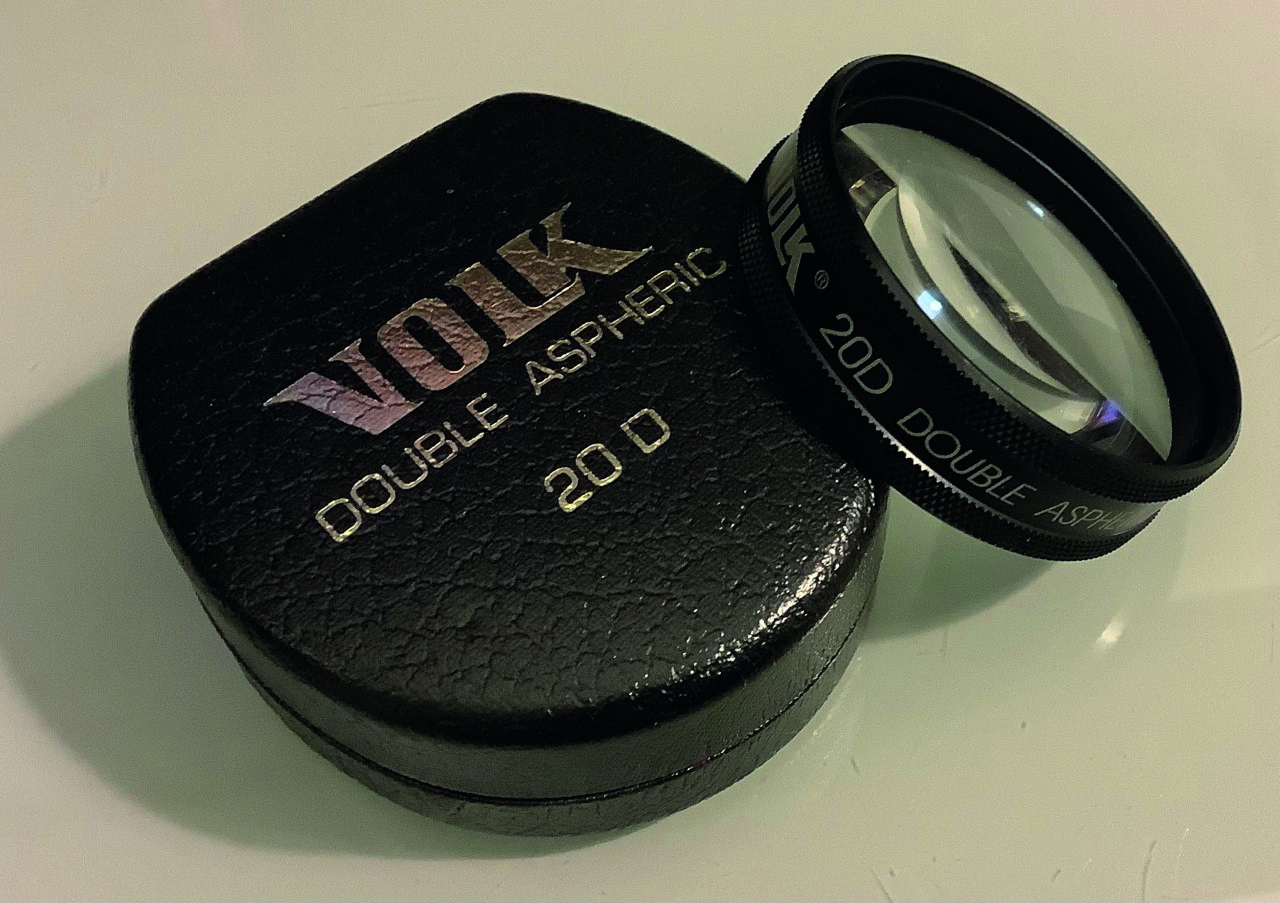
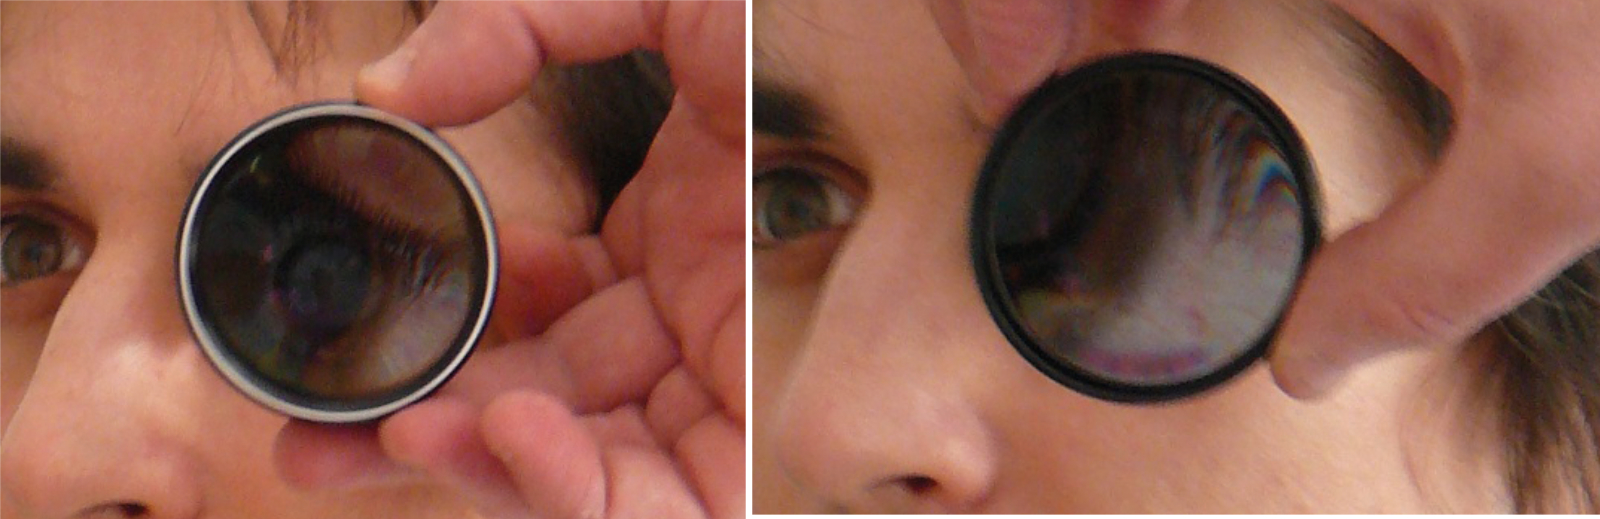
Figure 8: The silvered edge (a) needs to be held facing the patient, as in (b)
Direct v Binocular Indirect Ophthalmoscopy
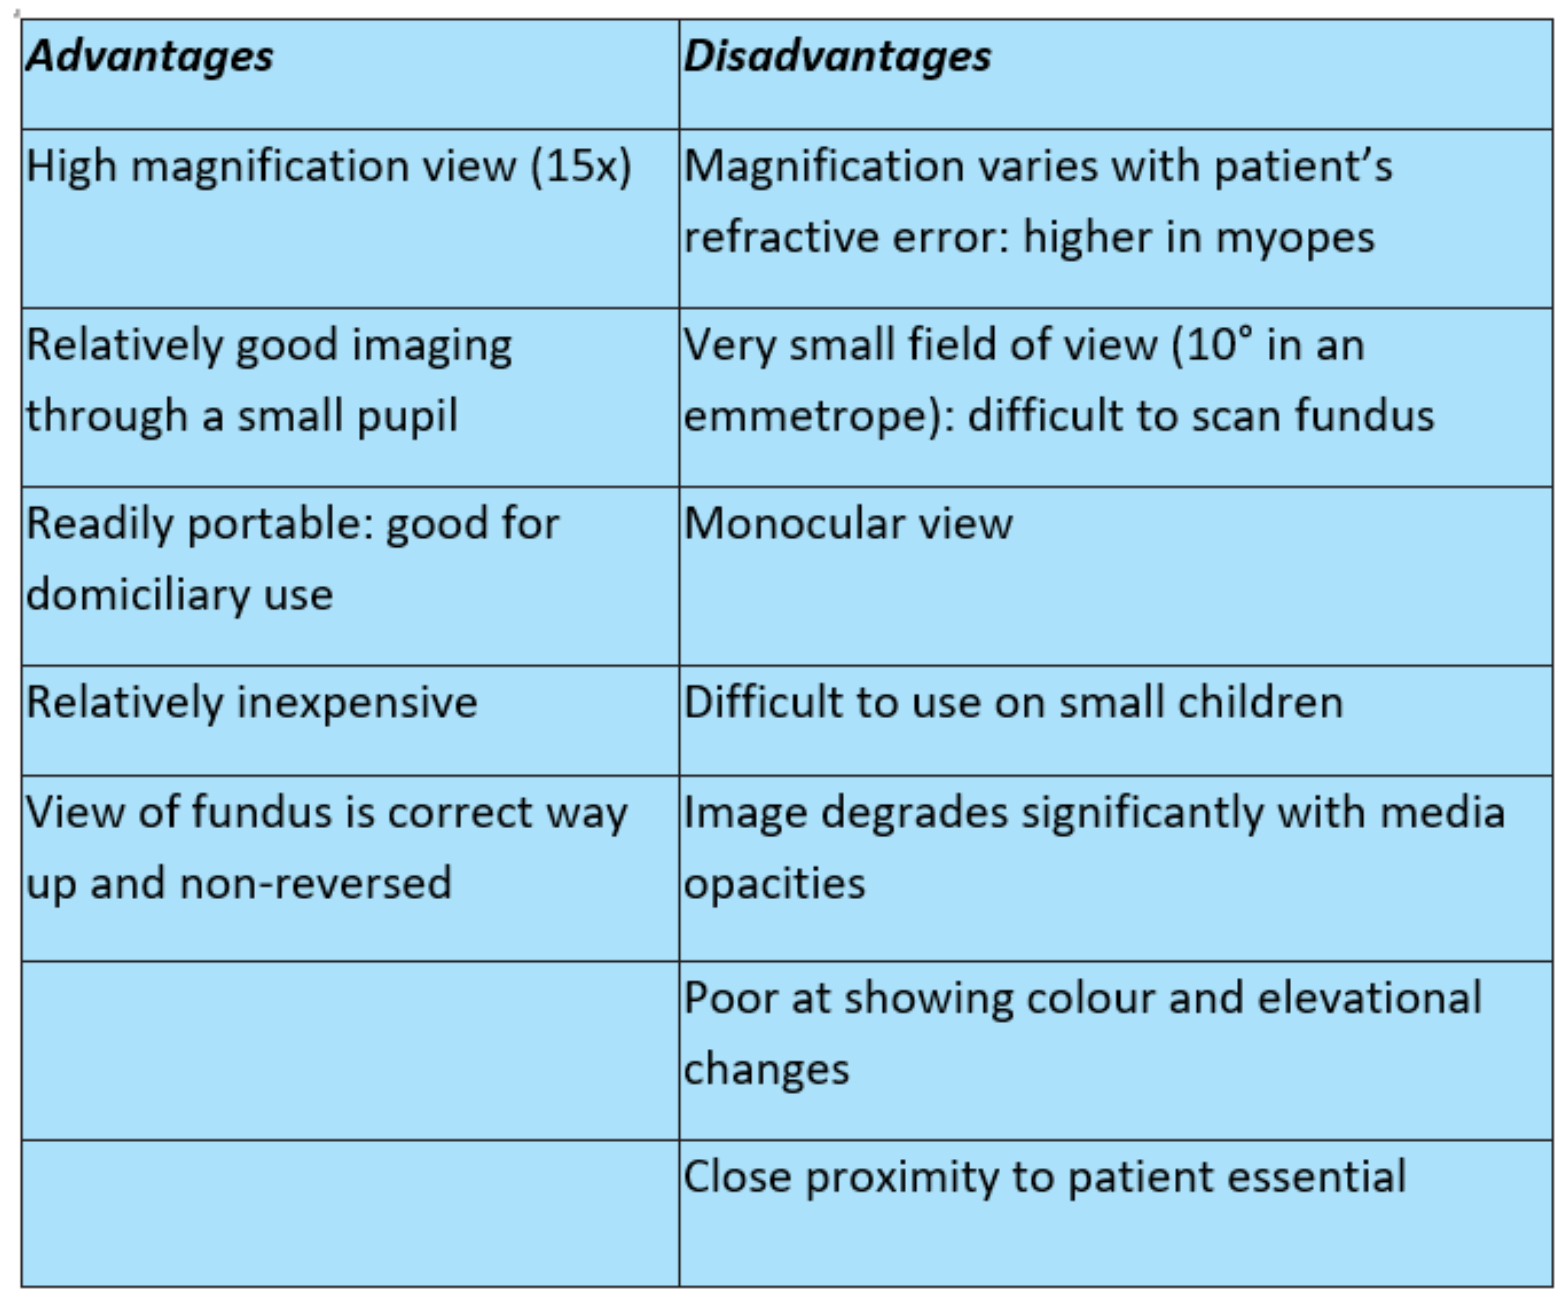
Though direct ophthalmoscopy is very much limited by its reliance on clear media, lack of stereoscopic view and variability of magnification with the ametropia of the patient, its simplicity and portability should secure the instrument a place in any practice where domiciliary visits are undertaken or where small children and the physically impaired are seen on a regular basis. The key advantages and disadvantages of direct ophthalmoscopy are summarised in table 3.
Table 3: Advantages and disadvantages of direct ophthalmoscopy
There are several reasons why slit-lamp BIO has overtaken direct ophthalmoscopy. Table 4 lists the main advantages but also the disadvantages, many of which are linked with the required use of a slit-lamp. These disadvantages are avoided by use of the headset BIO.
Table 4: Advantages and disadvantages of slit-lamp BIO

Advantages of HBIO
The key advantages of HBIO are as follows:
- Wide field view of the fundus, which is almost completely independent of the degree of ametropia. Excellent illumination and a dynamic viewing method allows accurate sweeping of the peripheral retina.
- High quality stereoscopic image; makes possible the accurate detection of elevations, such as retinoschisis and rhegmatogenous or exudative detachments.
- Portable; this makes the technique suitable for domiciliary visits.
- Long working distance: allows the examiner to remain at arm’s length from the patient, essential for some patients where proximity causes distress, for example some patients with learning disability.
- Child-friendly: children tend to be attracted to the light source which, for HBIO, provides a view of the entire posterior pole. The longer working distance also makes possible the introduction of a secondary target of interest or focus, such as a toy.
- Better fundus view through media opacities than with slit-lamp BIO.
- Wide range of either magnification or field of view can be determined by varying the choice of condensing lens.
- Can be used in conjunction with scleral indentation to perform a dynamic examination of the extreme retinal periphery.
Modern HBIO Design Features
Many of the previously published disadvantages of HBIO have largely been addressed in the latest instruments. These include the following:
- Weight: older units were hampered by discomfort for the wearer of the headset. Also, heavy charging and transformer units made them somewhat cumbersome for carrying around. This is far less of an issue nowadays. For example, most headsets are much lighter and incorporate their own rechargeable battery. The Keeler Spectra is a spectacle mounted system (figure 9) and so of minimal weight. The recently introduced Heine Omega 600 (figure 10) is made of the latest lightweight alloys and incorporates an ultralight lithium battery, making it the lightest high-end headset yet available. Look out for a review of this instrument in the coming weeks.
- Portability: the introduction of lithium batteries means that there is no longer any need for heavy charger units and flexes. The battery on the Heine Omega 600 lasts for up to eight hours on a single charge via a simple USB charge input.
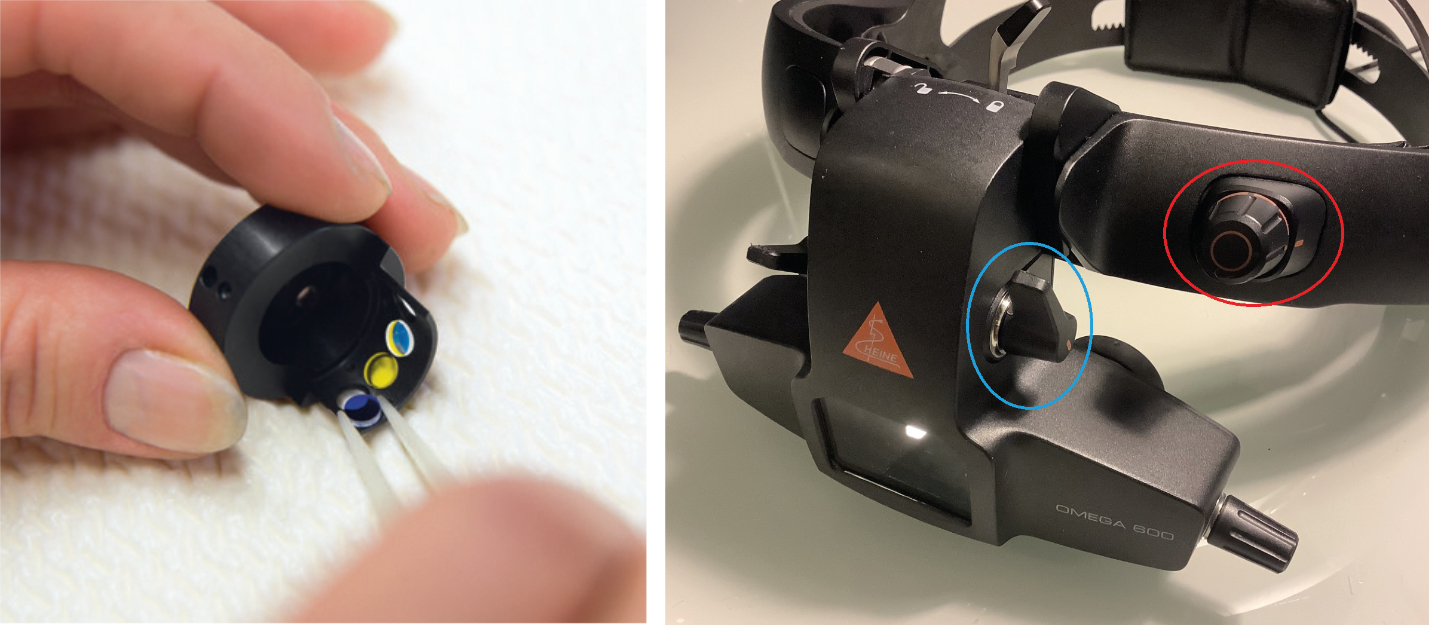
- Patient discomfort glare: most units allow for the introduction of filters (figure 11). Typically, these are blue (for fluorescein viewing), green (for red-free view of blood vessels) and yellow. The yellow filter is useful for reducing glare for the patient and, when combined with easily adjusted light intensity via a conveniently located rheostat (figure 12), is especially useful for assessing the very young and the learning disabled.
Figure 11 & 12: Three filters ready for incorporation in the Heine Omega 600 (image courtesy of Heine); Close up of the front of the Heine Omega 600 headset unit showing the easily accessed rheostat (red circle) and switches for adjusting filters and aperture stops for size of incident light beam
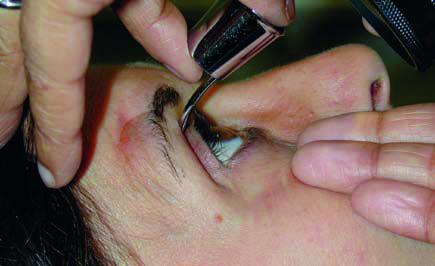
- Need for dilation: while there is no doubt that dilation aids the view of the fundus, any developments that reduce this need are to be welcomed. While it is true that in paediatric clinics, young patients are likely to be undergoing cycloplegia and so are already dilated, in community clinics and on domiciliary visits this is less likely. Furthermore, the need for good cooperation on the part of the patient, especially with babies (figure 13) and learning disabled, means that stinging eye drops are not helpful.
Figure 13: Imaginative use of play, noises and distractions can combine with appropriate pupils stops, a yellow filter and light intensity adjustment all make assessment of the very young and the learning disabled much more accurate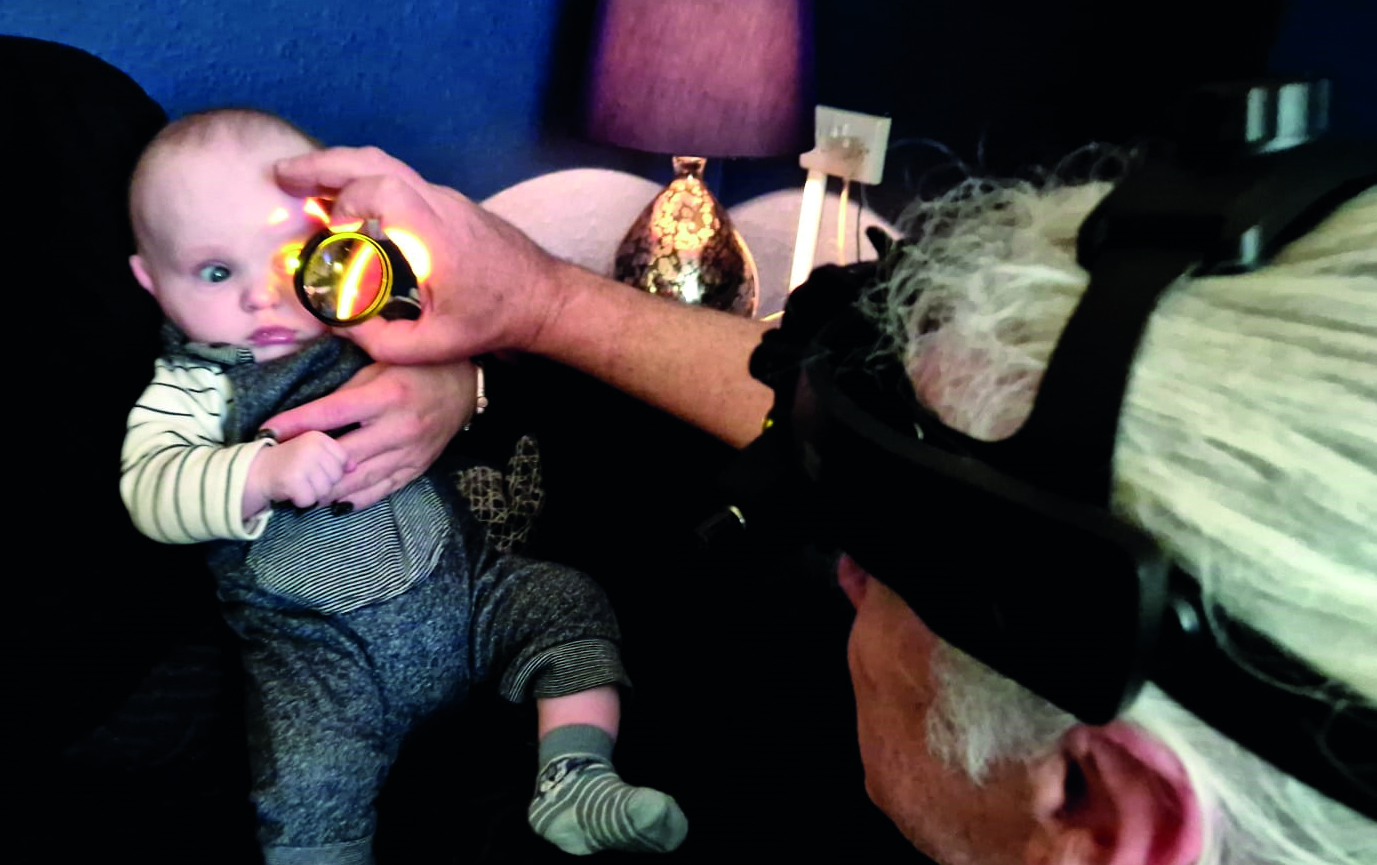
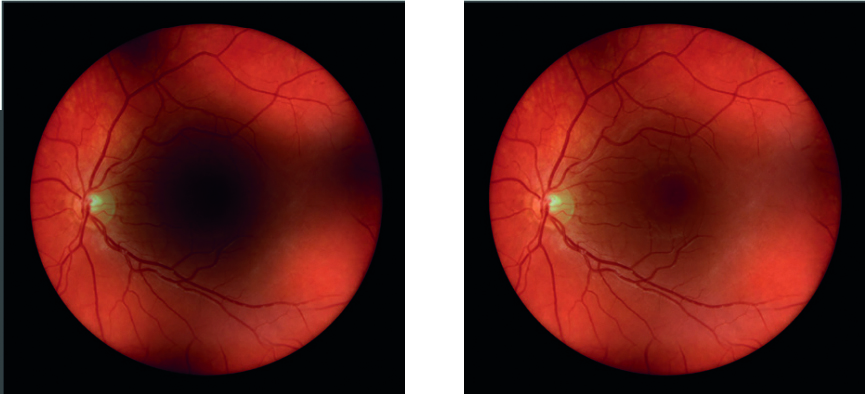
- Image degradation with media opacity: as well as indirect optics’ use of the Gullstrand reflex-free system, as discussed earlier, rheostat adjustment can maximise the quality of the fundus view through media opacification. The Heine Omega 600 has a ‘vision boost’; this is a one click increased step up of incident light intensity that gives a quick enhancement of the view through cataract without causing patient discomfort (figure 14).
Figure 14: Image of the retina through cataract (left) and the same view when the Vision Boost is introduced (right)
- Recording: though traditional manual recording of the views gained is most commonplace, other options include the use of a teaching mirror, allowing a colleague to view the same as the wearer of the headset (figure 15). Some headsets also have the option for a digital output so that images can be captured digitally for later analysis.
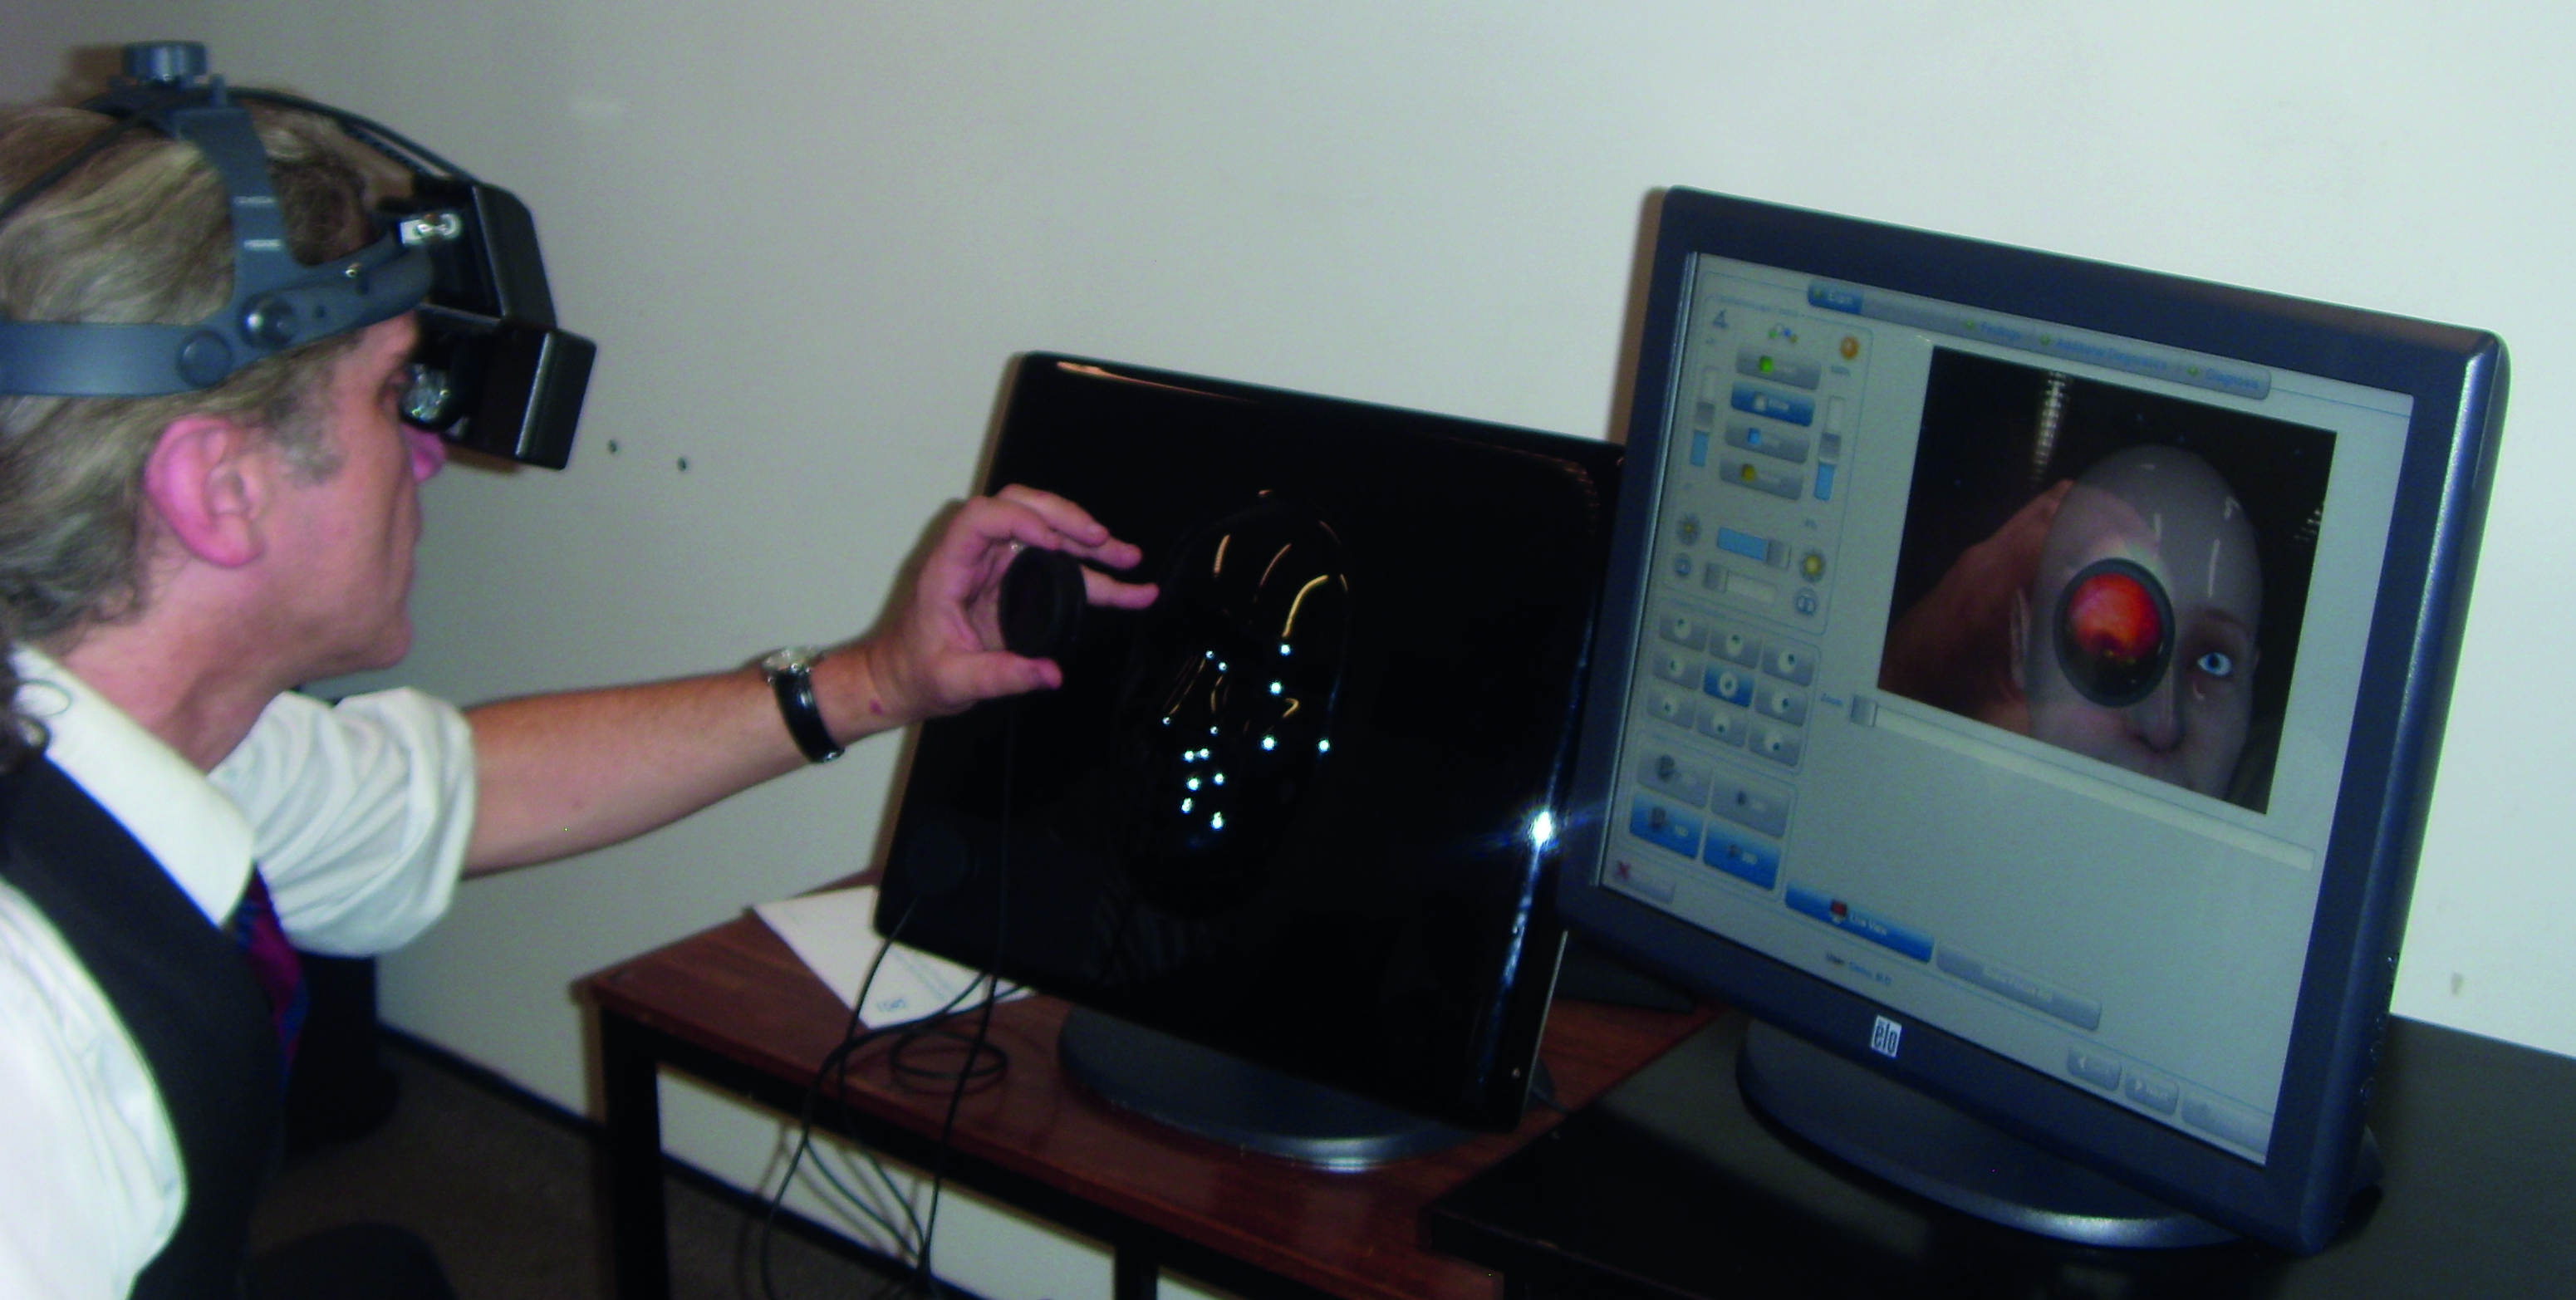
- Training requirement: advances in technology has led to the development of virtual reality headset BIO systems (figure 16) which allow training of both use of the HBIO technique as well as disease identification.
Figure 15 & 16: Teaching mirror for the Heine Omega 600 (image: Heinz); Teaching mirror for the Heine Omega 600 (image courtesy of Heine)
Technique
The first step is to prepare the patient. Ideally, they should be supine to allow for easier viewing without the clinician breaking their back when trying to view the superior retina. That said, with the newest lightweight systems making clinician movement easy and with parental help when viewing the very young, simple recline and elevation of the testing chair often suffices.
As already discussed, dilation is often needed, but there are many instances where this is better to avoid and this author usually attempts a view undilated first. When required, full dilation with one drop of 2.5 percent phenylephrine, then one drop of 0.5 percent tropicamide is preferred. This produces maximal dilation and improves patient comfort, as less attempted constriction on examination.
The room lights should be dimmed to give the best retinal image quality.
The next step is to set up the instrument. Unless a spectacle-mounted design, the headset should be placed over the head and the top knob adjusted to ensure the viewing eyepieces are aligned with the eyes. At this point, the rear knob can be adjusted to make the whole unit secure.
Once this is achieved, the viewer should adjust the tilt of the observation system relative to the headband such that their line of sight is perpendicular to the back surface of the eyepieces. The eyepieces should be positioned as close as possible to their eyes (or spectacles if the clinician has a correction).
The next step is to ensure that each eye can see the image centrally to their individual eyepiece. The easiest way is to stand around 50cm away from a plain wall and switch on the unit. The disc of light should be seen in each eyepiece centrally. To achieve this, it is usually necessary to use the horizontal (PD) sliders and the vertical tilt lever.
Finally, the appropriate filter and aperture stop is selected, and the rheostat set to a lower level to first look through the condensing lens, which should now be placed before the patient’s eye.
To start viewing, the condensing lens should be positioned before the pupil (figure 17) and the light trained upon it. I use a finger and thumb to hold the lens and other fingers placed (with permission) on the patient forehead to steady my hand (figure 18).
Figure 17 & 18: Positioning the lens; Use of fingers to hold the lens and steady the hand
The red reflex should be clearly visible when the lens is held close to the patient. As the lens is moved away from their eye, the reflex starts to fill the lens and the retinal view comes into focus. At first, the image often is lost or too many reflections ruin the view. The easiest way to recover is to move the lens back towards the patient to regain the reflex and repeat. Generally, when examining a patient in the supine position, the lens is held in the right hand when standing on the patient’s right side and the left hand when standing on their left. Practising this approach from the outset reaps rewards when attempting scleral indentation, which is easier to learn if the examiner is happy holding the lens in either hand. If the patient is just reclined, then the clinician may have to adjust their own height to ensure the light is always incident via the pupil.
It is preferable to examine the fundus in a systematic fashion. Most examiners will begin examining the right eye by asking the patient to look to the 12 o’clock position (relative to their head) such that the examiner can view the patient’s superior retina from the 6 o’clock position (ie opposite to the patient’s direction of gaze). Typically, the extreme periphery is examined first, working toward the equator along that 12 o’clock meridian. The patient is then asked to look halfway between the 12 and 3 o’clock positions, and the examiner moves round to view from between the 6 and 9 o’clock positions. Again, the examiner works from the extreme periphery to the equator. Having examined the entire retina from equator to ora in each quadrant, the examination is completed by examining the posterior pole.
If reflections become troublesome, tilting the lens should help, just as with slit-lamp BIO. When sweeping across the retina (for example, from the extreme periphery to the equator), it is important to maintain a direct line between the observation system, the centre of the condensing lens and the patient’s pupil. This is sometimes referred to as the ‘common axis principle’ (figure 19).
Figure 19: The common axis principle. Always keep a direct line through the observation system, the centre of the condensing lens and the centre of the patient’s pupil
Scleral Indentation
The use of indentation of the sclera can help to differentiate some forms of peripheral retinal damage, such as ‘white with pressure’ lesions (figure 20). This technique is helpful for lesions anterior to the equator, but is best practised once the general technique of HBIO has been mastered. It shall be considered in more detail in a future article.
Figure 20: Use of scleral indentation
Patients for HBIO
I suggest modern HBIO should always be considered for accurate examination of the following patients:
- Dilated patients with any suspicion of retinal tear or damage in the peripheral retina
- Domiciliary patients, especially those with media opacities
- Very young patients (with or without dilation)
- Appropriate learning disabled patients where a longer working distance and the potential for helpful distraction to fundoscopy is useful
To illustrate these points, look out for some case studies in the coming weeks.
Conclusion
It is time to have another look at headset binocular indirect ophthalmoscopy. The latest instruments make the technique much easier, more convenient, and more comfortable for a wider range of patients. Patients who, in many cases, might not otherwise have a sufficient assessment of their retina.
References
- Schepens CL. A binocular indirect ophthalmoscope. Transactions of the American Academy of Ophthalmology, 1947;51:298
- Table 2 Properties of some commonly used condensing lenses for HBIORosser D. Binocular indirect ophthalmoscopy – part 1. Optician, 30.07.2010, pp 14-18