Surgical sutures, also known as stitches, are primarily used to hold body tissues together and approximate wound edges after an injury until healing is sufficiently advanced for the wound to be self-supporting. Sutures can also pull non-rigid body parts into more favourable positions, for example rotating the lower eyelid away from the cornea in involutional entropion. Ligature is the use of a suture to tie-off a hollow lumen, such as a blood vessel to control bleeding or around the base of a pedunculated skin tag to create therapeutic ischaemia. Sutures can also be used to secure foreign objects, such as mesh implants, vascular grafts and drains, in place.
Optometric Suturing
All optometrists will encounter stitches in the eye and adnexa placed by ophthalmologists, and so a basic understanding of their function and how to identify complications that warrant therapeutic intervention is universal. With training, and in appropriate settings, it is already the case that some specialist optometrists do manage suture complications, including the removal of a loose stitch to lessen discomfort and infection risk.
Suturing is a manual skill that requires regular practice to become competent and to maintain competence. It is not likely that in the near future suturing will be a part of daily practice for most optometrists but, as those with further training and desire move into delivering therapeutic procedures, it is incumbent upon them to be able to manage complications they create. At times, this is best done with a stitch. Examples include the closure of a gaping wound following the removal of a large chalazion by blade, or removal of a broad-base papilloma by radiofrequency; optometrists may be involved with each within medical clinics. Another scenario is the emergency repair of an eyelid laceration in a rural setting.
The main barrier to optometrists suturing at present is that prescribing local anaesthetics for administration by injection as independent prescribers is illegal. This point of law is due to the inclusion of a clause in the independent prescribing legislation that, with no self-evident reason, was prohibitive and specific to optometrists. In time, it is to be expected that this clause will be removed, so the scope of practice of independent prescribing optometrists will align with other professions with independent prescribing privileges. Until legislation catches up with clinical need, a workaround in a multidisciplinary team is to use supplementary prescribing or patient group directives. In these circumstances, the optometrist is not independently prescribing the injectable, but it is lawful for them to follow a protocol and administer medicines by injection.
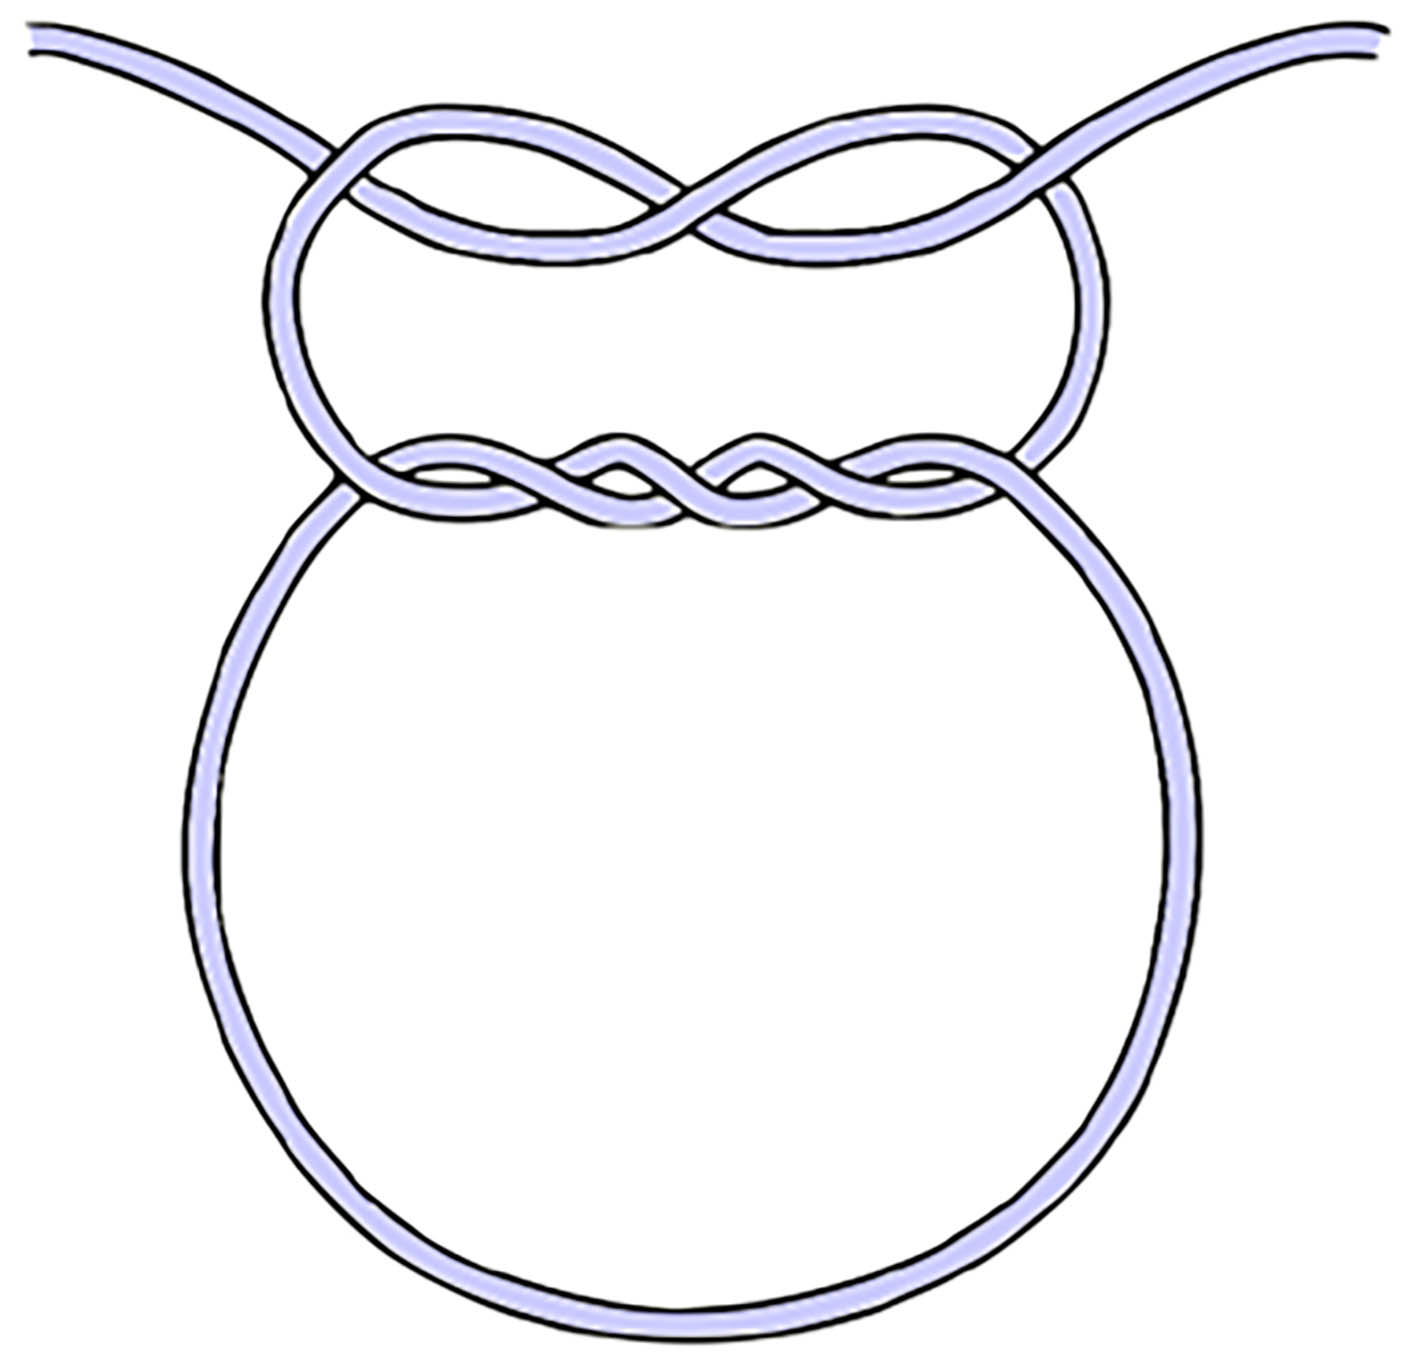
Table 1: Needle profiles
History of Suturing
Surgeons have been stitching people back together for thousands of years. Ancient civilisations used whatever was available to do the job, including animal hair. Practice evolved to use naturally derived suture materials, such as catgut and silk. Catgut is a braided suture material using collagen fibres from the walls of the intestines of animals, more usually from animals larger than cats, most commonly derived from cows. Greek surgeon Galen of Pergamon, in c.1600BC, noted that he used silk or catgut to suture together gladiators’ severed tendons.
Nowadays, while there remains a place for natural threads, they have largely been supplanted by synthetic materials that can be engineered to perform as required by the specific task with consistency of performance. However, of even greater significance for the practice of suturing was the introduction of anaesthesia and recognition of the importance of sterility.
Needles
Reusable needles with holes, termed ‘eyes’, were used initially for suturing. The thread had to be threaded through the eye of the needle as is done in embroidery sewing. The main problem of traditional needles is that their head must be made fatter than the shaft to accommodate the hole, and the thread must double-up as it passes through the hole. These both act to increase drag and trauma as the needle passes through tissue. In addition to avoiding the considerable fiddliness of threading of very small needles with very fine threads, a smoother passage results when single-use eyeless needles with the thread pre-attached.
These one-piece needle and threads are termed swaged needles. This is because they were first made by placing the suture inside a hollowed end of the needle where it was crimped (swaged) in place. They are also referred to by the oxymoron ‘atraumatic needles’.
Swaged needles come in a range of shapes and sizes, and with different profiles. Tougher tissue needs larger and more robust needles. You would not use the same needle to repair a laceration on the leg as would be appropriate to secure a delicate corneal graft.
Needles can be either straight or curved. A straight needle can be used without instruments. A curved needle must be handled with forceps and a needle holder. Most needles are curved, rather than straight, because they can be manoeuvred easily in small spaces and allow the surgeon to take decent bites of tissue by turning their wrist. Types of needle profile are listed in table 1, seen above.
Cutting profile
Cutting needles have a sharpened edge on their inner concave edge, which appears like a triangle with the honed point facing towards the surgeon in cross-section. The inner concave edge cuts through the tissue towards the surface, while the outer surface is flat. Cutting needles are useful for passing through tough tissues, and are not needed much in ophthalmology.
Reverse cutting profile
Reverse cutting needles also have a sharpened point, but this time the inner surface is flat, while the outer convex edge cuts through tissue away from the surface. This looks like an upside-down triangle in cross-section. Reverse cutting needles are useful in tissues with a risk of the suture cutting out and so are less likely to inadvertently cut back through the tissue (‘cheese wire’) if the needle is pulled toward the surgeon. Reverse cutting needles are the most frequently used needles in ophthalmic plastic surgery where the skin is relatively thin.
Side cutting (spatulated) profile
Side cutting or spatula needles have a trapezoid shape that is smooth on the top and bottom, but with cutting edges on both lateral sides. This allows them to safely create a path within thin, flat layers of tissue where there is not so much room for variation in depth. Spatulated needles are commonly used for suturing sclera and the cornea.
Taper point profile
Taper needles are rounded in cross-section, and can be either sharp or blunt. They work by piercing the tissue without cutting it, essentially spreading the tissue as it passes through it. These are good for soft and very delicate tissues, such as the closure of conjunctival flaps in glaucoma filtration surgery. Because the tapered point stretches the tissue around it as it passes, rather than cutting the tissue, the hole created by the pass is as compact and watertight as possible. In thicker skin, a tapered point needle requires significantly more force to push than a cutting needle.
Suture Material
Suture material is often classified into absorbable thread versus non-absorbable thread, which is further delineated into synthetic fibres versus natural fibres, and then monofilament or polyfilament (braided).
The functional properties that matter are as follows:
- Non-absorbable vs absorbable
- Tensile strength; the ability of the suture to hold tissues in place without breaking
- Elasticity; the ability of the suture to adapt to changing tissues as may occur with swelling
- Tissue reactivity; the inflammatory response of the surrounding tissue
- Knot security; the ability of the suture to maintain a knot that holds the thread in place
Suture materials most commonly used in ophthalmology are:
- Polyglactin (Vicryl, Dexon)
- Nylon (Ethilon)
- Polypropylene (Prolene).
Polyglactin is a synthetic, absorbable, braided multifilament suture material. It is a synthetic replacement for catgut that causes less tissue reaction. It has high tensile strength for approximately three weeks. The tensile strength is then gradually lost over the next month. It is used for sutures within the tarsal plate in oculoplastic surgery to the eyelids, and at a thinner diameter to close conjunctival wounds, including for trabeculectomy. It can be used for skin closure, but because of its slow breakdown time, it should not be left in place because it will lead to visible scarred suture tracts.
Nylon and polypropylene are non-absorbable, synthetic, monofilament suture materials with high tensile strength. Nylon degrades over several years, while polypropylene is virtually permanent. Because nylon and polypropylene are monofilament materials, they can be placed in running fashion with less resistance to passage through tissue during removal than a multifilament suture material. Because of their slick and wiry properties, polypropylene and nylon sutures are more likely to unravel if knots are not tied secure and square with multiple throws and long tails.
Either nylon or polypropylene can be used for skin sutures where a ‘slick,’ easily removed suture is desired. With a thinner diameter, nylon is commonly used for the flap of a trabeculectomy, closing corneal wounds and penetrating keratoplasty, and polypropylene is used to secure the haptics of intraocular lenses to the sclera when they cannot be stabilised in the capsule.
Suture Size
The tensile strength of a suture material is directly proportional to its diameter. However, we should seek to use the smallest possible size for a particular task to minimise tissue damage, inflammation and patient discomfort (table 2).
Table 2: Suture sizes

Thread diameters are nominally designated a gauge number. At one time, sutures were available in seven thicknesses. They were reasonably assigned a number between 1 to 7. A lower gauge denoted a thinner suture, but without regular decrements. Then, a slightly thinner suture arrived, and was designated size 0. To practical minds, there are no numbers smaller than zero, and so when the next thinner material became available it was designated ‘00’ and the next ‘000’.
The main thing to remember is that more zeroes mean a finer suture material. For ease of communication, and perhaps to avoid openly admitting the silliness, the 00 became ‘two zero’ or 2-0, and 000 became 3-0, and so on. The higher the first number of the paring the thinner the thread. Nowadays, it is rare to use a suture larger than 1-0, which is as large as fishing line with a diameter of 0.35mm. 10-0 sutures are very fine with a diameter of 0.02mm, which is similar to a human hair.
Governments, boards of trade and standards offices have tried to abolish the gauge, considering it to be inaccurate and old-fashioned. Its idiosyncrasies reflect that it was born experimentally in the practice of the wire-drawers in the 19th century. It stolidly persists because it works. It is simpler to ask for a 4-0 suture than a suture with a diameter of 0.07mm.
Suturing Tools
To obtain the best results, it is important to have good quality instruments that are the correct size for the location and nature of the wounds being closed. The instruments also need to be correctly sterilised and handled carefully.
The basic suturing kit includes:
- Needle holder
- Toothed tissue forceps
- Fine suture scissors
The needle holder is used to grab onto the suture needle. Forceps are used to hold the tissues gently and to grab the needle, and suture scissors: used to cut the stitch from the rest of the suture material.
Whenever using sharp instruments there is a risk of accidentally sticking yourself. Needlesticks are especially hazardous because of the risk of serious infection, and so it is important to get in the habit of using the instruments correctly and to never handle the suture needle with your fingers.
Suturing Technique
When suturing the edges of a wound together, it is important to evert the skin edges; that is, to get the underlying dermis from both sides of the wound to touch. For the wound to heal, the dermal elements must meet and heal together. If the epidermis turns in and touches the epidermis of the other side, the skin edges are said to be inverted. In these situations, the wound will not heal as quickly and tends to leave a ridge.
Key points to be borne in mind when suturing are that stitches should be spaced equally along the wound, and that there are equal bites on either side of the wound because if there is too much variation the skin edges will not approximate evenly and this risks an unsightly scar or even an epidermal inclusion cyst. Sutures should lie perpendicularly across the wound. Knots should not lie over the wound.
The different suture patterns are beautifully illustrated on the website dermnetnz.org/topics/suturing-techniques.
Preparation
Suturing is a sterile procedure, and therefore the wound and surrounding skin must be prepared with antiseptic solution. A drape is usually placed around the sterile field. You must wash your hands and wear sterile gloves. Thereafter, you must take care not to ‘de-sterilise’ during the procedure by touching any external surfaces.
The wound should be inspected and cleaned. The skin edges should be debrided if they are dirty or ragged, as they might be in cases of trauma. Patients should be up to date with their tetanus immunisation. If there is concern about possible contamination then a course of antibiotics is warranted, and options include co-amoxiclav or a suitable alternative if there is penicillin allergy. All wounds should have local anaesthetic infiltration before the intervention.
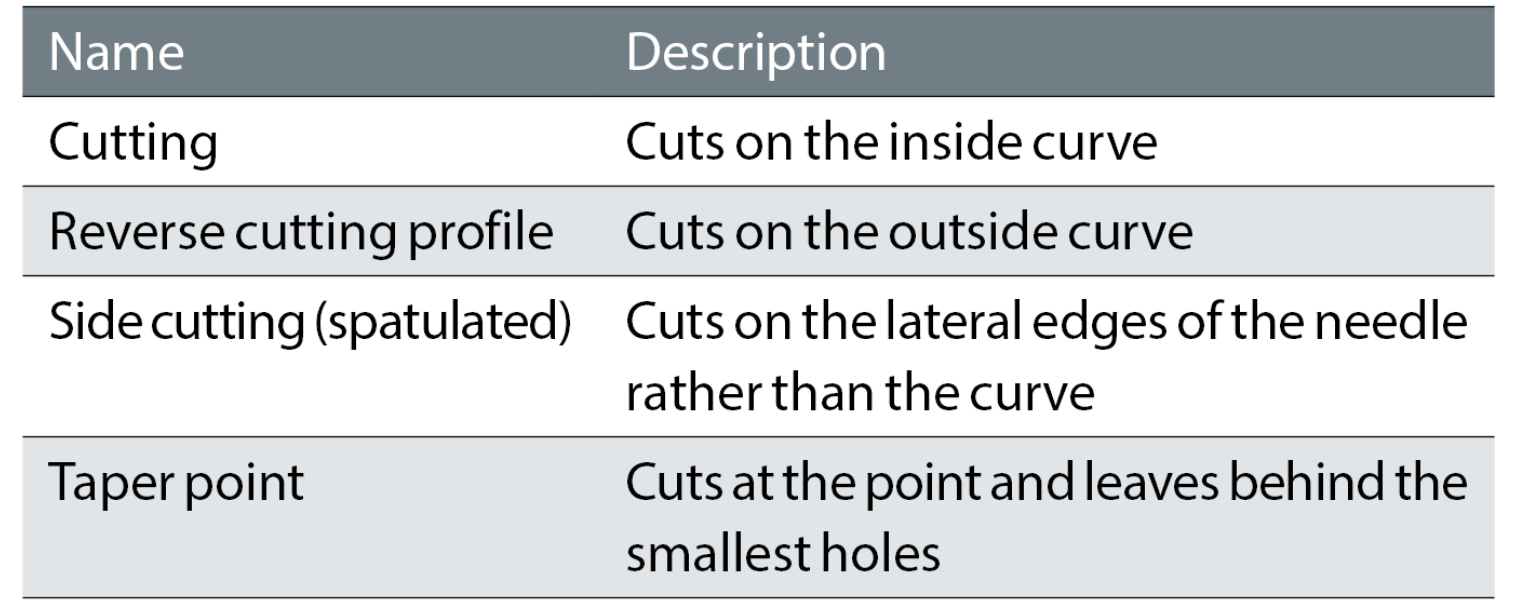
Interrupted sutures
Interrupted sutures are individually placed and tied (figure 1). They are the technique of choice if you are worried about the cleanliness of the wound because if the wound looks like it is becoming infected, a few sutures can be removed easily without disrupting the entire closure. The technique also allows the position and tension to be adjusted precisely. A downside of interrupted sutures is that they take longer to place than a continuous suture, and a greater amount of suture material remains in the wound when the sutures are buried.
Figure 1: Interrupted suture
In this technique, a suture is placed in a two-step manner. Out-to-in, passing the needle and suture through the skin on one side of the wound, from the top surface down, into the middle of the wound, and then pulling the suture along the path made by the needle through the skin. In-to-out, passing the needle back into the wound, through the skin on the opposing side, to emerge on the outer surface of the skin.
Out-to-in
The skin is gently lifted with forceps and the surface of the skin pierced with the needle perpendicularly. The point of penetration is typically 4mm from the wound edge as a general guide for suturing, but around the face where the skin is thinner this distance is reduced to approximately 2 to 3mm.
The wrist holding the needle is supinated, turned as though spooning porridge, so that the needle passes through the dermis and rises out of the middle of the wound. Forceps are used to hold the needle while the needle holder that is gripping outside the wound is released. The needle holder then regrasps the needle inside the wound where it was being held by the forceps, and the forceps released.
In-to-out
The opposing skin edge is gently lifted with forceps. This time the needle has to travel perpendicularly through the dermis from inside to outside. The curvature of the needle is used with supination of the wrist to move the needle through the skin. Equal needle bites of depth and distance from the wound should be taken to allow wound edges to oppose equally and neatly and to avoid steps. Forceps are used to grasp the needle from outside the wound and pull it and the attached suture through the skin.
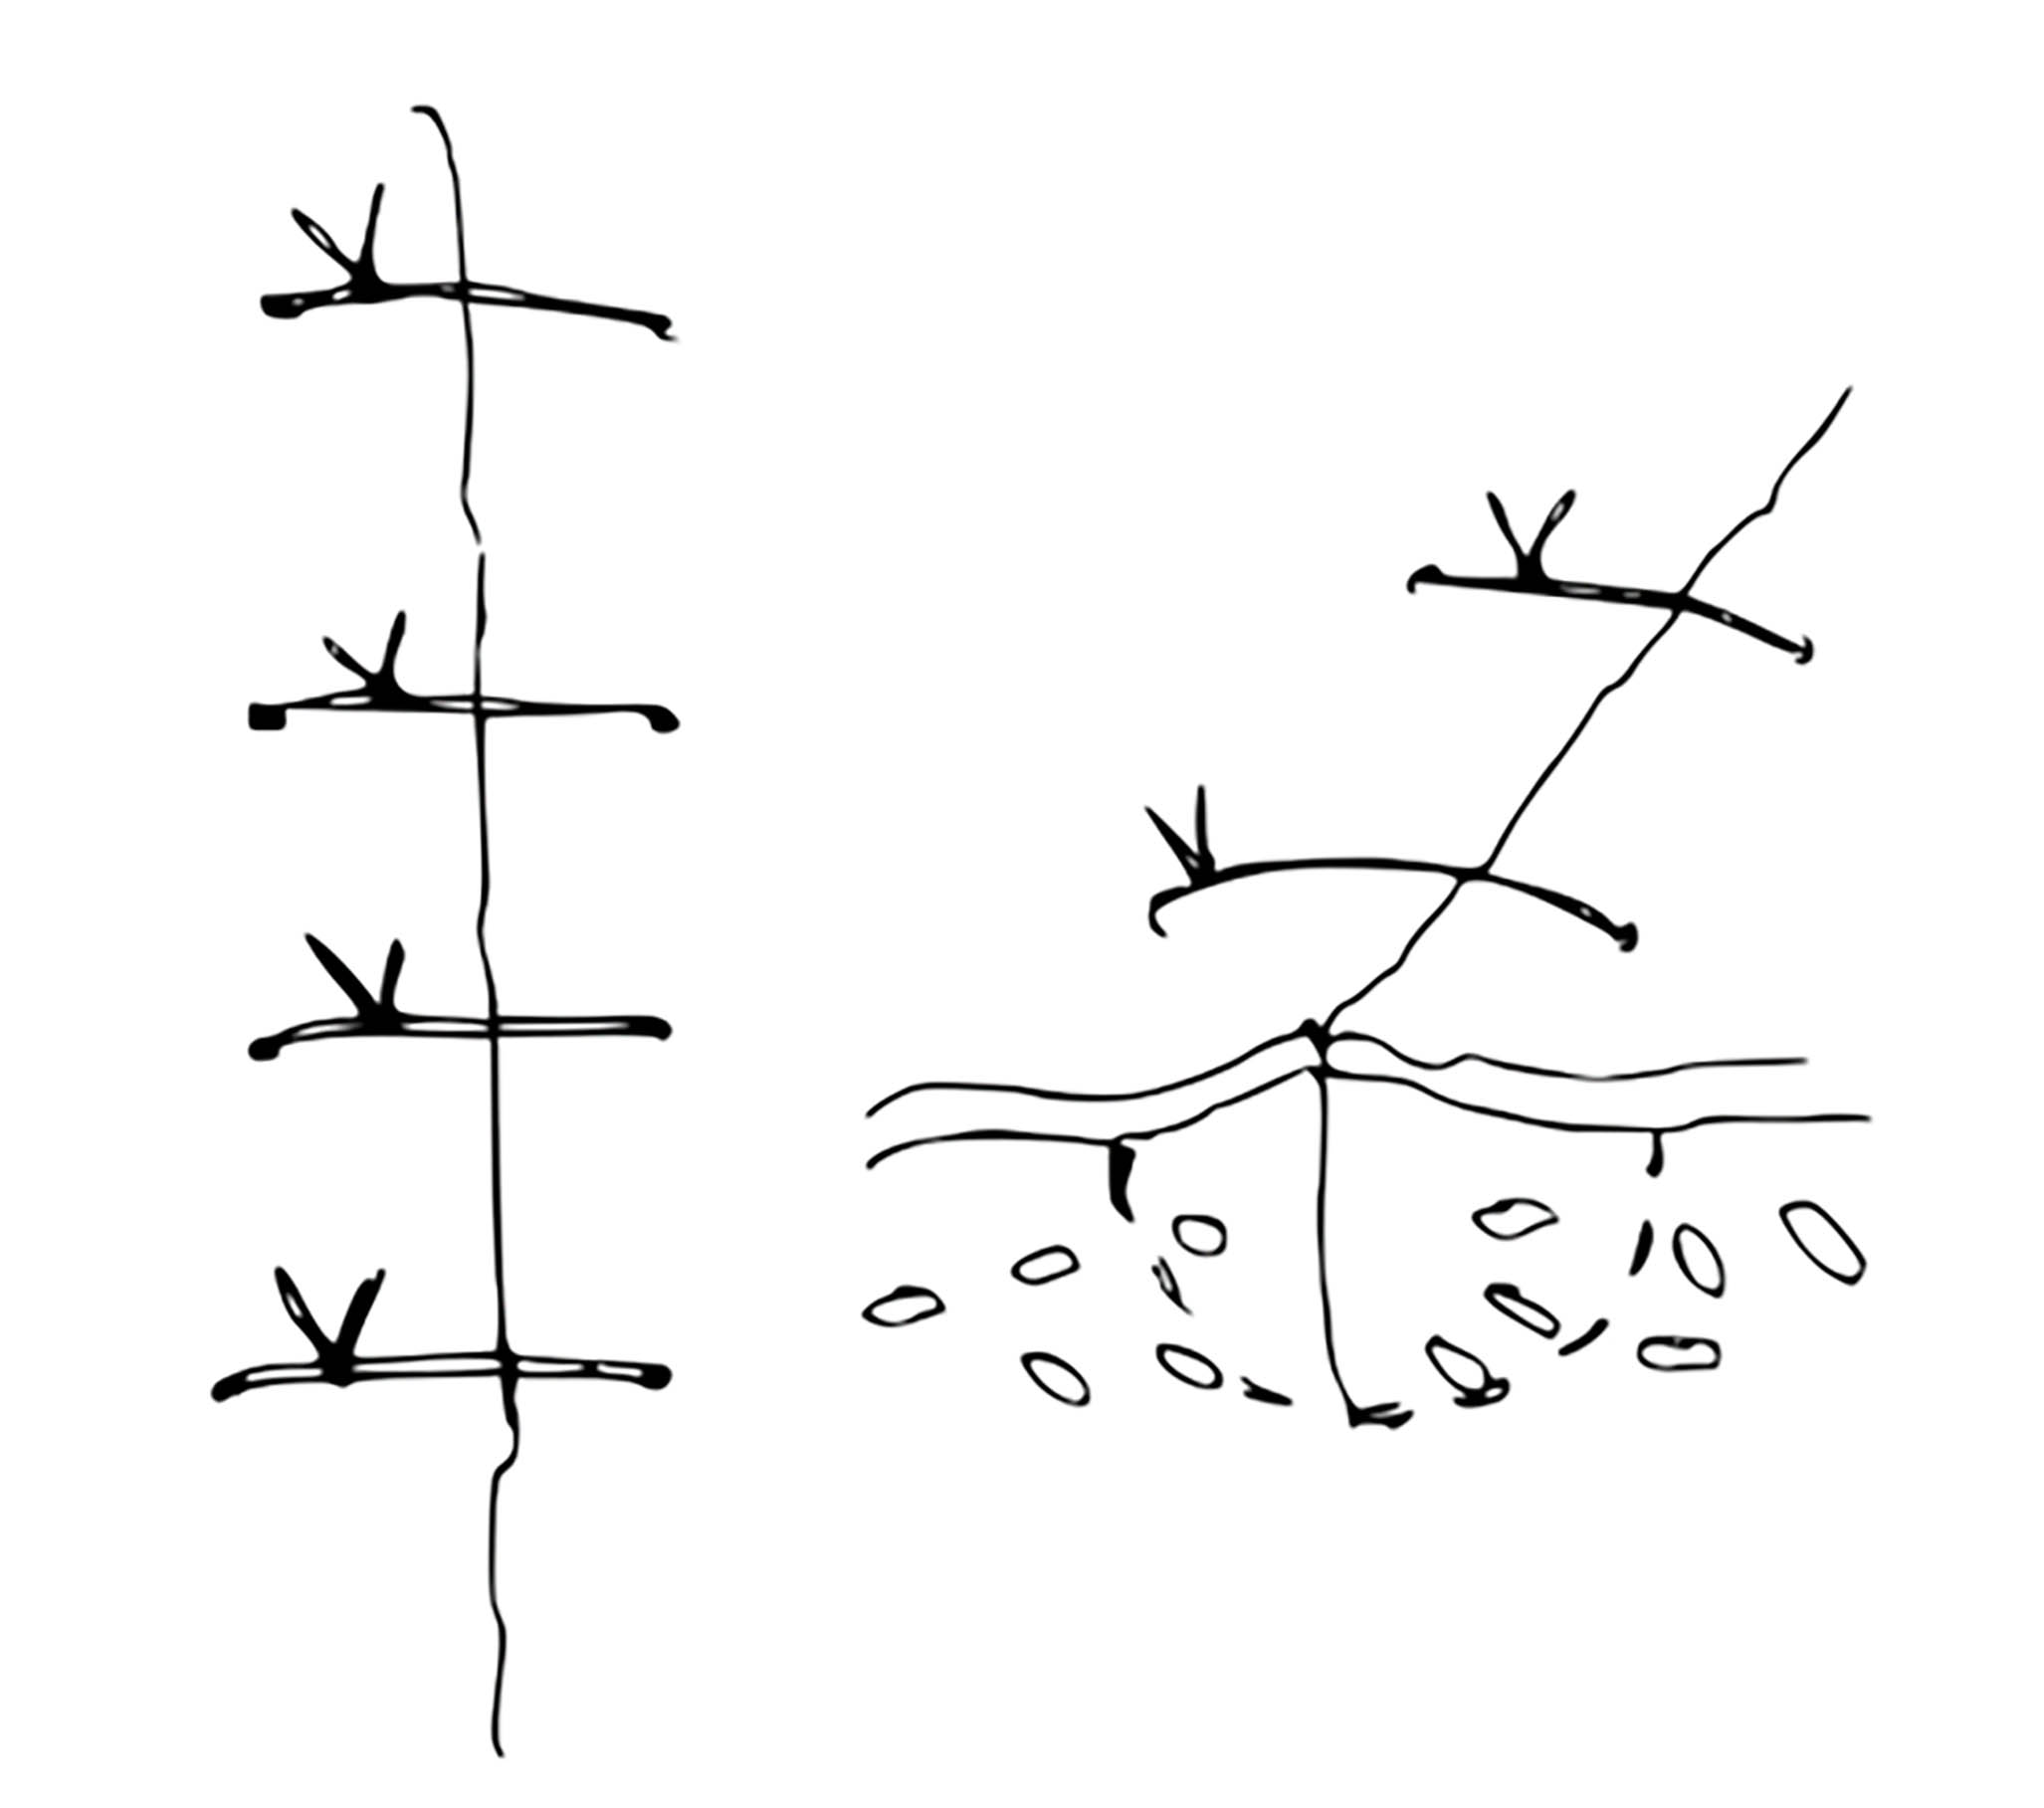
Continuous Sutures
Continuous sutures are a progressive series of sutures (figure 2). The method offers a significant time saving over multiple interrupted sutures. However, it is not as strong as interrupted sutures, and can strangulate the blood supply in wounds under more than minimal tension.
Figure 2: Continuous sutures
The technique starts the same as with interrupted sutures, but afterwards the needle is reintroduced and directed diagonally across the wound to exit the skin on the other side. The suture is then brought across perpendicular to the wound edge and reintroduced on the first side again with each bite. Once the entire wound is closed, a loop is made with the last pass of suture, and this loop is grasped by the needle holder to tie the knot.
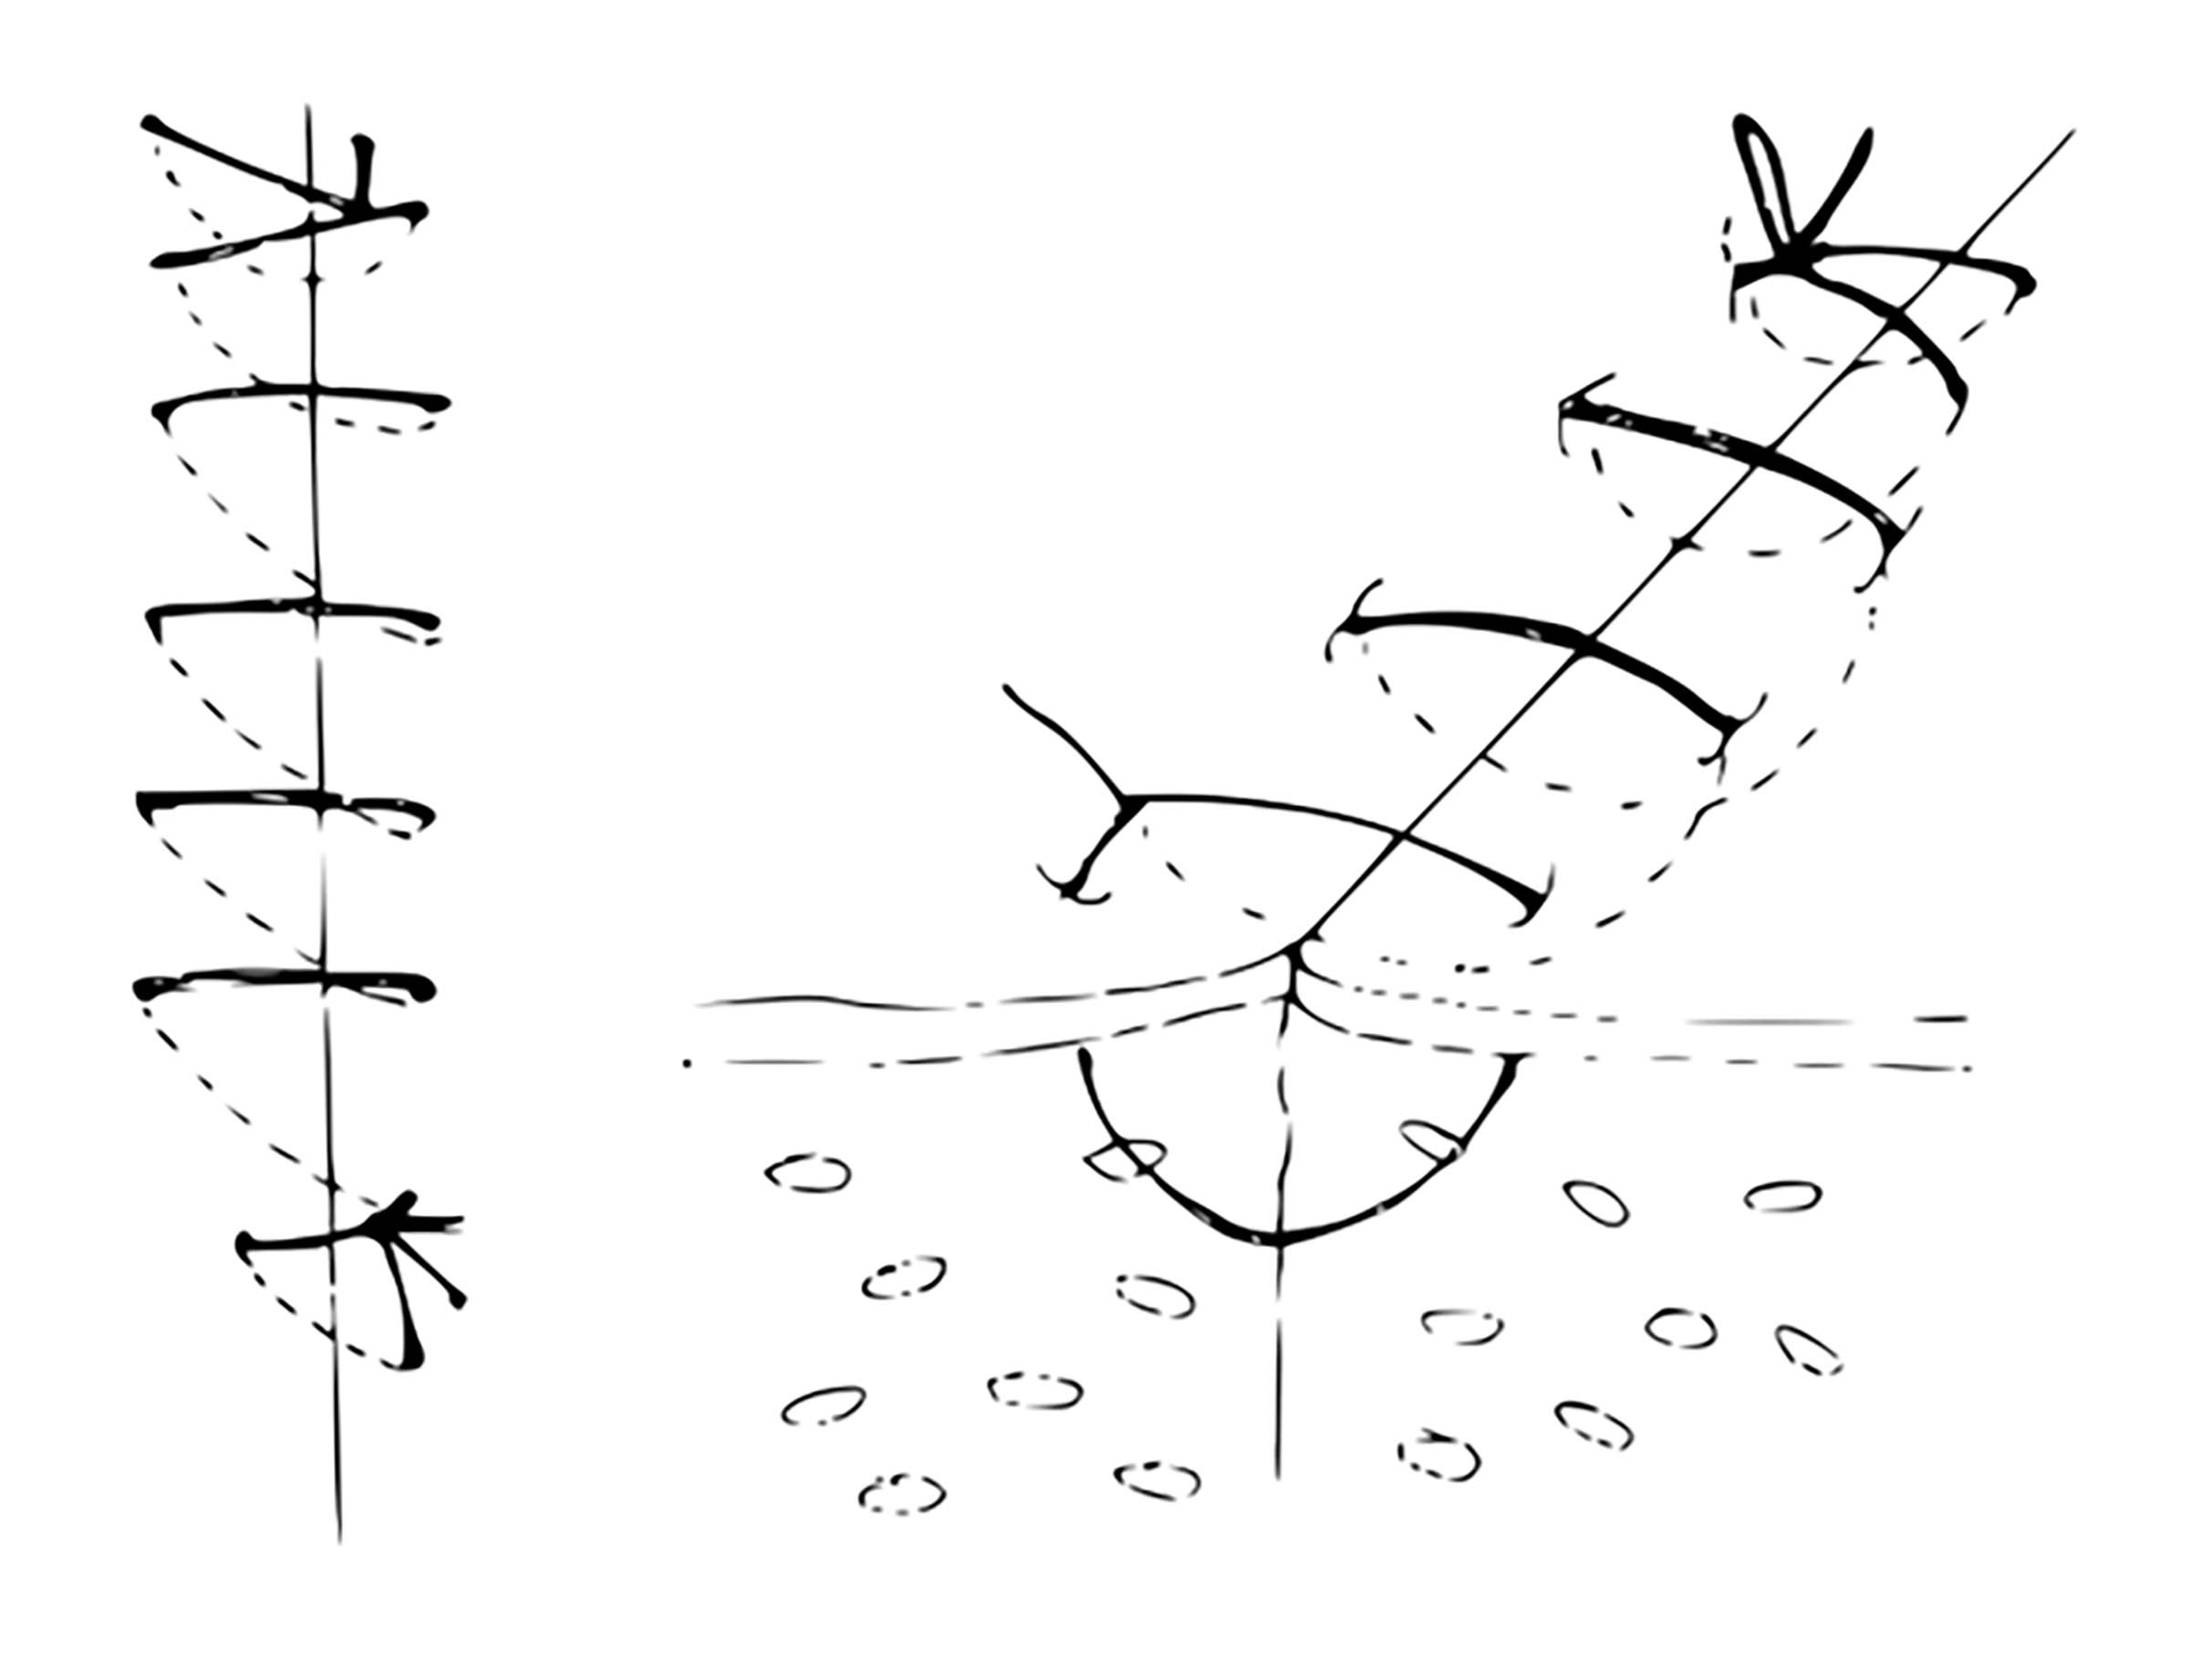
Knots
There are lots of knots. To start, you only need to know one – a variant of the square knot, aptly termed the surgeon’s knot (figure 3). It is difficult to explain how it is tied, but it is beautifully illustrated in a video on the website vetsurgeryonline.com/knots.
Figure 3: Surgeon’s knot
In words, after the thread has been passed into the skin on one side of the wound, through the wound, and then up through the skin the opposing side to exit the body, there is a long length of suture on the first side, and a short end of suture with a needle attached on the other. The needle holder is placed along the length of the wound and the long end of the suture is wrapped around it twice. The needle holder is used to grasp the short end of the suture, which is pulled through the loops made. This forms the first part of a shoelace knot with an extra twist to increase friction and lessen the chance of it loosening. Then, rather than finishing with a bow, the knot is completed with a simple square throw, which is done as before, but only using one loop.
Oftentimes, additional square throws are added for additional security. With these the direction is reversed to avoid the undependable granny knot. This step is more important with slippery synthetic monofilaments.
Suture knots must be tied with appropriate tension. A wide scar can result if the sides are not pulled together. More commonly, there is a tendency to tie knots too tightly. Sutures that are too tight will cause ischemia of the flap margin and result in tissue necrosis, with eventual tearing of the suture through the tissue. In point of fact, sutures that are too tight will result in wound dehiscence more frequently than sutures that are loosely tied. As a clinical guide, no blanching should be present. If this occurs, the suture should be removed and replaced.
Knots should be positioned to the side of the incision line. The cut ends of the suture (ears) should be as short as possible without jeopardising knot security.
Acquiring Practice in Suturing
It is safer and less stressful to learn about medical techniques in protected environments before practice in human beings. There are suturing practice kits using silicone that can be purchased, but a time-tested low-cost model for ophthalmological surgery is based on using the skin of grapes that simulate the thin skin of the eyelids. Beginners may want to start with an orange that has a relatively thick skin. Banana peels are intermediate level and provide a good approximation of the junction between the epidermis and dermis.
There are also numerous suturing courses that target a range of healthcare professionals. However, anyone doing this in a human will want someone experienced watching them for quite some time before undertaking the technique unsupervised.
Alternatives to Sutures
Suturing is the established method for closing wounds, but there are alternatives that include staples, tissue adhesives and skin closure tapes.
Stapling uses a preloaded mechanical device. It is very quick, but the method is too crude for anything involving the eye or ocular adnexa. Metal staples are also more difficult to remove than sutures.
Tissue adhesives provide an alternative method for wound closure that is painless, fast, and does not require a follow-up visit for removal. They are liquid monomers that undergo an exothermic reaction upon exposure to a moist surface (eg skin or ocular surface), changing to a polymer that forms a strong tissue bond. For skin wounds, the edges are approximated and two to three layers of tissue adhesive applied. The primary downside of tissue adhesives is that their low tensile strength makes them inappropriate for high-tension areas.
Skin closure tapes (for example, Steri-Strips) are popular for minor skin wounds. They are quick to apply, do not need an injection of anaesthetic, and have a lower risk of infection. The disadvantages of using skin closure tapes are that they come away when wet, are less precise in bringing wound edges together, and that not all areas of the body can be taped. In particular, skin closure tapes are unsuitable for mucous membranes, and that excludes their use for the conjunctiva and cornea.
Summary
Optometrists motivated to provide more complete ophthalmic care for patients are driving the evolution of contemporary optometry. They are expanding their scope of their practice to include more therapeutic procedures. Suturing is a technical skill. It is commonly done by nurses and veterinary technicians. Many optometrists have the dexterity and need only a small increment in their knowledge to be able to do this safely.
- Dr Michael Johnson is a therapeutic optometrist based in South Gloucestershire.
Useful Resources
- https://dermnetnz.org/topics/suturing-techniques - For illustration of different suturing patterns
- https://www.vetsurgeryonline.com/knots - For illustration of suture knots